
Stucco Window Trim Ideas for Stylish Exteriors
Stucco exteriors offer a timeless, durable appeal that works beautifully across Spanish Revival, Mediterranean, and modern architectural styles. However, without the right detailing, large expanses of stucco can sometimes feel flat or unfinished. For those looking for visual inspiration, I have curated a comprehensive Picture Gallery at the end of this blog post.
The secret to elevating a stucco façade lies entirely in the window trim. This is where you add depth, shadow lines, and architectural character that transforms a simple box into a custom home.
In my years designing exteriors, I have found that the trim profile is just as important as the color you choose. Whether you are renovating a dated 1990s home or building new, the following ideas will help you navigate the unique constraints and opportunities of stucco detailing.
Understanding Stucco Trim Systems and Scale
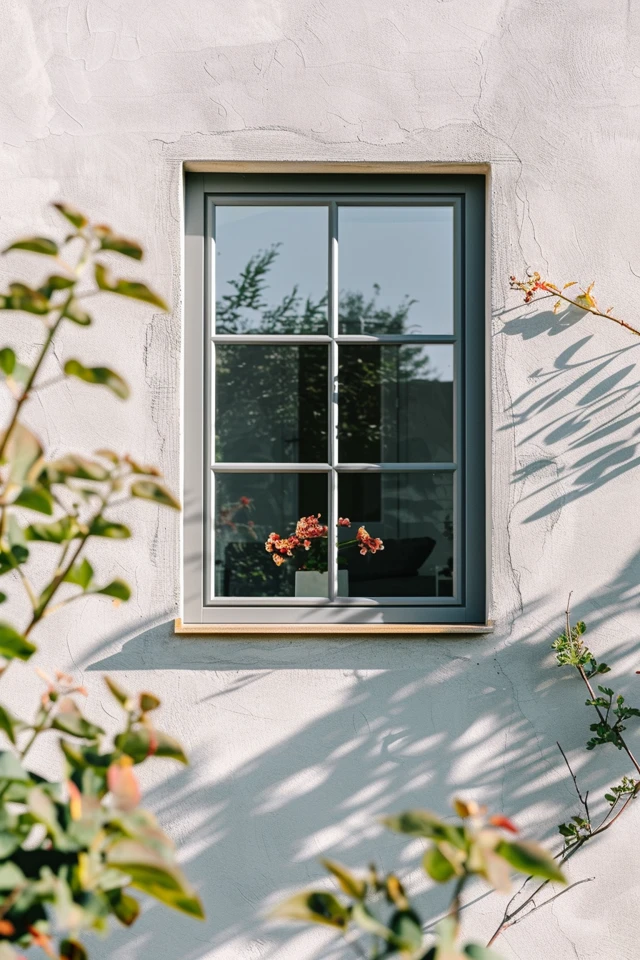
Before we dive into specific styles, we must address the “bones” of the design. Stucco trim is rarely wood; it is usually an architectural foam shape coated in stucco mesh and base coat, or it is heavy precast stone.
When selecting trim sizes, scale is everything. A common rule of thumb I use is that the trim width should be roughly 1/6th to 1/8th of the window’s width, though rarely less than 3.5 inches.
If your trim is too narrow, the window looks cheap and “sticker-like.” If it is too wide on a small window, it overwhelms the glass and reduces the perceived light.
For the depth (how far it sticks out from the wall), you need a minimum of 1.5 inches to create a noticeable shadow line. Without that shadow, the trim disappears when the sun hits the wall directly.
Designer’s Note:
The biggest failure I see in stucco trim is the “flat ledge.” Never install a window sill that is perfectly flat. It must have a slope (pitch) of at least 1/4 inch away from the window to shed water. Flat ledges collect rainwater, leading to ugly staining and eventual leaks.
Modern Minimalist: The “Stucco Band” Technique
For contemporary homes, less is often more. The most popular modern treatment is the “stucco band” or “pop-out.”
This is essentially a squared-off layer of stucco that frames the window. It usually matches the texture of the main walls but provides a geometric relief.
To achieve this look successfully, keep the lines sharp. I recommend using a “smooth trowel” finish on the bands, even if the main walls have a heavier “sand” or “lace” texture.
Recommended Dimensions for Modern Bands:
- Side width: 4 to 6 inches.
- Top width: Match the sides exactly for a symmetrical box look.
- Sill depth: Keep the sill flush with the side casing for a clean, picture-frame aesthetic.
- Projection: 1 to 2 inches maximum to maintain a sleek profile.
This style works best with high-contrast colors. For example, white stucco bands on a charcoal or sage green exterior create a crisp, graphic look.
Classic Elegance: Precast Stone and Corbels
If your home leans toward French Country, Tuscan, or Spanish Colonial, simple bands will feel too plain. You need the visual weight of stone or simulated stone.
Precast concrete trim is the gold standard here. It is heavy, durable, and ages beautifully. However, it is also expensive and requires robust structural framing to support the weight.
A cost-effective alternative is high-density architectural foam shapes that are coated to look like stone. This is what 90% of “stone” trim is on modern residential builds.
Key Elements for Traditional Trim:
- The Header: This should be taller than the side casings, often featuring a keystone in the center.
- The Sill: This should extend past the side casings by 2 to 3 inches on each side (these extensions are called “horns”).
- Corbels: These are the decorative brackets under the sill. Use them sparingly; usually, they look best only on feature windows, not every single bathroom window.
Common Mistake + Fix:
Mistake: Installing intricate, heavy stone trim on standard vinyl sliding windows. The styles clash violently.
Fix: If you have standard sliders, stick to simpler profiles. Use the heavy stone trim only if you have recessed windows or casement windows that fit the architectural gravity of the stone.
Material Matters: Wood vs. Foam vs. Composite
Choosing the material for your trim is a functional decision as much as an aesthetic one. Stucco retains moisture, which makes wood trim risky if not detailed perfectly.
Architectural Foam (EPS):
This is the most common choice for stucco homes. It is lightweight, affordable, and essentially rot-proof. It moves with the house, reducing cracks.
Best for: Painting to match the house or creating a “cast stone” look.
Solid Wood (Cedar/Redwood):
Wood offers a warmth that stucco cannot mimic. A dark-stained cedar lintel above a window breaks up the masonry feel.
The Risk: Wood expands and contracts differently than stucco. You must leave a 3/8-inch caulk gap between the wood and the stucco to prevent cracking.
Fiber Cement (Hardie):
This is a great middle ground. It looks like wood but handles moisture better. However, it is thinner than foam, so you won’t get deep shadow lines unless you double-stack it.
What I’d do in a real project:
If the budget allows, I love using a real timber header (lintel) above the window combined with a stucco or stone sill below. This mix of materials adds instant history to a home. If we are on a tight budget, I use foam pop-outs but paint them a contrasting color to mimic the look of wood.
Color Theory for Stucco Facades
Color placement on stucco trim can change the perceived size of your house. Because stucco has texture, it grabs shadows, which can make colors look darker than they appear on a swatch.
Monochromatic Styling:
Painting the trim the exact same color as the body of the house is a very high-end, modern move. It relies on the shadow lines of the trim to provide definition. This makes a small house look larger because the eye isn’t stopped by contrasting borders.
The 2-Shade Shift:
For a subtle, sophisticated look, choose a trim color that is two shades darker or lighter than the body color on the same swatch strip. This provides definition without the jarring “cartoon outline” effect.
High Contrast:
Dark bronze or black window frames are trending. If you have dark frames, you actually have two choices:
1. Paint the stucco trim dark to make the window feel massive.
2. Paint the stucco trim light to highlight the crispness of the frame.
Designer’s Rule of Thumb for LRV:
Check the Light Reflective Value (LRV) of your paint. Stucco walls get hot. If you paint a large south-facing band in black (low LRV), it will absorb massive heat and potentially crack the stucco or warp the foam underneath. Stick to LRVs above 35 for large foam trim pieces.
Dealing with Arches and Curves
Stucco is one of the few materials that handles arches effortlessly. If you have arched windows, the trim must follow the curve perfectly.
Straight molding cut into segments (segmented arches) looks messy and cheap. You must order flexible molding or custom-cut foam radiuses.
When designing the trim for an arch, I usually recommend a “spring line” detail. This is where the curve of the arch meets the straight vertical sides.
You can either have the trim flow continuously or add a small capital detail at the spring line to mimic a column. Continuous flow is more modern; capitals are more traditional.
Renovation Constraints: Retrofitting Trim
If you are updating an existing stucco home, you face different challenges than a new build. The most common issue is that the existing windows are “flush mounted,” meaning they don’t sit deep in the wall.
Adding thick trim around a flush window can make the window look like it is drowning.
The Solution:
Use a flatter trim profile. Instead of a 2-inch thick foam pop-out, use a 1-inch thick profile.
Alternatively, you can visually recede the window by painting the inner edge of the new trim a dark color (like charcoal). This tricks the eye into thinking there is more depth/shadow than there really is.
Project Management Tip:
When retrofitting, the stucco seal around the window is likely compromised when you remove old trim. Always budget for a waterproofing contractor to inspect the “fin” of the window before applying the new decorative trim. Do not rely on the painter to do this.
Lighting Your Stucco Trim
Exterior lighting interacts with stucco texture in specific ways. If you have invested in beautiful trim, you want to show it off at night.
Avoid “wall grazing” lights (lights placed directly against the wall shining up) if your stucco finish is uneven, as it highlights every flaw.
Instead, use soffit lighting in the eaves to wash light down the wall. This highlights the top edge of your window headers (lintels) and casts a shadow below the sill, emphasizing the architectural relief.
For a dramatic entry, place a small uplight in the landscaping aligned with the center of a feature window. This accentuates the verticality of the side trim.
Maintenance and Durability
Stucco trim is durable, but it is not maintenance-free. The horizontal surfaces (the top of the header and the sill) take a beating from the sun and rain.
Cleaning:
Soft wash your stucco trim annually. Do not use high-pressure power washers on foam trim; you can gouge the surface. A simple garden hose and a soft-bristle brush with mild detergent are sufficient.
Cracks:
Hairline cracks are inevitable in stucco. However, if a crack opens up wider than a credit card (approx. 1/16 inch), it needs to be filled with elastomeric caulk and repainted immediately to prevent water intrusion behind the foam.
Paint Schedule:
Plan to repaint stucco trim every 5 to 7 years, slightly more often than the vertical walls, because the sills hold snow and water longer.
Final Checklist: Before You Install
Use this checklist to ensure your design is ready for execution.
Design & Scale:
- Is the trim width proportional to the window size (approx 1/6th width)?
- Does the style match the home’s architecture (e.g., no keystones on modern homes)?
- Do sills have a positive slope away from the wall for drainage?
Technical & Material:
- Have you confirmed the material (Foam, Wood, Precast)?
- If using foam, is it high-density mesh-reinforced?
- If using wood, is the back-primed to prevent warping?
- Are you using the correct paint type (elastomeric is often best for stucco)?
Logistics:
- Do you have a plan for flashing and waterproofing before the trim goes on?
- Have you checked lead times? Custom precast stone can take 8-12 weeks.
- Does your HOA require approval for exterior modification?
FAQs
Can I add stucco trim to a house that already has siding?
Generally, no. Stucco trim is designed to bond to a stucco substrate. Mixing materials (stucco trim on vinyl siding) creates water-trapping nightmares and aesthetic clashes. Stick to wood or PVC trim for siding homes.
Is architectural foam durable enough for the ground floor?
Yes, provided it is coated correctly. High-quality foam trim comes with a fiberglass mesh and a cementitious base coat that gets rock-hard. It resists weed-whacker bumps reasonably well, though heavy impacts (like a baseball bat) could dent it.
How much does it cost to add stucco trim to an existing home?
Costs vary wildly by region, but expect to pay between $15 and $30 per linear foot for foam trim installation and finishing. Precast stone will be significantly higher, often triple that price due to material and labor weight.
Should the window trim be lighter or darker than the stucco?
There is no hard rule, but lighter trim generally feels more traditional and “beachy,” while darker trim feels more modern or rustic/mountain. If your house is small, lighter trim usually makes it feel more expansive.
Conclusion
Upgrading your stucco window trim is one of the highest ROI projects you can undertake for your home’s exterior. It changes the perceived quality of the construction and defines the architectural style more than any other element.
Whether you choose the sharp, clean lines of a modern relief or the heavy, romantic look of precast stone, the key is consistency. Stick to one style, ensure your proportions are correct for the window size, and prioritize water management with sloped sills.
By paying attention to these details, you ensure your exterior looks intentional and custom, rather than just another cookie-cutter builder box.
Picture Gallery


