
Stylish Ceiling Ideas for Bathrooms Makeover
When we think about renovating a bathroom, our minds usually drift to tile selections, vanity styles, or the perfect soaking tub. The ceiling is frequently treated as an afterthought, often left as a boring expanse of flat white drywall. In the design world, we refer to the ceiling as the “fifth wall,” and in a smaller space like a bathroom, it offers an incredible opportunity to make a massive stylistic impact without taking up usable square footage.
Treating your bathroom ceiling with the same care as your floors or walls can elevate a standard renovation into a spa-like retreat. Whether you are dealing with a compact powder room or a spacious master bath, the ceiling sets the mood for the entire environment. It is the surface you look at most often when you are relaxing in the bath, so it deserves more than a coat of builder-grade flat paint.
For plenty of visual inspiration to help you visualize these concepts, please note that our curated Picture Gallery is located at the very end of this blog post.
1. The Power of Paint and Finish
The most accessible and budget-friendly way to transform a bathroom ceiling is through paint, but the rules here are different than in a living room. In a bathroom, moisture is the enemy, so the finish you choose is just as important as the color. Standard flat paint absorbs moisture and is prone to mildew growth, making it a poor choice for any room with a shower.
For a durable and stylish finish, I always recommend using a satin or semi-gloss finish. These sheens reflect light, which helps make small bathrooms feel larger, and they create a hard barrier against humidity. If you want a moody, dramatic look, consider painting the ceiling the same color as the walls. This technique, known as “color drenching,” blurs the boundaries of the room and makes the space feel infinitely cozy.
If you are feeling bold, a high-gloss lacquer finish can look stunning, mimicking the reflective quality of water. However, this is a high-risk design choice. High-gloss finishes highlight every single imperfection in the drywall. If your ceiling isn’t perfectly skim-coated and sanded by a professional, a high-gloss paint will show every wave and bump.
Designer’s Note: The “Lid” Effect
I once worked on a powder room project where the client wanted a dark charcoal ceiling to match the slate floors. We initially worried it would feel like a cave. To prevent this, we installed crown molding painted in a crisp white to separate the dark walls from the dark ceiling.
The result was sophisticated rather than claustrophobic. If you paint a ceiling dark, ensure your lighting is sufficient. You will likely need to increase the wattage of your bulbs or add sconces, as dark surfaces absorb light rather than reflecting it.
2. Warmth and Texture with Wood Cladding
Wood brings an organic, spa-like warmth that tile and porcelain simply cannot replicate. Installing wood planks on a bathroom ceiling instantly softens the hard surfaces of the room. The two most popular applications are tongue-and-groove planks and shiplap. Tongue-and-groove offers a cleaner, more seamless look, while shiplap provides distinct shadow lines that add rustic or coastal character.
However, putting wood in a humid environment requires strict adherence to material selection. You cannot simply buy standard pine from the lumber yard and nail it up. Softwoods like pine are very porous and will warp or rot if not sealed perfectly. For bathrooms, I prefer Cedar, Teak, or Hinoki Cypress. These woods are naturally resistant to moisture and rot.
If you must use a less expensive wood like Pine or Poplar, it must be primed and painted on all six sides—front, back, and all edges—before installation. This encapsulates the wood so moisture cannot penetrate it. If you want the natural wood look, use a marine-grade spar varnish. This is the same sealant used on boats and will protect your ceiling from the steam of a hot shower.
Common Mistakes + Fixes
Mistake: Installing wood planks tight against the wall.
Fix: Wood expands and contracts with humidity changes. You must leave a 1/4-inch to 1/2-inch expansion gap around the perimeter of the ceiling. You can hide this gap easily with crown molding or a simple piece of trim. Without this gap, your beautiful wood ceiling will buckle and bow within a year.
3. Architectural Details: Beams and Coffers
If you have a higher ceiling, typically 9 feet or above, you have the vertical real estate to add architectural elements like beams or coffering. Exposed beams can add a farmhouse or Tudor vibe, depending on the finish. In a bathroom, I usually recommend faux beams made of high-density polyurethane rather than solid timber.
Polyurethane beams are lightweight, resistant to moisture, and indistinguishable from real wood once installed. They won’t rot, and they don’t require heavy structural support in the ceiling joists, making them perfect for renovations.
Coffered ceilings—a grid of recessed panels—add a sense of grandeur and formality. This is an excellent choice for a master bath in a traditional home. The key to coffering is scale. The beams making up the grid should not be too deep, or they will make the ceiling feel heavy. A depth of 3 to 4 inches is usually sufficient for a bathroom.
Pro-Level Rules of Thumb for Beams
- Spacing: Space your beams roughly 4 to 6 feet apart. If they are too close, the ceiling looks cluttered; too far apart, and the effect is lost.
- Direction: Run beams across the shorter width of the room. This visual trick pushes the walls out and makes the room feel wider.
- Color: Contrast is key. If the ceiling is white, use wood-toned beams. If the ceiling is wood, paint the beams black or white.
4. Wallpaper and Statement Patterns
Wallpaper on the ceiling is a trend that has solidified into a design staple. It draws the eye upward and adds personality to a space that is often clinical. In a powder room, you can get away with standard wallpaper because there is no shower generating steam. You can use delicate papers or even fabrics in these half-baths.
For a full bathroom with a tub or shower, you must use vinyl wallpaper. Vinyl is durable, scrubbable, and impervious to water. Avoid “grasscloth” or natural fiber papers in a full bath; they will absorb humidity, smell musty over time, and eventually peel away from the backing.
When selecting a pattern for the ceiling, consider the scale of the room. Large-scale florals or geometrics work well because they don’t look busy from a distance. Tiny, intricate patterns can tend to blur together when viewed from the floor.
A Note on Installation
Installing wallpaper on a ceiling is physically demanding and technically difficult. Gravity is working against you. I strongly advise hiring a professional for ceiling applications. If you are DIYing it, use a “paste-the-wall” adhesive rather than “paste-the-paper.” It is much cleaner and easier to manage overhead. Additionally, use a seam roller to ensure the edges are perfectly flat, as steam will attack any loose seam instantly.
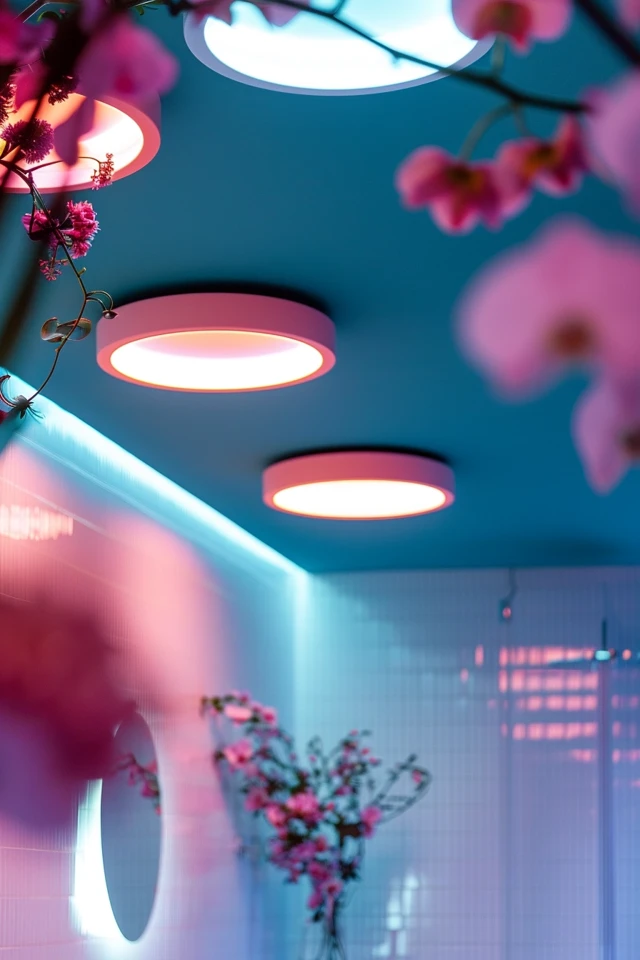
5. Lighting Integration and Medallions
Your ceiling design is incomplete without considering how it interacts with light. The placement of your lighting fixtures can make or break the aesthetic of your new ceiling. If you are installing wood or wallpaper, you need to map out your recessed cans and junction boxes before the finish material goes up.
For a touch of elegance, consider adding a ceiling medallion around your central fixture. In the past, these were heavy plaster, but today you can buy lightweight urethane medallions that glue right to the drywall. This is a five-minute upgrade that adds instant history and charm to a bathroom, especially when paired with a vintage-style chandelier or semi-flush mount.
Be mindful of safety ratings. Any fixture located directly over a bathtub or shower must be “wet-rated.” Fixtures in the general vanity area usually only need to be “damp-rated.” Ignoring these ratings is a code violation and a safety hazard.
What I’d Do in a Real Project: The Lighting Checklist
- Recessed Lights: I place these 18 to 24 inches away from the wall to wash the tile or art with light. Avoid placing them directly over your head at the vanity, as this creates unflattering shadows on your face.
- The Chandelier: If ceiling height allows, I center a statement fixture in the room or over the tub. The bottom of the fixture must be at least 8 feet above the rim of the tub unless the fixture is low-voltage or protected.
- The Fan: Do not forget the exhaust fan. I try to hide it near the shower or toilet, rather than dead center. Look for fans with “hidden” intakes that look like regular recessed lights.
6. Tiling the Fifth Wall
Taking the wall tile all the way across the ceiling is a high-impact move often seen in luxury steam showers, but it works in standard bathrooms too. It creates a seamless, envelope effect that is incredibly modern and hygienic. This works best with mosaic tiles or smaller format tiles, as large heavy tiles are difficult to set overhead.
If you choose to tile the ceiling, you must use a specific type of mortar—usually a polymer-modified thin-set that has stronger adhesion to fight gravity while the tile cures. You also need to ensure your ceiling joists are rigid enough to support the extra weight.
This look is particularly effective in small shower stalls. By running the tile from the floor, up the walls, and across the ceiling, you eliminate visual breaks. This continuity tricks the eye into thinking the space is larger than it actually is.
Final Checklist: Planning Your Ceiling Makeover
Before you buy a single gallon of paint or box of planks, run through this checklist to ensure your project runs smoothly.
Step 1: Assess the Ventilation
No amount of design will save a bathroom with poor airflow. If your mirror fogs up and stays foggy for 10 minutes, your fan is too weak. Upgrade to a fan with at least 50 CFM (Cubic Feet per Minute) for small baths, and 100+ CFM for larger master baths.
Step 2: Check the Height
Measure your floor-to-ceiling height. If you have 8-foot ceilings, avoid thick beams or heavy coffers that drop the height further. Stick to paint, wallpaper, or thin beadboard.
Step 3: Lighting Plan
Decide if you are moving junction boxes. Moving a light fixture requires cutting into the drywall. Do this rough-in work before applying any decorative finishes.
Step 4: Surface Prep
Clean the ceiling thoroughly. Bathroom ceilings often have a film of hairspray, dust, and condensation residue. Wash it with a TSP (Trisodium Phosphate) substitute to ensure your paint or adhesive bonds correctly.
Step 5: Moisture Barrier
If you are using wood, prime the back. If you are painting, use a mold-killing primer. This invisible step is the secret to longevity.
FAQs
Q: Can I put a chandelier over my bathtub?
A: Yes, but there are strict electrical codes. Generally, the bottom of the fixture must be 8 feet above the highest point of the tub rim. If you don’t have that height, the fixture must be wet-rated and on a GFCI-protected circuit. Always consult a licensed electrician for this specific zone.
Q: How do I hide a popcorn ceiling in the bathroom?
A: Scrapping popcorn is messy and risks asbestos exposure in older homes. The best way to hide it is to cover it. Installing tongue-and-groove wood planks or beadboard directly over the popcorn (using furring strips to anchor into the joists) is the cleanest solution.
Q: Is peel-and-stick wallpaper safe for bathrooms?
A: In a powder room (no shower), yes. In a full bathroom, I generally advise against it. The humidity softens the adhesive, and the corners will eventually curl. Traditional paste-the-wall vinyl wallpaper is much more permanent and durable for humid zones.
Q: What color ceiling makes a small bathroom look biggest?
A: A bright, crisp white is the standard answer because it reflects the most light. However, painting the ceiling the same pale color as the walls (like a soft sage or sky blue) eliminates the contrast line where the wall meets the ceiling, which can actually make the room feel more expansive and airy.
Conclusion
Renovating your bathroom ceiling is one of the most effective ways to infuse character into your home without altering the footprint of the room. Whether you choose the organic warmth of cedar planks, the bold statement of a vinyl wallpaper, or simply a fresh coat of satin paint in a daring color, the result is a space that feels curated and complete.
Remember that function must always accompany form in a bathroom. Prioritize moisture-resistant materials, ensure your ventilation is up to par, and seal your finishes properly. By treating the “fifth wall” with intention, you turn a purely functional space into a personal sanctuary.
Picture Gallery


