
Title: Stylish Microwave Wall Shelf Ideas for Kitchens
Introduction
Microwaves are essential appliances for modern living, but they are notorious for dominating valuable counter space. If you are working with a compact kitchen footprint or simply desire a clutter-free aesthetic, relocating this bulky appliance to a wall shelf is a transformative design move. To give you plenty of visual inspiration, I have curated a Picture Gallery at the end of this blog post with real-world examples.
However, simply mounting a board on the wall is not enough to achieve a polished, high-end look. The goal is to integrate the shelf so naturally that it feels like part of the kitchen’s architecture rather than an afterthought.
In my years designing kitchens, I have found that a dedicated microwave shelf offers the perfect intersection of ergonomics and style. It clears the prep zone while keeping the appliance at a safe, accessible height for every member of the family.
1. Determining the Perfect Height and Placement
The most critical decision you will make in this project is where exactly to place the shelf. If you mount it too high, removing hot bowls becomes a safety hazard; place it too low, and you lose the benefit of clearing your counters.
I generally recommend mounting the base of the microwave shelf between 48 and 54 inches off the floor. This places the buttons and handle at eye level for most adults, ensuring you can look down into a mug or bowl as you pull it out.
You also need to consider the “landing zone” concept frequently used in professional kitchen planning. There should always be a clear countertop surface within 15 to 24 inches of the microwave.
If your shelf is isolated on a wall with no counter nearby, you risk burning your fingers while walking across the kitchen with hot food. Always anchor the shelf vertically above a section of countertop or an island.
Designer’s Note: The Depth Trap
One of the most frequent errors I see DIYers make is buying a standard 12-inch deep shelf for a microwave. Most microwaves are 15 to 18 inches deep, and that does not include the extra 2 inches needed in the back for the plug and cord.
Always measure your specific unit and add 2 to 3 inches to that depth. You want the microwave feet to sit fully on the shelf with a slight reveal in front for a custom look.
2. Selecting Materials for Structural Integrity
Microwaves are deceivingly heavy, often weighing between 30 and 50 pounds. When you add the weight of a heavy casserole dish and the vibration caused by the door opening and closing, a standard floating shelf kit will rarely suffice.
You must prioritize structural support over minimalism here. While invisible floating brackets look sleek, they often sag over time under the dynamic load of a microwave.
I prefer using heavy-duty L-brackets made of steel or iron. You can find beautiful, hand-forged options that add an industrial or farmhouse touch to the design.
If you prefer the look of wood alone, opt for a “torsion box” style shelf. This is a hollow shelf built over a heavy-duty 2×4 cleat that is screwed directly into the wall studs.
Common Mistakes + Fixes
- Mistake: Anchoring into drywall only.
- Fix: Microwaves are dynamic loads; you must hit at least two wall studs. If the studs don’t align with your center point, mount a piece of finished lumber to the studs first, then mount the shelf to that lumber.
- Mistake: Using particle board or MDF.
- Fix: Steam and moisture from cooking can cause MDF to swell. Use solid wood, sealed butcher block, or metal for longevity.
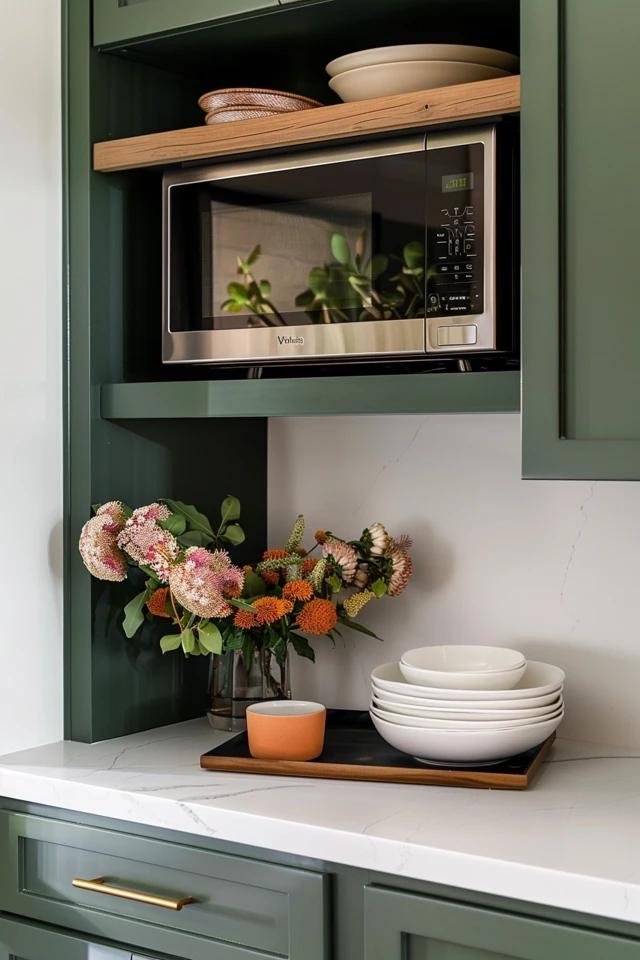
3. Integrating the Shelf into Cabinetry
The difference between a “rental fix” and a “custom design” often comes down to how well the shelf blends with the existing cabinetry.
If you have upper cabinets, try to align the bottom of the microwave shelf with the bottom of the adjacent cabinets. This creates a continuous visual line that makes the kitchen feel wider and more organized.
For a built-in appearance, consider adding side panels to the shelf. This creates a “cubby” effect that hides the ugly metal sides of the microwave, which are rarely finished attractively.
You can also paint the shelf the exact same color as your wall. This is a trick we use in small apartments to make the microwave visually disappear, reducing visual clutter.
4. Managing the Electrical Reality
Nothing ruins a stylish wall shelf faster than a thick black power cord dangling down the wall. In my client projects, cord management is never an afterthought; it is part of the initial plan.
Ideally, you should have an electrician install a recessed outlet directly behind where the microwave will sit. A recessed outlet allows the plug to sit flush inside the wall, saving you that precious 2 inches of shelf depth.
If moving the outlet is not in the budget, use paintable cord covers. Run the cover vertically down the wall and paint it the exact same color and sheen as your wall paint.
Another clever disguise is to use a large cutting board or a stack of cookbooks. Lean them against the wall on the counter below the shelf to obscure the view of the cord and outlet.
What I’d Do in a Real Project: A Quick Checklist
- Measure the Appliance: I measure the width, height, and depth, including the rear clearance for venting.
- Locate Studs: I use a magnetic stud finder to mark the framing locations to ensure the shelf never sags.
- Select the Bracket: I choose a bracket rated for at least 75 lbs to account for the appliance plus food weight.
- Plan the Electrical: I decide immediately if we are moving the outlet or hiding the cord, as this dictates placement.
- Test the Height: I have the primary cook stand at the wall and simulate reaching into the microwave to determine the safest height.
5. Styling Around the Appliance
Once the microwave is secure, the fun part begins: styling. Since the microwave is a cold, industrial box, you need to introduce organic textures to soften the look.
I love placing a trailing plant, such as a Pothos or Philodendron, on the very edge of the shelf or on a bracket above it. The organic lines of the leaves help break up the rigid rectangular geometry of the microwave.
If your shelf is wide enough, add a small grouping of functional items next to the microwave. A ceramic jar with wooden spoons or a vintage sugar bowl can add personality.
However, be careful not to block the vents. Most microwaves vent out the sides or the back left corner; keep your decor at least 3 inches away from these areas to prevent overheating.
6. Lighting Considerations
A microwave shelf can cast a large shadow on the counter below it. If you use that space for food prep, this shadow can be frustrating and even dangerous when using knives.
I always recommend installing an LED puck light or a thin LED strip on the underside of the microwave shelf. This restores functionality to the countertop below.
Battery-operated motion sensor lights are a great solution here if you don’t want to wire a new switch. They attach magnetically and provide excellent task lighting without complex installation.
7. Material Finishes and Coordination
Your shelf finish should converse with other elements in the kitchen. It doesn’t need to match perfectly, but it should relate to the room’s material palette.
If you have hardwood floors, try to match the shelf stain to the floor. This “sandwich” effect creates excellent balance in the room.
Alternatively, coordinate with your hardware. If you have matte black faucet and cabinet pulls, a shelf supported by matte black iron brackets looks incredibly cohesive.
For modern kitchens with high-gloss cabinets, a stainless steel shelf often looks best. It mimics the finish of the appliance and feels like professional restaurant shelving.
8. Creative Alternatives for Small Spaces
Sometimes, a single shelf isn’t enough storage. In very tight kitchens, I often design a “vertical station” using twin-track shelving.
This system allows you to place the microwave on one deep shelf, while having shallower shelves above it for spices, mugs, or pantry goods. It maximizes vertical real estate efficiently.
Another option is a corner shelf. Corners are often dead zones in kitchens. A custom-cut pentagonal shelf can house a small microwave, tucking it out of the way while utilizing space that usually goes to waste.
Just ensure your corner shelf is deep enough. A standard diagonal cut might not accommodate the square back of the microwave, so template it with cardboard first.
Final Checklist: Ready to Install?
Before you drill that first hole, run through this final punch list to ensure success.
- Clearance Check: Is there enough room for the microwave door to swing open 90 degrees without hitting a wall or cabinet?
- Ventilation Check: Do you have 3 inches of clear air space on the intake and exhaust sides of the unit?
- Cord Check: Will the cord reach the outlet without being pulled tight? Extension cords are generally not recommended for microwaves due to high wattage.
- Hardware Check: Do you have toggle bolts or lag screws long enough to penetrate the drywall and bite 1.5 inches into the stud?
- Level Check: Do you have a 2-foot level to ensure the shelf is perfectly flat? An unlevel shelf can cause the microwave to rattle or the door to swing open.
FAQs
Q: Can I put a microwave inside a cabinet instead of on a shelf?
A: You can, but only if the cabinet is specifically designed for it. Standard cabinets lack the ventilation required. You risk overheating the appliance and warping the cabinet finish. You generally need a “trim kit” to do this safely.
Q: How much weight should my microwave shelf hold?
A: Look for a weight rating of at least 75 to 100 pounds. While the microwave may only weigh 35 pounds, the force of pulling the door open and placing heavy dishes inside adds significant stress to the brackets.
Q: Is it safe to put things on top of the microwave?
A: Generally, no. Most microwaves have vents on the top or sides that heat up significantly. Placing bread, plastic, or decor directly on top can create a fire hazard or melt items. Always use a separate shelf above the unit if you need more storage.
Q: Can I use a floating shelf for a microwave?
A: Yes, but it must be a heavy-duty model with a solid steel internal bracket that screws into studs. Standard “decorative” floating shelves from big-box stores are usually hollow and held up by weak clips; these are dangerous for microwaves.
Q: What is the best wood for a microwave shelf?
A: Hardwoods like oak, maple, or walnut are best because they resist denting and hold screws tightly. Softwoods like pine can dent easily under the microwave’s feet. If using pine, ensure it is sealed well with polyurethane to protect against steam and grease.
Conclusion
Moving your microwave to a wall shelf is one of the most practical upgrades you can make in a kitchen. It reclaims your counter space for chopping, mixing, and plating, making the kitchen feel larger and more functional.
By focusing on structural integrity, proper ergonomics, and thoughtful styling, you can turn a utilitarian necessity into a beautiful design feature. Remember that safety comes first: prioritize hitting those studs and managing the electrical cords properly.
With the right materials and placement, your microwave shelf will look like a custom architectural detail rather than a quick storage fix.
Picture Gallery


