
Sunroom Tile Floor Ideas for Your Home Retreat
There is nothing quite like stepping into a sunroom early in the morning with a cup of coffee. It is that magical threshold between the comfort of your interior living space and the wildness of your garden. However, designing this space comes with a unique set of challenges that standard living rooms do not face.
Sunrooms endure extreme temperature fluctuations, intense UV exposure, and heavy foot traffic from the outdoors. Choosing the wrong flooring here can lead to cracked surfaces, faded colors, or a floor that burns your feet in July and freezes them in January. As a designer, I always prioritize durability alongside aesthetics in these high-exposure zones.
You want a floor that anchors the room visually while standing up to muddy paws and potting soil. For those looking for visual inspiration, I have curated a comprehensive Picture Gallery at the end of the blog post to spark your imagination. Let’s dive into the practical design details to get your project started on solid ground.
1. Selecting the Right Material for Durability and Style
The first decision you make dictates the longevity of the entire room. In a sunroom, performance is just as important as looks. You need a material that can handle direct sunlight without fading and moisture without warping.
Porcelain Tile
Porcelain is arguably the best all-around choice for sunrooms. It is fired at higher temperatures than standard ceramic, making it denser and less porous. This means it absorbs almost no water, making it frost-proof if your sunroom is unheated or “three-season.”
I typically recommend a “color-body” porcelain. This means the color runs through the entire thickness of the tile. If you drop a heavy planter and chip the tile, the chip will be the same color as the surface, making it nearly invisible.
Natural Stone (Slate and Travertine)
For a rustic, organic look that bridges the gap to the outdoors, natural stone is unbeatable. Slate is particularly effective because its naturally cleft surface provides excellent grip. Its dark tones also absorb heat during the day, radiating it back at night, which is a passive heating bonus in cooler climates.
However, stone requires maintenance. You must seal natural stone immediately upon installation and reseal it every 1–2 years. Without this, water from your watering can or spills from wine will stain the porous surface permanently.
Encaustic Cement Tiles
If you want that charming, old-world European greenhouse vibe, cement tiles are the trend right now. They offer incredible patterns and matte finishes that feel soft underfoot.
Be aware that cement tiles are thicker than standard tiles (usually 5/8 inch vs. 3/8 inch). You have to account for this height difference during the framing stage, or you will end up with a nasty toe-stubbing threshold where the sunroom meets the house.
2. Layout Patterns to Maximize Spatial Perception
The way you lay your tile can completely change the perceived size of your sunroom. Most sunrooms are long and narrow or relatively compact. The right layout plays a trick on the eye to make the volume feel more generous.
The Diagonal Lay
Installing square tiles on a 45-degree angle is a classic designer trick for small spaces. When you lay tiles parallel to the walls, the eye counts the rows. When you lay them diagonally, the widest part of the tile faces the entrance, pushing the walls outward visually.
Large Format Rectangles
I often use 12×24 inch or even 24×48 inch tiles in sunrooms. Fewer grout lines create a less cluttered visual field. If your sunroom is narrow, lay the rectangular tiles perpendicular to the long walls. This visually stretches the width of the room, counteracting the “bowling alley” effect.
The Herringbone Pattern
This is a stunning choice for a more formal or “garden conservatory” aesthetic. It adds texture without introducing a new color. However, be prepared for higher costs. Herringbone requires more cuts at the perimeter, leading to about 15-20% material waste compared to the standard 10% for straight lays.
3. Managing Color, Glare, and Temperature
In a standard room, you pick a color based on the paint on the walls. In a sunroom, you must pick a floor color based on the sun itself. This is a technical consideration that many homeowners overlook until it is too late.
The Glare Factor
Avoid high-gloss or polished finishes in a sunroom. When the noon sun hits a polished white floor, the glare can be blinding, making the room uncomfortable without sunglasses. Always opt for matte, honed, or textured finishes.
Thermal Properties
Dark floors (charcoal slate, black porcelain) act as a thermal mass. They absorb heat. In a northern climate, this is wonderful in winter. In a southern climate, a black floor can become painfully hot to walk on barefoot.
If you live in a hot region, stick to lighter tones like creams, sand, or light grays to reflect the heat. If you live in a cold region, mid-to-dark tones can help keep the room ambiently warmer.
Connecting to the Landscape
The goal of a sunroom is to blur the line between inside and out. I like to look at the hardscaping outside the windows. If you have a bluestone patio right outside, I will try to find a porcelain tile that mimics that bluestone tone. This creates a seamless visual flow, making the sunroom feel like an extension of the garden.
4. Vital Technical Considerations: Slip Resistance and Grout
Safety is paramount in a room that serves as a transition to the outdoors. You will be walking in with wet shoes from rain or snow, and you might be watering plants. A slippery floor is a major liability.
Understanding DCOF Ratings
When shopping for tile, ignore the texture descriptions like “rough” and look for the data sheet. You want to check the DCOF (Dynamic Coefficient of Friction). For a sunroom, you want a rating of 0.42 or higher. If you have elderly residents or kids running in from the pool, I prefer to see a rating closer to 0.60.
The Importance of Grout Color
Never use bright white grout in a sunroom. It is a rookie mistake. Between soil from potted plants, dust from open windows, and mud from the yard, white grout will turn gray-brown in patches within six months.
Select a grout color that matches the darkest tone in your tile or go for a neutral “driftwood” or “charcoal” gray. I also highly recommend using epoxy grout or a high-performance urethane grout. Unlike traditional cement grout, these resist staining and do not require sealing.
5. Comfort Underfoot: Heating and Rugs
Tile is hard and cool. While this is great for durability, it can feel austere. To make the room a true “retreat,” you need to layer in comfort.
Radiant Floor Heating
If you are pouring a new subfloor or doing a major renovation, install electric radiant heating mats under the tile. Sunrooms often lack the insulation of the main house. A warm floor makes the room usable year-round. It is more efficient than trying to heat the air in a room made of glass windows.
Rug Sizing and Material
You will likely want an area rug to define the seating zone. In a sunroom, you need a rug that resists UV fading. Polypropylene (often sold as indoor/outdoor rugs) is the gold standard here. It won’t bleach out in the sun and can be scrubbed clean with soap and water.
For sizing, follow the standard living room rules: the front legs of all furniture should sit on the rug. Ideally, leave about 12 to 18 inches of exposed tile around the perimeter of the room. This highlights your beautiful flooring choice while keeping the space feeling open.
Designer’s Note: The Expansion Joint Lesson
I once worked on a beautiful sunroom project where we used large format porcelain tiles. The installer, trying to be helpful, grouted everything tight to the wall for a “clean look.”
Six months later, during a heatwave, the tiles in the center of the room “tented” and cracked with a loud pop.
Here is the lesson: Sunrooms experience rapid temperature changes. Tile and subfloors expand and contract. You must leave a 1/4-inch gap around the entire perimeter of the room (covered by the baseboard). Furthermore, never grout the joint where the floor meets the wall. That joint must be filled with color-matched 100% silicone caulk. This flexible joint allows the floor to move slightly without cracking.
Common Mistakes + Fixes
Mistake: Ignoring Subfloor Deflection
Sunrooms are often additions built on wood joists that might span long distances. If the floor has too much “bounce,” tile grout will crack.
Fix: Before tiling, ensure your contractor installs a cement backer board or an uncoupling membrane (like Schluter-Ditra). The uncoupling membrane is vital in sunrooms as it separates the movement of the wood subfloor from the tile layer.
Mistake: Poor Transition Strips
Using a cheap metal strip where the sunroom tile meets your living room hardwood looks unfinished.
Fix: Plan for a flush transition. If the heights are different, have your carpenter fabricate a custom wood threshold that matches your living room floor stain, creating a deliberate and elegant step or ramp.
Mistake: Choosing Highly Textured Slate for Dining Areas
Deeply cleft slate looks beautiful, but if you plan to put a dining table in the sunroom, chairs will wobble, and you won’t be able to slide them in and out.
Fix: If you want the slate look, choose “honed” slate, which has been sanded flat, or a slate-look porcelain which offers the visual texture but a flat surface for furniture.
What I’d Do in a Real Project: A Mini Checklist
If I were managing your sunroom renovation today, this is the exact order of operations I would follow:
1. Audit the Use Case: Is this a potting room (needs drain, hose-friendly floor) or a reading lounge (needs warmer textures)?
2. Check the Orientation: South-facing rooms need lighter floors to reduce heat absorption. North-facing rooms can handle dramatic dark floors.
3. Sample in Situ: I would order 3 to 4 full-size samples. I would place them in the sunroom and look at them at 8:00 AM, 12:00 PM, and 5:00 PM. The sunlight changes the color drastically throughout the day.
4. Select the Grout: I would pick a high-performance grout in a medium gray tone to hide future dirt.
5. Plan the Layout: I would “dry lay” the tiles without glue first to minimize slivers of small tile cuts at the visible edges of the room.
Frequently Asked Questions
Can I tile directly over an existing concrete slab in my sunroom?
Yes, but you must check for moisture and cracks. If the concrete has cracks, they will transfer to the tile. You must use a crack isolation membrane. Also, verify the concrete is level; you may need a self-leveling underlayment first.
Is ceramic or porcelain better for a sunroom?
Porcelain is significantly better. It is denser, less water-absorbent (0.5% or less), and harder. Ceramic is softer and more prone to cracking if a heavy object falls, and it can absorb moisture which leads to freeze-thaw damage in unheated spaces.
How do I clean textured sunroom tiles?
Textured tiles trap dirt. Avoid sponge mops, which just push dirty water into the texture. Use a soft-bristle deck brush with warm water and a pH-neutral cleaner to lift the dirt, then vacuum it up with a wet-dry vac or wipe with a microfiber cloth.
Does tile floor fade in the sun?
High-quality glazed porcelain and natural stone generally do not fade. However, cement tiles can fade over time if they are not treated with a UV-resistant sealer. If you have intense sun exposure, porcelain is the safest bet for color retention.
Conclusion
Designing a sunroom is about balancing the ruggedness required for an semi-outdoor space with the comfort of an indoor sanctuary. The floor you choose is the foundation of that balance. Whether you opt for the sleek reliability of porcelain, the organic warmth of slate, or the artisan charm of cement tile, always prioritize the technical ratings alongside the aesthetics.
Remember to consider the sun’s path, the seasonal temperature swings, and the reality of muddy shoes. When you choose a floor that handles the elements gracefully, you create a space that feels effortless.
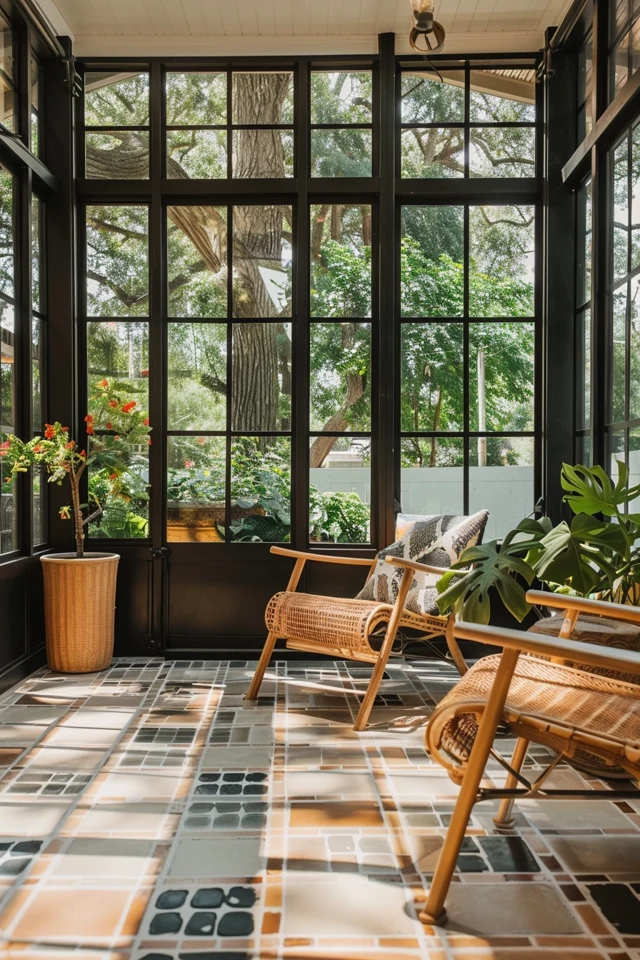
Picture Gallery


