
Sweet Birthday Candy Bars – Ideas to Delight Guests
Introduction
Creating a candy bar for a birthday party is about more than just piling sugar onto a table. It is an exercise in interior design, involving scale, color theory, and traffic flow. When executed well, a candy station serves as a stunning focal point that anchors the room’s decor and creates a memorable interactive experience for your guests.
I remember my first attempt at a dessert table for a client event years ago. I focused entirely on the candy selection but ignored the vertical space and lighting. The result was a flat, uninspiring display that looked lost in the corner of the room. Since then, I have learned that the vessel height, table linens, and background styling are just as important as the sweets themselves.
In this guide, I will walk you through the structural and stylistic rules I use to build professional-grade displays. We will cover measurements, vessel selection, and how to adapt your setup for outdoor landscapes. Don’t forget to explore our Picture Gallery at the end of the article to see these concepts brought to life.
Mastering the Layout and Spatial Planning
The first step in designing a candy bar is determining its placement within the room. A common mistake is shoving the table against a wall in a high-traffic zone, which creates bottlenecks. Just like we plan clear walking paths around a sofa or kitchen island, you need to account for the “hover factor” of guests selecting treats.
In a standard living room or dining area, aim for a minimum of 36 to 48 inches of clearance between the front of the candy table and the nearest piece of furniture. If you are expecting a large crowd, increase this to 60 inches to allow people to pass behind those who are filling their bags.
Avoid placing the table near the primary entrance or exit. This stops the flow of traffic immediately upon entering. Instead, position the station as a destination point. A far corner that is visible from the entrance draws guests into the room, maximizing the use of your event space.
If you are using a standard rectangular folding table, which is usually 30 inches high, consider raising it. Professional event designers often use leg risers to lift the table to 36 or 42 inches (counter or bar height). This brings the display closer to eye level, making it more visually impactful and easier for adults to access without stooping.
The Art of Vessel Selection and Scale
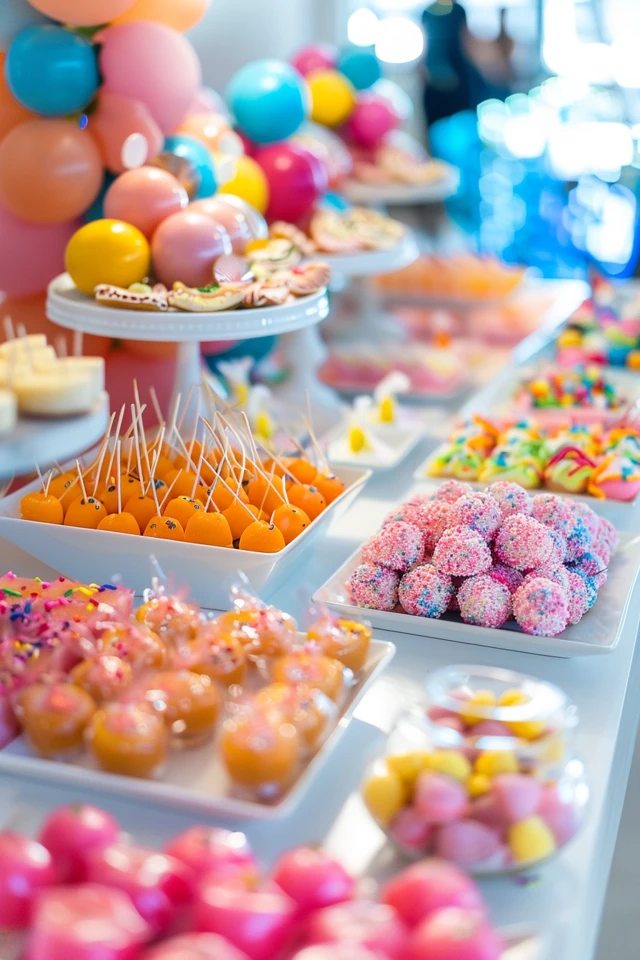
Once the location is set, we move to the hardware: the jars and containers. In interior design, we use the “rule of three” and varying heights to create visual interest. A flat row of identical jars looks clinical and unappealing. You want to create a skyline effect with your containers.
Start with your anchors. These should be your tallest, heaviest vessels, placed at the back of the table. I typically use apothecary jars that range from 18 to 24 inches in height. These large jars should hold loose, bulky items like marshmallows, popcorn, or large gumballs that take up volume without costing a fortune.
For the middle ground, use vessels in the 10 to 14-inch range. This is where cylinder vases or wide-mouthed fishbowls work well. They are easier to scoop from and should hold your premium candies, like chocolate-covered pretzels or specialty gummies.
The front row is for trays, low bowls, and platters. These should be no higher than 4 to 6 inches. This layer creates depth and allows guests to reach the back jars without knocking anything over. This tiered approach mimics the way we style bookshelves or fireplace mantels, ensuring the eye travels up and down the display.
Material Choices
For adult parties, glass is the standard for clarity and elegance. It sparkles under lighting and shows off the candy colors. However, for children’s parties or high-traffic outdoor events, I highly recommend high-quality acrylic.
Modern acrylics mimic the look of hand-blown glass but eliminate the risk of shattering. If you are hosting a pool party or an event on a stone patio, glass is a significant liability. Stick to heavy-weight plastic that won’t blow over in a breeze.
Color Theory and Textile Selection
A candy bar is a massive block of color. To keep it from looking chaotic, you must apply color theory restrictions. I generally advise sticking to a maximum of three main colors. For example, pink, white, and gold; or navy, light blue, and silver.
If you want a rainbow theme, group the candies by color rather than mixing them. This creates a “color block” effect that reads as organized and intentional rather than messy.
Choosing the Right Linen
The tablecloth is the foundation of your design. Standard polyester throw covers can look cheap and often don’t reach the floor, exposing the table legs and whatever storage boxes you have hidden underneath.
I always use floor-length linens. For a lush, high-end look, aim for a “puddle” effect where the fabric is 2 to 4 inches longer than the table height. Velvet or sequin table linens add texture that contrasts beautifully with the smooth, shiny surface of glass jars and candy wrappers.
If your candy colors are vibrant, keep the linen neutral—white, champagne, or soft gray. If your candy selection is mostly white or chocolate, use a bold, patterned tablecloth to provide the necessary contrast.
Lighting and Backdrop Mechanics
Lighting is the secret weapon of interior design, and it applies perfectly to food displays. A dark candy bar looks unappetizing. If you are indoors, try to position the table under dimmable recessed lighting or a chandelier.
If overhead lighting isn’t available, or if you are in a dim corner, use portable battery-operated uplights. Place these underneath the table (if you have a sheer cloth) to make the table glow, or place small LED puck lights behind the large back-row jars to illuminate the candy from within.
Creating a Backdrop
Without a backdrop, your candy bar is visually floating. A backdrop frames the vignette and provides a finished look. This doesn’t require a professional photo wall. You can use existing architectural features.
Position the table in front of a large mirror, a window with nice drapery, or a piece of large-scale art. If you are using a blank wall, consider installing temporary floating shelves above the table to hold themed decor or floral arrangements. This draws the eye upward and balances the visual weight of the candy jars below.
Outdoor Landscape Considerations
Moving a candy station outdoors introduces a set of challenges that requires a landscape design mindset. The first issue is the ground surface. Grass is uneven. A standard folding table with narrow legs will sink into the soil, causing the table to tilt and heavy glass jars to slide.
If you must set up on grass, place a solid board or pavers under the table legs to distribute the weight. Alternatively, use heavier outdoor furniture, like a teak potting bench or a wrought iron console table, which naturally fits the garden aesthetic and offers better stability.
Battling the Elements
Heat and humidity are enemies of sugar. Chocolate melts at temperatures as low as 85 degrees Fahrenheit. If your party is in mid-summer, avoid chocolate entirely unless the station is indoors. Stick to hard candies, lollipops, and jelly beans.
Wind is another factor. In a landscape setting, lightweight plastic bags and napkins will fly away instantly. Use weighted napkin holders or heavy ceramic vessels to hold serving supplies. Secure your tablecloth with clips or weights; a flapping tablecloth can easily knock over a pedestal jar.
Finally, consider insects. Sugar attracts bees and ants. For outdoor setups, I recommend using jars with lids. Apothecary jars are perfect for this. If you use open bowls, cover them with glass domes or mesh food tents until the party actually starts.
Designer’s Note: The Stability Lesson
I once designed a candy bar for a 40th birthday where we used tall, slender trumpet vases for aesthetic height. The venue had slightly plush carpeting. As soon as the jars were filled with heavy jawbreakers, the center of gravity shifted.
Midway through the party, a guest bumped the table lightly, and a tall vase toppled, shattering glass and scattering candy everywhere.
The Fix: Now, I always use “Museum Wax” or clear mounting putty on the bottom of tall or top-heavy vessels. A small pea-sized ball of wax anchors the jar to the table or the riser. It is invisible, removable, but strong enough to prevent tipping from accidental bumps. This is especially crucial if you are using glass risers or stacking crates to create elevation.
Common Mistakes + Fixes
Mistake: The Scoops are Too Big
Using a standard kitchen scoop for small candies like Sixlets or M&Ms encourages over-serving. Guests fill a large bag, eat half, and throw the rest away. It also depletes your stock too quickly.
Fix: Match the scoop to the candy size. Use tongs for gummies and pretzels, and small 2-ounce scoops for loose, small candies.
Mistake: Buying Based on Volume, Not Weight
It is hard to visualize how much candy fills a jar. People often underbuy, resulting in half-empty jars that look sad.
Fix: A standard gallon-sized jar holds about 5-8 pounds of candy. Buy more than you think you need. You can always use filler, like crumpled tissue paper or an overturned cup, inside the jar (hidden by the candy) to make it look full without buying 10 pounds of sweets.
Mistake: Ignoring the “Reach Zone”
Placing the most popular items at the very back creates a traffic jam and forces guests to lean over the table, dragging their sleeves through the front trays.
Fix: Place high-demand items (chocolate, popular gummies) in the middle ground where they are easily accessible. Save the back row for decorative, bulky items that are chosen less frequently.
What I’d Do in a Real Project: The Setup Checklist
If I were hired to style your candy bar today, this is the exact workflow I would follow to ensure success:
1. The foundation check
I would verify the floor is level. If it is a rug, I’d check for stability. If outdoors, I’d ensure we are not in direct sunlight.
2. The riser placement
Before adding any jars, I would place wooden crates or acrylic risers under the tablecloth to create permanent tiers. This looks cleaner than placing boxes on top of the cloth.
3. The dry run
I would arrange all empty jars on the table to check the composition. I’d ensure there is equal visual weight on the left and right sides (symmetry or balanced asymmetry).
4. The sanitation station
I would designate a small spot on the side for hand sanitizer and a trash bin for wrapper waste. This keeps the main display pristine.
5. The fill
I would fill the jars only after they are in their final position. Moving a glass jar filled with 10 pounds of candy is a recipe for back strain or breakage.
6. The finishing touches
I would add labels to every jar. Guests have allergies, and no one wants to guess if that is a peanut butter or caramel filling.
FAQs
How much candy do I really need to buy?
The general rule of thumb for interior event planning is 1/4 to 1/2 pound of candy per guest. For a party of 50 people, you should aim for roughly 15 to 25 pounds of candy. It is always better to have leftovers than an empty table.
How do I keep the table looking good during the party?
Assign someone (a host or helper) to “fluff” the table every hour. This involves refilling jars that are getting low, removing discarded wrappers, and wiping up any spills. A messy table loses its appeal very quickly.
Can I mix store-bought and homemade treats?
Absolutely. Mixing store-bought bulk candy with homemade items like cake pops or rice crispy treats adds a personal touch. Just ensure the homemade items are presented on trays or stands, while the bulk candy stays in jars.
What is the best way to label the jars?
Use cardstock tent cards or tie tags around the neck of the jars with ribbon. Avoid sticky labels directly on the glass, as they are a pain to remove later. Ensure the font is large and legible—at least size 16 or 18 point.
Conclusion
Designing a sweet birthday candy bar is a delightful way to merge the principles of interior design with the joy of celebration. By paying attention to spatial planning, vertical scale, and material selection, you elevate a simple treat station into a sophisticated design feature.
Remember that the goal is not just to feed your guests, but to provide them with an experience. The sound of the scoop, the sparkle of the glass, and the vibrant colors all contribute to the atmosphere of the party. With the measurements and strategies outlined here, you are well-equipped to build a display that is as functional as it is beautiful.
Picture Gallery


