
Sweet Cookie Table Ideas for Your Next Event
Introduction
There is something undeniably magnetic about a well-styled cookie table. It serves as a focal point that draws guests together, sparking conversation over shared nostalgia and sugar. Whether you are honoring a regional wedding tradition or simply love the idea of an edible display, the design mechanics remain the same as any other interior vignette.
I remember styling my first dessert station for a client who was terrified it would look like a cluttered bake sale. The secret wasn’t the cookies themselves, but how we manipulated height, texture, and flow to create a cohesive landscape. If you are looking for visual inspiration, you can visit the Picture Gallery at the end of this blog post.
When approached correctly, a cookie table functions like a piece of temporary architecture in your event space. It requires the same attention to scale, lighting, and composition that I would apply to styling a bookshelf or a coffee table. Let’s dive into the practical design rules that will elevate your display from simple snacks to a stunning design feature.
1. Layout and Traffic Flow Engineering
Before we buy a single platter, we must address the floor plan. A beautiful table is useless if it creates a bottleneck that blocks the flow of the party. In interior design, we look at “circulation paths,” and a high-traffic area like a dessert station requires specific clearance.
Positioning the Table
Avoid pushing the table flush against a wall unless you have absolutely no other choice. A floating table allows guests to access treats from both sides, effectively doubling your service speed. If you must place it against a wall, ensure you have at least 48 inches of clearance in front of the table for people to pause and choose without blocking the walkway.
The Rule of Linear Feet
How big should the table be? A good rule of thumb for scale is to allow for 1 linear foot of table space for every 15 guests.
- For 50 guests, a standard 4-foot console table works well.
- For 100 guests, upgrade to a 6-foot or 8-foot banquet table.
- For 150+ guests, consider an L-shape configuration or two parallel 6-foot tables.
Surface Protection
If you are renting a venue or using your own dining table, surface protection is non-negotiable. Cookies vary in oil content, and butter spots can ruin porous stones like marble or unsealed wood. Always use a high-quality felt pad under your decorative linens. This adds a plush, luxurious feel to the tabletop and protects the finish underneath.
Designer’s Note: The Bottleneck Effect
In one of my early projects, we placed the cookie table right next to the bar. It was a disaster. The line for drinks merged with the line for cookies, creating a traffic jam that frustrated guests.
The Fix: Always separate your “high dwell time” stations. Keep the cookie table at least 10 feet away from the bar and the photo booth. This encourages movement throughout the room.
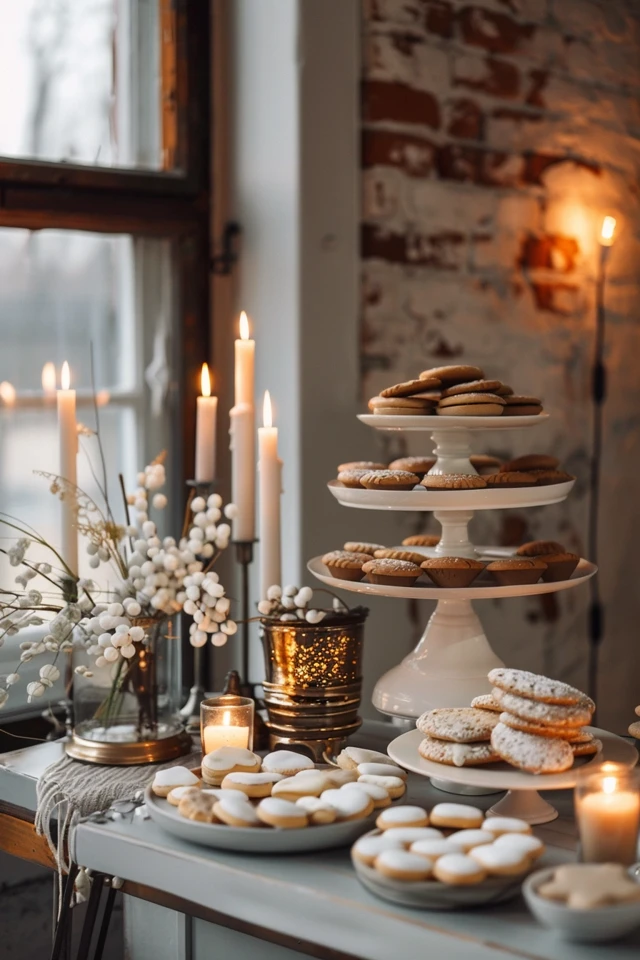
2. Creating Vertical Interest and Composition
The biggest mistake I see with DIY cookie tables is “flatness.” When every platter sits directly on the table surface, the display looks underwhelming and cluttered. As a designer, I always aim to occupy the vertical space to draw the eye upward and create a dynamic cityscape of treats.
The Triangle Method
When arranging your vessels, visualize a triangle. Your tallest element should be in the center (or the back center if against a wall), with heights tapering down as you move toward the edges. This keeps the visual weight balanced.
Specific Heights to Aim For
You need distinct variations in height to make the table readable. I recommend aiming for three specific tiers:
- Tier 1 (Table Level): Trays and flat platters lying directly on the linen.
- Tier 2 (Mid-Range): Cake stands or pedestals that are 4 to 6 inches high.
- Tier 3 (The Peaks): Tall compotes or tiered stands reaching 10 to 14 inches high.
Creative Riser Solutions
You don’t need to buy expensive catering equipment. In residential design, we often “shop the house.” Stacked coffee table books (in a color palette that matches the event) make excellent risers. Simply place a glass plate on top. Sturdy wooden crates turned upside down add rustic texture.
For a seamless, high-end look, use the “hidden riser” trick. Place sturdy boxes or bricks on the bare table, then drape your tablecloth over them. This creates hills and valleys in the fabric, allowing you to perch platters at different heights without seeing the mechanics underneath.
Common Mistakes + Fixes
Mistake: Using unstable or top-heavy pedestals for heavy cookies.
Correction: Always test the stability. If you are serving dense items like biscotti or fudge-filled cookies, use wide-base cake stands. Save the delicate, spindly pedestals for light items like meringues or macarons.
3. Selecting Vessels and Material Palettes
The materials you choose for your serving ware will dictate the style of the event. In interior design, we rely on a “mix, don’t match” philosophy to keep things interesting. A table full of identical white ceramic platters can look sterile and cafeteria-like.
The Material Mix Checklist
Try to incorporate at least three different textures on the table to create depth.
- Glass/Crystal: Adds sparkle and feels formal. Great for reflecting light.
- Wood/Wicker: Adds warmth and grounds the display. essential for rustic or boho themes.
- Metal: Silver, gold, or brass adds a jewelry-like accent. Use hammered textures to hide fingerprints.
- Ceramic/Stone: Provides solid blocks of color and weight.
Vessel Shapes and Function
The shape of the container must match the cookie type.
- For drop cookies (Chocolate Chip/Oatmeal): Use flat platters or shallow bowls.
- For biscotti or pretzel rods: Use tall cylinders or apothecary jars to keep them upright.
- For delicate cookies (Lace cookies/Macarons): Use tiered stands to prevent crushing.
Coordinating with Home Decor
If the event is in your home, look at your existing hardware. If your kitchen has brushed nickel pulls, bring in silver or pewter serving ware. If your dining room has a brass chandelier, use gold-rimmed platters. This makes the cookie table feel like an intentional part of the home’s architecture, rather than a temporary addition.
What I’d Do in a Real Project
If I were styling a modern holiday party, I would use a monochromatic palette. I would choose matte black ceramic platters mixed with slate stone boards. To warm it up, I would add walnut wood risers. The dark background makes the colors of the cookies pop significantly more than white plates do.
4. Lighting and Ambiance
Lighting is the most underutilized tool in event styling. You can have the most beautiful cookies in the world, but if they are sitting in a dark corner, they lose their appeal. Proper illumination creates texture and makes the food look appetizing.
Color Temperature Matters
Never use cool, blue-toned LED lights (4000K-5000K) around food. It makes baked goods look gray and unappealing. Always opt for warm white lighting (2700K-3000K). This spectrum enhances the golden-brown tones of the cookies and makes the frosting colors look true to life.
Battery-Operated Freedom
Cord management is a nightmare for table islands. Invest in rechargeable, battery-operated picture lights or small uplights. You can tuck these behind large jars or floral arrangements to wash the table with a soft glow.
The Candlelight Rule
Candles add unparalleled romance, but they pose a safety risk near guests reaching for food.
- Rule: If using real wax candles, they must be in glass hurricanes or lanterns that are at least 2 inches taller than the flame.
- Placement: Place candles at the back of the display, never in the front where a sleeve could catch fire while reaching for a snickerdoodle.
- Scent: Never use scented candles on a food table. The smell of “Fresh Linen” or “Pine Forest” clashes horribly with the aroma of vanilla and chocolate. Unscented beeswax is the only way to go.
5. Styling the “Negative Space” and Decor
Once the platters are placed, you will notice gaps. In design, we call this negative space. While some negative space is good for breathing room, too much makes the table look sparse. We use “filler” decor to bridge the gaps and tie the theme together.
Greenery and Florals
Fresh elements bring life to the table. However, avoid tall floral centerpieces that block sightlines.
- Garland: A eucalyptus or magnolia leaf garland woven between the platters connects the separate elements into one cohesive unit.
- Bud Vases: Use small clusters of single stems. This is budget-friendly and fills small voids without overwhelming the cookies.
signage and Labels
Labels are not just functional; they are a design opportunity.
- Consistency: Use the same font and card stock as your main event invitations.
- Holders: Use heavy place card holders that won’t tip over. Small stone cubes or brass stands work well.
- The “Why”: Guests have allergies. Clearly label nuts, gluten, and dairy. It saves you from answering the same question 50 times.
Napkins and Tongs
Don’t hide the napkins. Treat them as decor. Fan them out in a spiral or place them in a beautiful basket. Ensure you have one set of tongs for every single platter. Guests should never have to use their fingers or share utensils between trays.
Designer’s Note: The “Refill” Strategy
A half-empty platter looks sad. However, you don’t want to dump a huge pile of cookies out at once, or they will go stale.
The Fix: I always instruct hosts to keep “back stock” in tupperware under the table or in the kitchen. Assign one person to monitor the table. When a tray looks picked over, either refill it or—better yet—remove the tray entirely and consolidate the remaining cookies onto a smaller plate. A small, full plate looks more appetizing than a large, empty one.
Final Checklist: The Cookie Table Styling Guide
Before your guests arrive, run through this quick checklist to ensure your design is sound.
Logistics
- Table Stability: Have you checked that the table doesn’t wobble?
- Linen Check: Is the tablecloth steamed? (Wrinkles ruin photos).
- Clearance: Is there 36-48 inches of walking space around the table?
- Safety: Are cables taped down or hidden?
Styling
- Height Check: Do you have at least three different height levels?
- Balance: Is the visual weight distributed evenly (not all heavy items on one side)?
- Tools: is there a tong or scoop for every single vessel?
- Labels: Are allergens clearly marked?
Atmosphere
- Lighting: Is the food lit with warm light?
- Scent: Are all candles unscented?
- Music: Is the table away from blasting speakers?
FAQs
How many cookies do I need per guest?
For a dedicated cookie table (where it is the main dessert), plan for 3 to 4 cookies per guest. If there is also wedding cake or other desserts, you can scale back to 2 to 3 cookies per guest. It is always better to have leftovers than to run out.
Can I set up the cookie table the night before?
You can set up the “hardscape” (table, linens, risers, empty platters, and decor) the day before. However, do not put the cookies out until 1-2 hours before the event starts to maintain freshness. If you must set them out early, cover the entire table tightly with plastic wrap, but be warned: this ruins your styling and takes time to remove.
What is the best way to transport cookies to a venue?
Transport cookies in flat, stackable plastic containers or bakery boxes, not on the serving platters. One wrong turn in the car can send a beautifully arranged platter sliding. Plate the cookies on-site. It takes about 20-30 minutes for two people to plate cookies for 100 guests.
How do I handle “take-home” bags?
Providing bags for guests to take cookies home is a great idea. Place these at the end of the table flow, not the beginning. If you put them at the start, guests will fill bags immediately, depleting your display before everyone has had a chance to taste. Use grease-proof paper bags or lined boxes to prevent butter stains.
Conclusion
Styling a cookie table is about more than just satisfying a sweet tooth; it is an exercise in composition, balance, and hospitality. By applying these interior design principles—scaling your furniture correctly, layering lighting, and mixing materials—you transform a simple spread into a memorable event feature.
Remember that the best designs are functional. A beautiful table that causes a traffic jam or has unreachable tiers fails its primary purpose. Keep the guest experience at the forefront of your planning.
Don’t be afraid to experiment with heights and textures. Use what you have in your home, mix your metals, and let the natural beauty of the baked goods shine through. With these guidelines, your next event will be as visually tasteful as it is delicious.
Picture Gallery


