
Teenager Bathroom Ideas: Chic & Functional Spaces
Designing a bathroom for a teenager is a distinct challenge that sits somewhere between a playful children’s bath and a sophisticated master suite. It is a space that sees high traffic, humidity, and an impressive amount of product accumulation. You need materials that can withstand the chaos while offering a style that feels mature enough for their growing independence.
The goal is to create a room that handles the morning rush efficiently but also serves as a sanctuary for evening relaxation. If you are looking for specific visual inspiration, please scroll down to the Picture Gallery at the end of the blog post.
Let’s explore how to balance durability with current trends to build a bathroom your teen will actually enjoy using (and hopefully keep clean).
1. Prioritize Storage: The Battle Against Clutter
The biggest complaint I hear from parents regarding teen bathrooms is the counter clutter. Between skincare routines, hair tools, and shaving kits, a standard pedestal sink simply will not cut it. You need dedicated, closed storage to keep the visual noise to a minimum.
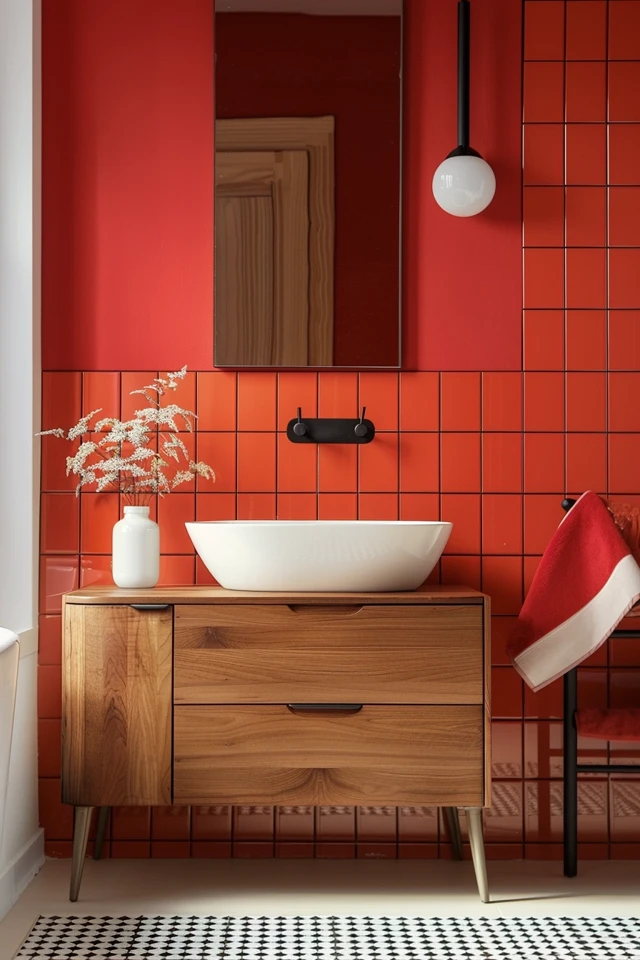
Start by evaluating the vanity. If you have the footprint, opt for a vanity with a minimum width of 36 inches to allow for both a sink and usable counter space. Drawers are infinitely better than doors. Deep cabinets under the sink often become black holes where products go to die, whereas drawers allow you to see everything at a glance.
If you are renovating, consider installing a vanity with a dedicated “hair tool drawer.” This drawer includes a built-in power strip and metal canisters to hold hot curling irons or straighteners safely. It keeps cords off the counter and prevents burn marks on your quartz.
For smaller spaces where a large vanity isn’t an option, look up. Recessed medicine cabinets have come a long way from the builder-grade mirrors of the past. Look for units that are 4 to 6 inches deep; this accommodates larger bottles and electric toothbrushes that won’t fit in standard shallow cabinets.
Designer’s Note:
When specifying drawer heights, I always aim for at least one top drawer that is 4 to 5 inches deep. This is the sweet spot for makeup organizers and standing skincare bottles. If the top drawer is too shallow, everything ends up on the counter anyway.
Common Mistakes + Fixes:
- Mistake: Relying on open shelving.
- Fix: Teens are rarely organized enough to keep open shelves looking styled. Use closed cabinetry for 90% of the storage and save open shelves for rolled towels or a single plant.
2. Lighting: The Critical Component for Grooming
Lighting is often an afterthought, but in a teenager’s bathroom, it is perhaps the most critical element. This is where they learn to shave or apply makeup, and poor lighting leads to frustration. The days of a single boob-light in the center of the ceiling are over.
You need to layer your lighting. Start with task lighting at the vanity. The golden rule here is to place sconces at eye level, flanking the mirror. This creates cross-illumination that eliminates shadows under the eyes and chin. If you only have a junction box above the mirror, choose a linear fixture that is at least 24 inches wide to disperse light evenly.
Pay close attention to “Kelvin” temperature. For bathrooms, I specify bulbs between 3000K and 3500K. This range mimics natural daylight. Anything lower (2700K) is too yellow and makes color matching difficult. Anything higher (4000K+) feels like a sterile hospital operating room.
Don’t forget the shower area. A recessed can light rated for wet locations is essential. If your teen takes long showers, put this light on a dimmer. It allows them to transition from a bright “wake up” shower in the morning to a relaxing steam in the evening.
Designer’s Note:
Always check the CRI (Color Rendering Index) of your LED bulbs. Look for a CRI of 90 or higher. This ensures that colors look true to life, which is vital for teens experimenting with makeup or checking their skin.
3. Material Selection: Durability Meets Style
Teenagers can be hard on finishes. You want materials that resist staining, scratching, and water damage. While marble is beautiful, it is porous and etches easily with acidic face washes or spilled nail polish remover.
Engineered quartz is my top recommendation for countertops. It mimics the look of natural stone but is non-porous and incredibly durable. You can leave a glob of toothpaste on it overnight, and it will wipe right off. Avoid dark solid colors for counters, as they show every speck of dust and hair. A light stone with subtle veining is the most forgiving.
For flooring, slip resistance and grout maintenance are key. Large-format porcelain tiles (12×24 inches or larger) are excellent because they minimize the number of grout lines you have to scrub. If you love the look of mosaic tile, save it for the shower floor or a backsplash where foot traffic is lower.
If you are working with a tight budget or a rental, Luxury Vinyl Plank (LVP) is a fantastic option. It is 100% waterproof, warm underfoot, and can be installed over existing tile in many cases. It provides a warm wood look without the risk of water damage that comes with real hardwood.
Common Mistakes + Fixes:
- Mistake: Using white grout on the floor.
- Fix: White grout will turn gray or yellow within months in a high-traffic teen bath. Choose a light gray or “greige” grout color that hides dirt while still looking fresh.
4. The Vibe: Sophisticated but Expressive
The aesthetic needs to bridge the gap between “fun” and “grown-up.” You want a base that is timeless, with layers of personality that can be easily changed as their tastes evolve.
Stick to neutral “hard” finishes (tile, tub, toilet, vanity). White, gray, wood tones, or black are safe bets. Then, bring in the personality through “soft” finishes like paint, shower curtains, towels, and hardware.
Wallpaper is a massive trend right now and works beautifully in bathrooms. For a teen space, look for bold geometrics, abstract botanicals, or even graffiti-inspired prints. If you are worried about humidity or commitment, use peel-and-stick wallpaper. It holds up surprisingly well in ventilated bathrooms and can be removed in an hour when they head off to college.
Mirrors are another easy way to make a statement. Swap out a standard builder-grade mirror for a round metal-framed mirror, an arched shape, or an irregular organic shape. This instantly modernizes the room without requiring a contractor.
Hardware (faucets, drawer pulls, towel bars) is the jewelry of the room. Matte black is very popular with teens for its edgy, industrial feel. Brushed gold or brass adds warmth and feels a bit more glamorous. Mixing metals is acceptable, but try to keep the faucet and shower trim in the same family.
Designer’s Note:
Let your teen have a say in the “soft” choices. Give them three pre-selected options for the shower curtain or paint color and let them pick the winner. It gives them ownership of the space without risking a design disaster.
5. Layout and Shared Spaces
If siblings are sharing this bathroom, the layout is paramount to preventing morning arguments. The most functional layout for shared teen baths is the compartmentalized design, often called a “Jack and Jill” setup.
In this layout, the toilet and shower are in a separate room with a door, while the vanity area remains open or accessible. This allows one teen to shower while the other brushes their teeth or dries their hair.
If you cannot move walls, double vanities are helpful, but only if you have at least 60 inches of width. If you have less than 60 inches, do not squeeze in two sinks. You will end up with tiny sinks and zero counter space. It is much better to have one large trough sink with two faucets, or a single sink with ample counter space on either side.
Towel storage is a frequent pain point in shared baths. Towel bars often get ignored, resulting in wet towels on the floor. I almost exclusively use hooks for teen bathrooms. They are easier to use—just grab and throw. Install sturdy double hooks for each user, spaced at least 12 inches apart to allow for drying.
What I’d do in a real project:
- Height Check: Install towel hooks at 60 inches off the ground. This keeps large bath sheets from dragging on the floor.
- Zone Defense: Assign a specific drawer and a specific hook to each teen. If possible, color-code their towels so there is no confusion about whose wet towel was left on the floor.
Final Checklist: The Designer’s Review
Before you finalize your plan or purchase items, run through this quick checklist to ensure the space is truly functional.
1. The “Elbow Test”
Stand at the vanity area. Do you have enough room to move your elbows while washing your face? If the vanity is next to a wall, you need at least 15 inches from the center of the sink to the wall.
2. Ventilation Check
Teens take long, hot showers. Ensure your exhaust fan is rated for the square footage of the room. I recommend installing a timer switch for the fan so it runs for 20 minutes after they leave, preventing mold growth.
3. Electrical Audit
Do you have an outlet near the mirror? Is it a GFCI outlet? If they use many devices, consider an outlet with built-in USB ports for charging waterproof speakers or phones (though we try to discourage phones in the bath, it’s a reality).
4. The Hamper Solution
Where will the dirty clothes go? If you don’t plan for a hamper, the floor becomes the hamper. Look for a tilt-out hamper built into the cabinetry, or ensure there is floor space for a stylish basket.
Frequently Asked Questions
How can I update a teen bathroom on a tight budget?
Focus on paint and hardware. A fresh coat of bold paint on the walls (or even painting the vanity cabinet) transforms the room for under $100. Swapping out the faucet and cabinet pulls for a modern matte black finish can make a dated vanity look brand new. Add a new shower curtain and a cohesive set of towels, and the room will feel completely different.
What is the best mirror size for a vanity?
The mirror should generally be 2 to 4 inches narrower than the vanity top. For a 30-inch vanity, a 26-inch wide mirror feels balanced. Vertically, taller is usually better as it reflects more light and makes the ceiling feel higher. Aim for a mirror that is at least 30 inches tall.
Should I choose a bathtub or a walk-in shower?
Most teenagers prefer showers. They are faster and easier to access. If this is the only bathroom in the house besides the master, keep the tub for resale value (families with toddlers need tubs). However, if there is another tub in the house, converting to a large walk-in shower with a glass door makes the bathroom feel significantly larger and more modern.
How do I stop the bathroom from smelling damp?
Beyond a good exhaust fan, avoid heavy cotton rugs that take forever to dry. Use quick-drying microfiber mats or wooden slat mats. Ensure towels are hung on hooks rather than folded over bars, as this increases airflow and drying speed.
Conclusion
Creating a chic and functional bathroom for a teenager is about anticipating their habits and designing around them. It requires a shift from “cute” decor to “resilient” materials. By focusing on smart storage, flattering lighting, and durable surfaces, you create a space that supports their daily routine rather than hindering it.
Remember that this space serves as a bridge to adulthood. Involving them in the process respects their growing autonomy and ensures the final result is a space they are proud to use. With the right planning, you can build a bathroom that survives the teenage years and remains stylish long after they have moved out.
Picture Gallery


