
Tiny House Shower Ideas for Small Spaces Retreat
Designing a bathroom for a tiny house is one of the ultimate tests of an interior designer’s skill set. You are balancing essential functionality with severe spatial constraints, all while trying to avoid the feeling of showering in a plastic closet. For inspiration on layouts and finishes, make sure to check out the Picture Gallery at the end of the blog post.
I recall a specific project where we had exactly 32 inches of width to work with between a wheel well and a kitchen cabinet. We had to decide between a cramped dry bath or a spacious “wet bath” that utilized the aisle space. Decisions in tiny homes are rarely about choosing what you want; they are about choosing what you can live with.
This guide will walk you through the architectural and aesthetic decisions required to build a functional, beautiful tiny shower. We will cover weight distribution, waterproofing, and visual tricks to make small footprints feel expansive.
1. Layout Strategies: The Wet Bath vs. The Dedicated Stall
The first decision you make dictates the rest of your tiny house plumbing. You must choose between a traditional enclosed shower stall or a wet bath (wet room). In a standard home, a wet room is a luxury; in a tiny house, it is often a space-saving necessity.
A dedicated stall keeps your toilet and vanity dry. This feels more residential and familiar. However, it requires a dedicated footprint of at least 30 inches by 30 inches, plus room for the door swing.
A wet bath turns the entire bathroom into the shower. The toilet, sink, and walls are all waterproofed, and the floor is sloped to a central drain. This allows you to overlap circulation space with shower space.
Designer’s Note:
If you choose a wet bath, pay attention to your toilet paper placement. It sounds trivial until you have soggy paper. I always specify a waterproof recessed niche with a cover or place the holder inside the vanity cabinet.
Common Mistakes + Fixes:
- Mistake: Using a shower curtain in a tiny wet bath without a track.
- Correction: Install a ceiling-mounted track that follows the perimeter. This keeps the wet curtain away from your legs and the toilet while showering.
When mapping out your floor plan, tape the dimensions on the floor. Stand in the space and mimic washing your hair. If your elbows hit the “walls,” you need to expand the width by at least two inches.
2. Material Selection: Weight and Flexibility
In a stationary home, we rarely worry about the weight of tile. In a Tiny House on Wheels (THOW), weight is a critical metric. Heavy stone or thick ceramic tile can add hundreds of pounds to your trailer’s gross vehicle weight rating (GVWR).
Furthermore, tiny homes move. They vibrate down the highway and settle on uneven ground. Rigid materials like large-format marble will crack under this torsion.
I often recommend flexible, lightweight alternatives that mimic luxury finishes. Fiberglass Reinforced Plastic (FRP) panels have come a long way and are incredibly durable. Another favorite is corrugated galvanized steel, which offers a modern, industrial look and is virtually indestructible.
What I’d do in a real project:
- Floor: I use a pre-formed shower pan whenever possible. It guarantees the slope is correct and eliminates the risk of tile grout cracking on the floor.
- Walls: If the client insists on tile, I use small mosaic tiles with flexible grout and a high-quality decoupling membrane (like Schluter-Ditra). This allows for slight movement without cracking.
- Sealant: I use marine-grade silicone for all corners and transitions.
If you want the look of stone without the weight, consider thin stone veneers or high-end porcelain slabs that are only 3mm thick. These provide the aesthetic without the structural penalty.
3. Optical Illusions: Lighting and Glass
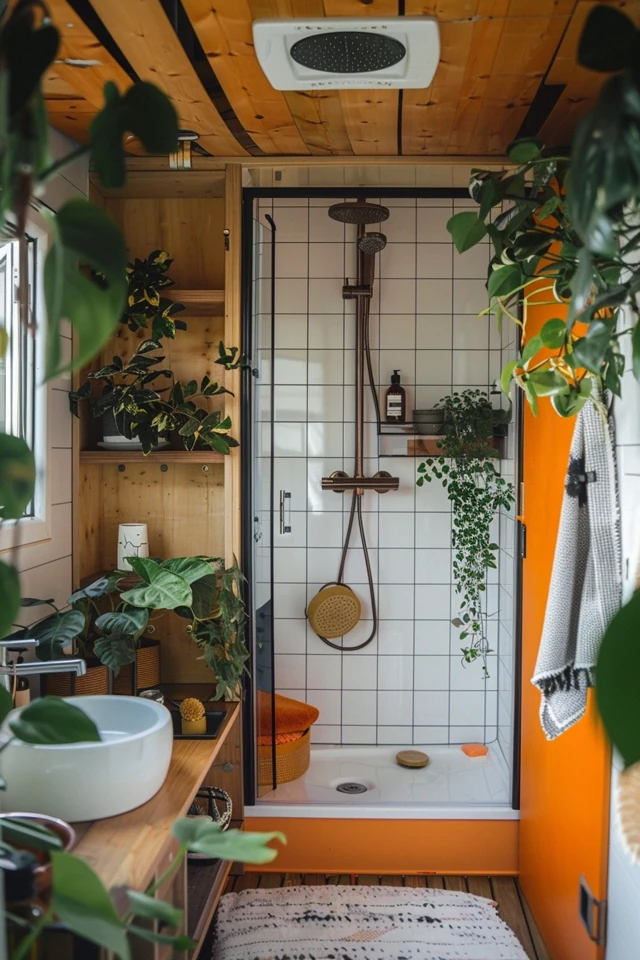
Dark, enclosed showers feel smaller. To create a retreat vibe in a tiny space, you need to trick the eye. The most effective tool for this is a frameless glass door or a fixed glass panel.
Glass removes the visual barrier, allowing your eye to travel to the back wall of the shower. This makes the entire bathroom feel like one cohesive room rather than chopped-up compartments. If privacy is a concern, use frosted glass, but keep it frameless.
Lighting is equally vital. A single overhead can light creates harsh shadows. I prefer installing waterproof LED tape light in a recessed ceiling channel or inside the shampoo niche.
Designer’s Rules of Thumb:
- Ceiling Height: If possible, install a skylight directly over the shower. It adds vertical volume and dumps natural light into the space, which is critical for preventing mold.
- Tile Orientation: Run rectangular tiles vertically to make the ceiling feel higher. Run them horizontally to make the narrow room feel wider.
- Fixture Finish: In small spaces, stick to one metal finish. Mixing chrome, brass, and black creates visual clutter.
Common Mistakes + Fixes:
- Mistake: Installing a light fixture that isn’t wet-rated in a small volume space.
- Correction: In tiny showers, steam accumulation is dense. Always use IP65-rated fixtures (water jet proof) for safety and longevity.
4. Plumbing and Utilities in Tight Quarters
The plumbing rough-in for a tiny house shower requires precise planning. You are often working around wheel wells, trailer tongues, and 2×4 framing (or even 2×3 framing to save weight).
Standard rough-in valves require a certain depth behind the wall. If your walls are thin, you might not have room for a standard mixing valve. You may need to build out a small “plumbing wall” or bump-out to house the mechanicals.
Tankless water heaters are standard in this industry. However, they require a minimum flow rate to ignite. If you install a low-flow eco shower head to save water, it might not pull enough water to trigger the heater.
Technical Insight:
Look for a shower head with a “navy switch” or pause button. This allows you to stop the flow of water while lathering without messing up your temperature settings. It is essential for off-grid living where water capacity is limited.
What I’d do in a real project:
- Drain Location: I always align the drain to avoid chassis cross-members. Check the trailer blueprints before drilling a hole in the subfloor.
- Access Panels: I insist on creating an access panel behind the shower valve. If a pipe bursts or a washer fails, you do not want to tear out your waterproof walls to fix it.
For off-grid setups, consider a recirculating shower system. These systems filter and reheat a small loop of water, allowing you to take long, hot showers using only a few gallons of actual water storage.
5. Storage: Niches and Ledges
In a 30-inch shower, protruding shelving is a nuisance. You will bump your elbows and knock shampoo bottles onto your toes. Recessed storage is the only viable option for a tiny house retreat.
I plan niche locations during the framing stage. The niche should fit between the studs. I typically size them 12 inches wide by 24 inches high to accommodate tall bottles and soaps.
If you cannot recess a niche due to exterior insulation or plumbing vents, install a corner shelf at shoulder height. Avoid hanging caddies on the shower head; they add visual clutter and stress the plumbing pipe.
Designer’s Note:
Don’t forget a place for the towel. In a tiny bathroom, the towel bar often ends up on the back of the door. Ensure the door swing doesn’t smash the towel bar into the glass shower enclosure.
Common Mistakes + Fixes:
- Mistake: Flat niche sills.
- Correction: Always pitch the bottom shelf of the niche slightly forward (about 1/8 inch) so water drains out. Standing water breeds mold quickly.
Final Checklist: Before You Build
Before you purchase a single tile or cut a piece of PEX pipe, run through this checklist. This list mimics the final review I do with my contractors.
- Weight check: Have you calculated the weight of your backer board, adhesive, and tile? Is it within your trailer’s axle limits?
- Elbow test: Have you mocked up the shower size with cardboard boxes to ensure you can wash your hair without hitting the walls?
- Head height: Does the shower head height accommodate the tallest person in the house? (Standard is 80 inches, but tiny houses often have lower ceilings).
- Extraction: Do you have a high-CFM exhaust fan? Small volumes of air saturate with humidity instantly.
- Subfloor prep: Is your subfloor marine-grade plywood? A tiny leak can rot standard OSB quickly.
- Access: Is there a panel to access the P-trap and mixing valve for maintenance?
- Door swing: Does the shower door block the toilet or vanity when open?
FAQs
What is the smallest comfortable shower size?
While International Residential Code often cites 30×30 inches as a minimum, I find 32×32 inches is the threshold for comfort. In RVs, you will see 24×36 inches, which is usable but tight. If you go smaller than 30 inches, consider a wet bath layout to borrow elbow room from the rest of the bathroom.
Can I use regular drywall in a tiny house bathroom?
Absolutely not. You must use cement board (Durock, WonderBoard) or a specialized foam board system (Kerdi-Board, Wedi) for wet areas. Even for the non-shower walls, I recommend moisture-resistant “green board” or “purple board” drywall to handle the humidity spikes.
How do I prevent tiles from cracking when the tiny house moves?
Use flexible materials. Modified thin-set mortar has polymers that allow for slight flex. More importantly, use a flexible grout or a high-quality siliconeized grout. Avoid large format tiles (12×24 or larger) as they are more prone to cracking due to torque. Small mosaics or subway tiles are safer.
Is a tub possible in a tiny house?
Yes, but it consumes a lot of water and space. Stock tanks (galvanized troughs) or Japanese soaking tubs are popular because they offer depth without taking up a large footprint. Just be wary of the water weight; water weighs 8.3 lbs per gallon, so a 40-gallon tub adds over 330 lbs to your load.
Conclusion
Creating a retreat in a tiny house is not about shrinking a standard bathroom; it is about reimagining what is necessary. By prioritizing waterproofing, utilizing vertical space, and choosing lightweight materials, you can build a shower that feels luxurious despite its size.
Focus on the tactile experience. Since the space is small, you can afford higher-quality fixtures and finishes than you might in a massive master bath. A rainfall shower head, a beautiful teak floor mat, or a handmade tile accent can make your daily routine feel special.
Remember that function comes first. A beautiful shower that leaks or breeds mold will ruin your tiny house experience. Plan your waterproofing details meticulously, and the aesthetics will follow.
Picture Gallery


