
Toilet Decor Ideas: Elevate Your Bathroom Style!
When we think about bathroom renovations, we usually daydream about a soaking tub, a double vanity with marble countertops, or a rain shower system. However, the toilet area—often affectionately dubbed the water closet—is the workhorse of the home and rarely gets the design love it deserves. To help you visualize these transformations, I have curated a stunning Picture Gallery at the end of the blog post.
I remember a project in Chicago where the client had a beautiful master bath, but the toilet was shoved in a dark, forgotten corner that felt disconnected from the rest of the room. By adding simple millwork and adjusting the lighting, we turned that utilitarian nook into a purposeful, elegant part of the suite. It proved that you do not need a massive budget to make a small space feel luxurious.
The following guide is designed to help you reclaim that vertical space and style the area with intention. We will cover everything from shelf measurements to sanitary considerations, ensuring your “throne room” is both functional and beautiful.
1. Mastering Over-the-Toilet Storage
The space directly above the toilet tank is prime real estate, especially in smaller powder rooms or apartments. The most common solution here is the floating shelf, but placement is everything.
If you install shelves too low, they interfere with maintenance; too high, and they look disconnected.
The Golden Rules of Shelf Placement
- Clearance is Key: I always recommend leaving at least 18 to 24 inches of clearance between the top of the toilet tank and the bottom of your first shelf. You must be able to lift the tank lid off completely for plumbing repairs without hitting the wood.
- Depth Matters: Avoid shelves that are deeper than 8 to 10 inches. If a shelf sticks out too far, it creates a “head-banger” hazard when you stand up.
- Spacing Strategy: If you are installing multiple shelves, space them 12 to 15 inches apart vertically. This accommodates taller items like rolled towels or tall vases without looking cluttered.
Material Selection
Bathrooms are humid zones. I avoid untreated pine or MDF that hasn’t been sealed properly, as they can warp or swell with moisture.
For a warm, organic look, opt for teak or sealed white oak. If you prefer a modern aesthetic, powder-coated metal shelves are excellent because they are easy to wipe down and impervious to rust.
Designer’s Note: The “Lean” Test
Before drilling any holes, I always have the tallest person in the household simulate standing up from the toilet. We mark the wall where their head naturally travels.
I have seen too many DIY projects where the shelf looked great on Instagram but physically intruded on the user’s space. Always prioritize ergonomics over aesthetics in this specific zone.
2. Wall Treatments: Paint, Wallpaper, and Wainscoting
Because the toilet area is usually a small, contained visual plane, it is the perfect place to take a risk. You can use high-impact materials here that might feel overwhelming in a large living room.
Treating the wall behind the toilet as an accent wall anchors the fixture and makes the room feel intentional.
Wallpaper Wisdom
In a full bathroom with a shower, humidity is your enemy. I generally advise against standard paper-based wallpapers unless the room has exceptional ventilation.
- Vinyl is King: Look for “scrubbable” or solid vinyl wallpapers. They resist moisture and can be wiped down with a damp cloth.
- Scale of Pattern: In a small water closet, a large-scale print can actually make the space feel bigger. Tiny, busy patterns often make a small room feel chaotic.
- Renters’ Solution: Peel-and-stick wallpaper has come a long way. It holds up well for a year or two and allows you to change the vibe without losing your security deposit.
Wainscoting and Millwork
If you want to elevate a builder-grade bathroom instantly, install beadboard or shiplap behind the toilet.
A common rule of thumb for height is to take the wainscoting up to 48 inches (just above the tank) or 60 inches (eye level). Cap it with a small ledge, which can serve as a narrow shelf for art or a reed diffuser.
Paint Finishes
Never use flat or matte paint behind a toilet. It is impossible to clean effectively.
I specify a Satin or Semi-Gloss finish for this wall. These sheens create a tight seal that prevents moisture absorption and allows you to use disinfectant sprays without burnishing the paint.
3. Lighting the Nook
Lighting is often the most neglected element in a toilet alcove. Relying solely on the main bathroom vanity light often casts a shadow right where you are sitting, making the space feel gloomy.
Sconces for Ambiance
If you have the electrical capability, adding a wall sconce nearby adds a layer of sophistication.
- Placement: A single sconce centered above artwork over the toilet is a classic look. Alternatively, two slim sconces flanking a piece of art can look very high-end.
- Lumen Output: You do not need floodlights here. A soft, ambient bulb (roughly 400–600 lumens) is sufficient.
- Color Temperature: Stick to 2700K to 3000K. Anything higher (4000K+) will feel like a hospital examination room, which is the opposite of the relaxing vibe we want.
No-Wire Solutions
If you are renting or don’t want to cut into drywall, rechargeable picture lights are a fantastic workaround.
I frequently use battery-operated LED picture lights to illuminate art above the toilet. They attach to the frame or the wall and provide that gallery look without the electrician’s bill.
Night Lighting
Consider the 3:00 AM user. A motion-sensor night light near the base of the toilet is practical and safe.
Modern toilets sometimes come with built-in night lights, but you can achieve the same effect with a plug-in LED strip hidden under the vanity toe-kick nearby.
4. Art and Accessories: Styling with Restraint
The line between “styled” and “cluttered” is thin, especially on top of a toilet tank. This is a functional zone that requires strict editing.
The Tank Tray Technique
I love using a tray on the toilet tank lid. It corrals small items and makes cleaning easier—you just lift the tray to wipe the lid.
- The Setup: Use a rectangular tray (woven rattan for texture or lacquer for shine).
- The Contents: A small room spray, a candle, or a small jar for cotton items.
- The Rule: Keep it low. Tall items on the back of the tank can wobble when the toilet is flushed or the seat is lifted.
Art Placement Guide
Art should be hung at eye level, but “eye level” changes depending on whether you are standing or sitting.
In a toilet nook, I usually split the difference. I hang the center of the artwork about 60 to 62 inches from the floor. This ensures it looks grounded relative to the toilet but isn’t too low for someone standing at the vanity nearby.
Common Mistakes + Fixes
Mistake: Hanging a heavy mirror directly over the toilet.
Fix: Unless it is a powder room where that is the only mirror, avoid this. It reflects the back of your head or the shower curtain. Art is almost always a better choice here.
Mistake: Using faux plants that gather dust.
Fix: If you have a window, use a real Pothos or Snake Plant—they thrive in low light and humidity. If you have no window, skip the fake greenery and use dried sculptural stems or simply omit the botanical element.
5. Functional Fixtures: Paper Holders and Hardware
The toilet paper holder is a small detail that has a massive impact on daily comfort. Builders often place these incorrectly, leading to awkward reaching.
Placement Standards
According to the National Kitchen and Bath Association (NKBA) guidelines, the ideal position for a toilet paper holder is:
- Height: 26 inches from the floor to the center of the holder.
- Distance: 8 to 12 inches from the front of the toilet bowl to the center of the holder.
If you are tight on space and the vanity is right next to the toilet, mounting the holder on the side of the vanity cabinet is a perfectly acceptable solution. Just ensure you use short screws so you don’t puncture the cabinet interior wall.
Baskets and Bulk Storage
If you don’t have a linen closet nearby, you need a solution for extra rolls.
I prefer a tall, slender woven basket placed on the floor. It hides the toilet paper while keeping it accessible. A round basket softens the many hard lines (tile, tank, vanity) usually found in bathrooms.
Hardware Finishes
Match your toilet lever to your faucet and towel bars. It is a tiny detail, but a chrome handle on the toilet clashes noticeably if everything else in the room is matte black or brushed brass.
Most toilet handles are universal and can be swapped out in five minutes with a simple wrench. It is one of the easiest “high-end” upgrades you can do.
Final Checklist: The Toilet Decor Audit
Before you finalize your design, run through this quick checklist to ensure functionality meets style.
- Lid Clearance: Can I remove the tank lid without hitting the shelf?
- Elbow Room: Do the baskets or floor decor crowd the seated user?
- Secure Mounting: Did I use wall anchors for the shelves? (Drywall alone will not hold them over time).
- Humidity Check: Is the art protected by glass or a frame that can withstand moisture?
- Lighting: Is the light temperature warm (3000K or lower)?
- Surface Safety: are the items on the tank tray stable enough to withstand flushing vibrations?
FAQs
Is it sanitary to store towels on shelves above the toilet?
This is a common debate. In my professional opinion, if the toilet has a lid, you should get in the habit of closing it before flushing to minimize the “plume.” However, for everyday hygiene, I prefer to store open towels in a cabinet or a spot further away. If you must use shelves above the toilet, consider using them for enclosed storage (like canisters) or decorative items, rather than open face cloths.
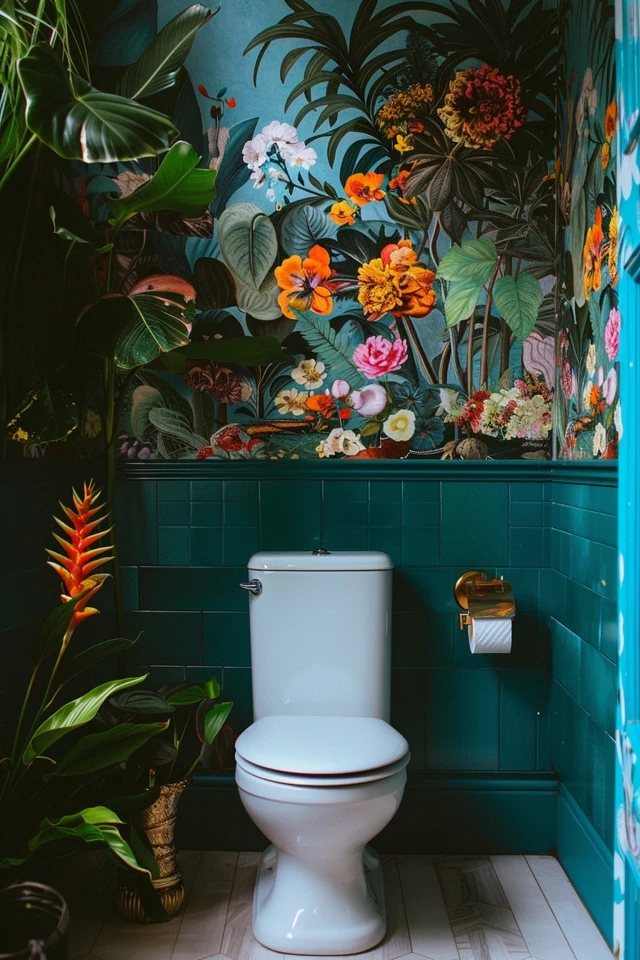
How do I decorate a toilet that is in a separate small room (Water Closet)?
Treat it like a jewel box. Because it is isolated, you can paint the walls a dark, moody color (Navy, Charcoal, Forest Green) without darkening the main bathroom. Add a large piece of art and a dedicated light fixture. It turns a claustrophobic space into a cozy design moment.
What size rug should go in front of the toilet?
I generally advise against the “contour” rugs that wrap around the base of the toilet. They tend to look dated. Instead, use a small rectangular rug (2′ x 3′) placed about 2 or 3 inches in front of the toilet base. It looks more like a proper area rug and is easier to wash.
Can I put wood paneling behind a toilet?
Yes, but seal it well. If you use shiplap or beadboard, ensure it is painted with exterior-grade or bathroom-specific semi-gloss paint. Pay extra attention to the baseboards behind the toilet, ensuring they are caulked tightly to the floor to prevent urine or water from seeping underneath.
Conclusion
Designing around the toilet is about balancing the practical realities of plumbing and hygiene with the desire for a cohesive aesthetic. It is easy to overlook this area, but because it is used every single day, it deserves thoughtful attention.
By focusing on the “rules of thumb” regarding shelf height, investing in the right paint finishes, and curating your accessories, you can turn a purely utilitarian spot into a seamless part of your home’s design story.
Start with one small change—perhaps upgrading the paper holder or adding a piece of art—and see how it shifts the energy of the room. Good design is often found in the smallest details.
Picture Gallery


