
Top Trends Kitchen Flooring Ideas
The kitchen floor is arguably the hardest-working surface in your entire home. It has to withstand dropped knives, simmering sauce splatters, muddy paws, and the constant shuffle of feet during morning routines. Yet, it also needs to set the aesthetic tone for the gathering place of the house.
Current trends are moving away from purely utilitarian looks toward materials that blend durability with intense character. We are seeing a shift toward organic textures, warmer tones, and patterns that make the floor the focal point rather than just a background element. If you are looking for visual inspiration, jump straight to the curated Picture Gallery included at the end of this blog post.
However, picking a floor based solely on a Pinterest photo is a recipe for regret. In my years of designing kitchens, I have seen beautiful floors ruined because they couldn’t handle the household’s lifestyle. This guide breaks down the top trends while keeping a strict eye on maintenance, installation costs, and long-term viability.
1. The Return of Warm, Matte Hardwoods
For a long time, the kitchen trend was cool-toned greys or high-gloss finishes. That era is officially over. The current demand is for authentic, warm wood tones—think white oak, walnut, or maple—with a matte or satin finish.
Hardwood in the kitchen scares some people, but it creates a seamless flow in open-concept homes. If your living room is wood, chopping up the floor plan with tile in the kitchen can make the house feel smaller.
Solid vs. Engineered Wood
In a kitchen environment, engineered hardwood is almost always the superior technical choice. Engineered planks consist of a real wood veneer on top of a plywood core. This construction makes the floor much more stable in the face of humidity changes and minor moisture exposure compared to solid wood.
Designer’s Note: The Finish Factor
The biggest lesson I have learned in renovations is that the finish is more important than the wood species.
- Avoid: High-gloss finishes. They show every smudge, crumb, and water spot. They are a nightmare to keep looking clean in a cooking zone.
- Choose: Wire-brushed or hand-scraped textures with a matte sealant. This texture hides dust and dents, making the floor much more forgiving.
Common Mistakes + Fixes
Mistake: Installing wood floors without checking the dishwasher clearance.
The Fix: Flooring adds height. If you add 3/4-inch wood flooring, your dishwasher might get trapped under the countertop. Always measure the vertical clearance before installation, or be prepared to remove the countertop to get the appliance out for service.
What I’d Do in a Real Project
If I am designing for a family with a dog, I specify a high-quality engineered white oak with a thick wear layer (at least 4mm). I would recommend a water-based polyurethane sealant, applied in three coats. This keeps the color natural without the yellowing effect of oil-based sealants.
2. Large-Format Natural Stone and Stone-Look Porcelain
The trend of “quiet luxury” has brought natural stone back into the spotlight. We are seeing a move away from busy, speckled granite tiles toward honed limestone, slate, and travertine.
The key to making this look modern, rather than like a hallway from 2004, is scale. We are moving past the standard 12×12 inch tiles. The trend is massive: 24×24 inches, 12×24 inches, or even larger slabs.
The Logic of Large Format
Bigger tiles mean fewer grout lines. Grout is the weak point in any kitchen floor; it absorbs grease and stains over time. By using large-format tiles, you minimize visual clutter and reduce the scrubbing required.
Porcelain vs. Real Stone
Real stone requires maintenance. Limestone and travertine are porous. If you spill red wine on unsealed limestone, it is there forever.
- Real Stone: unparalleled texture and warmth. Requires annual sealing.
- Stone-Look Porcelain: Indestructible. You can drop a pot on it, bleach it, and ignore it. High-end porcelain now mimics natural stone so well that it is hard to tell the difference.
Rule of Thumb: Slip Resistance
Kitchens are wet zones. You must check the COF (Coefficient of Friction) or slip rating of the tile.
- Avoid: Polished finishes. They turn into an ice rink when wet.
- Choose: Honed or textured finishes. They provide grip under socks and shoes.
Designer’s Note: Grout Color
Never use white grout on a kitchen floor. It will be grey within three months. I always specify a grout color that matches the darkest tone in the tile or goes one shade darker. This hides the inevitable discoloration that happens in high-traffic areas.
3. The Elevated Checkerboard
Pattern is back, but it isn’t just for retro diners. The classic checkerboard floor is having a massive resurgence, but with a softer, more organic approach.
Instead of stark black and white, designers are using softer pairings. Think cream and sage green, terracotta and slate blue, or grey and white marble. This adds a layer of history and charm to a new build.
Materials Matter
You can achieve this look at various price points.
- Luxury: Marble tiles (e.g., Carrera and Bardiglio). Be aware that marble etches with lemon juice or vinegar spills.
- Mid-Range: Through-body porcelain tile. Durable and cost-effective.
- Budget/Rental: Vinyl composition tile (VCT) or peel-and-stick tiles.
Layout Logic
The direction you lay the pattern changes the room’s perception.
- Straight Lay: Feels traditional and historic.
- Diagonal (On the Bias): Makes a narrow kitchen feel wider. The eye follows the longest line, which pushes the walls out visually.
What I’d Do in a Real Project
For a client who wants character but hates maintenance, I would use two colors of matte porcelain tile in a warm grey and a soft cream. I would lay them on the diagonal. I would ensure the installer creates a dry layout first to ensure we don’t end up with tiny slivers of tile at the most visible wall.
4. Luxury Vinyl Plank (LVP): The Practical Hero
Five years ago, I would have hesitated to put vinyl in a high-end kitchen. Today, it is one of my most requested materials. The technology has improved drastically.
LVP (Luxury Vinyl Plank) is essentially plastic, but it is waterproof, soft underfoot, and incredibly realistic. It is the number one choice for families with young kids, heavy pets, or pool access directly from the kitchen.
Understanding the Specs
Not all LVP is created equal. When shopping, ignore the total thickness and look at the “wear layer.” This is the top clear coat that protects the print.
- 12 mil: Okay for low traffic. Avoid for main kitchens.
- 20 mil or higher: This is the commercial standard. This is what you want for a kitchen. It resists scratches from dog claws and dragging chairs.
Core Types
You will see terms like WPC (Wood Plastic Composite) and SPC (Stone Plastic Composite).
- SPC: This is rigid and denser. It is more dent-resistant. If you have heavy stone islands or heavy appliances, go with SPC.
- WPC: This is softer and warmer but can dent easier.
Designer’s Note: The Repeat Pattern
The giveaway that a floor is fake is seeing the exact same knot pattern every three feet. Before buying, ask how many unique planks are in the box (the “pattern repeat”). You want a product with at least 8 to 10 unique planks. During installation, I always open 4-5 boxes at once and mix them to ensure the identical planks aren’t right next to each other.
5. Brick and Terracotta: The Organic Aesthetic
This trend aligns with the move toward “wabi-sabi” design—finding beauty in imperfection. Brick pavers and terracotta tiles bring an earthy, grounded feeling to the kitchen.
This is a specific look that works best in farmhouse, Mediterranean, or eclectic modern homes. It adds instant texture that wood or standard tile cannot replicate.
The Height Issue
Brick pavers are thick. While standard tile is roughly 3/8-inch thick, brick can be closer to 1 inch.
- Construction constraints: If you are renovating, you might not have the clearance for brick without raising your cabinets.
- Solution: Look for “thin brick” veneers. These are sliced bricks meant for floors that install like regular tile.
Maintenance Reality Check
Terracotta is extremely porous. It soaks up oil like a sponge.
- Sealing: You must seal these floors immediately upon installation and re-seal them regularly.
- Patina: You have to accept that these floors will change over time. They will develop a patina. If you are a perfectionist who wants a pristine floor, skip terracotta.
Common Mistakes + Fixes
Mistake: Using bright white thin-set or grout with terracotta.
The Fix: Terracotta creates a lot of red dust during installation. This dust will stain white grout pink permanently. Always use a grey or natural-colored grout and clean the tiles thoroughly before grouting.
Final Checklist: Choosing Your Floor
Before you swipe your credit card or sign a contract, run your choice through this filter.
- The Water Test: If you are considering a new material, get a sample. Pour a spoon of red wine and a spoon of oil on it. Leave it overnight. Wipe it up in the morning. If it stains, are you okay with that?
- The Barefoot Test: Stand on the sample barefoot. Kitchens require long periods of standing. Stone is hard on the knees; vinyl and cork are forgiving.
- The Light Test: Put the sample on the floor, not on a table. The light hits the floor differently. A color that looks great at waist height might look too dark when it is in shadow on the ground.
- The Transition Check: How will this meet the floor in the hallway? Do you need a bulky T-molding, or can you do a flush transition? Flush transitions look expensive; bulky strips look like an afterthought.
- The Cabinet Contrast: Do not try to match your wood floor to your wood cabinets exactly. It rarely works. Go significantly lighter or significantly darker to create contrast.
FAQs
What is the best flooring for a small kitchen?
Large-format tiles or wide-plank wood are best. It seems counterintuitive, but small tiles with many grout lines make a small room feel busy and cluttered. Larger pieces trick the eye into seeing a larger expanse of space.
Should flooring go under kitchen cabinets?
Yes. Always install flooring wall-to-wall before the cabinets go in (floating floors are the exception). This prevents height issues with dishwashers and allows you to change the cabinet layout later without having to patch the floor. Note: If using floating LVP, install cabinets first, then floor up to the kickplate, as heavy cabinets can pin the floor and cause buckling.
Is it okay to mix wood cabinets with wood floors?
Absolutely, but contrast is key. If your cabinets are a medium walnut, try a pale white oak floor. If you have dark espresso cabinets, a light maple floor works well. Avoid matching the tone exactly, or your kitchen will look like a generic wood box.
How do I clean matte finish floors?
Avoid wax or oil soaps (like Murphy’s). They leave a residue that makes matte floors look dull and patchy. Use a pH-neutral cleaner specifically designed for your floor type. For daily cleaning, a dry microfiber mop is your best friend.
Conclusion
Selecting kitchen flooring is a balancing act between the look you love and the reality of how you live. The current trends toward warm woods, checkerboard patterns, and organic stone offer incredible versatility, but they all require different levels of care.
Don’t rush the decision. Order samples, live with them for a few days, and visualize how they will look with your cabinets and countertops. The best floor is one that you don’t have to worry about every time you drop a piece of broccoli. It should support your life, not complicate it.
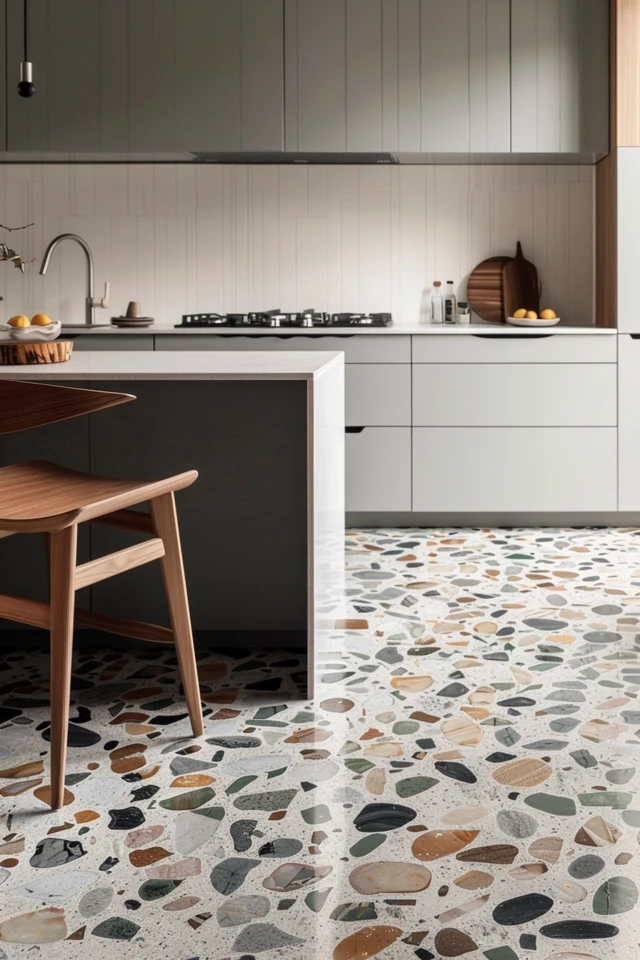
Picture Gallery


