
Transform Your Bath with Dream Shower Ideas
The shower is often the most undervalued square footage in a home. We spend significant time there every morning or evening, yet it frequently suffers from poor lighting, cramped elbows, and lackluster water pressure. A well-designed shower does more than just clean you; it resets your mindset for the day ahead or helps you decompress after a long shift.
I once worked with a client who had a massive master bathroom, but the shower was a dark, fiberglass insert tucked in the corner. By stealing just six inches from an adjacent linen closet and swapping the solid walls for glass, we completely changed how the light traveled through the room. If you are looking for visual inspiration, check out the Picture Gallery at the end of this blog post.
Whether you are planning a full gut renovation or just looking to upgrade your fixtures, the details matter immensely. In this guide, I will walk you through the structural, aesthetic, and functional decisions that turn a standard washroom into a spa-level experience.
1. Selecting the Right Tile and Materials
The materials you choose set the tone for the entire bathroom, but they also dictate your maintenance schedule. In a shower environment, durability and water resistance are just as important as the color palette.
Porcelain vs. Natural Stone
For most households, especially those with kids or pets, porcelain tile is the superior choice. It is non-porous, meaning it does not absorb water, bacteria, or cosmetic dyes. Porcelain technology has advanced to the point where it can convincingly mimic marble, slate, or wood without the upkeep.
Natural stone, such as Carrara marble or limestone, offers undeniable beauty and unique veining. However, it requires sealing at least once a year and is susceptible to etching from acidic shampoos or cleaners. If you choose natural stone, you must commit to the maintenance.
Slip Resistance is Non-Negotiable
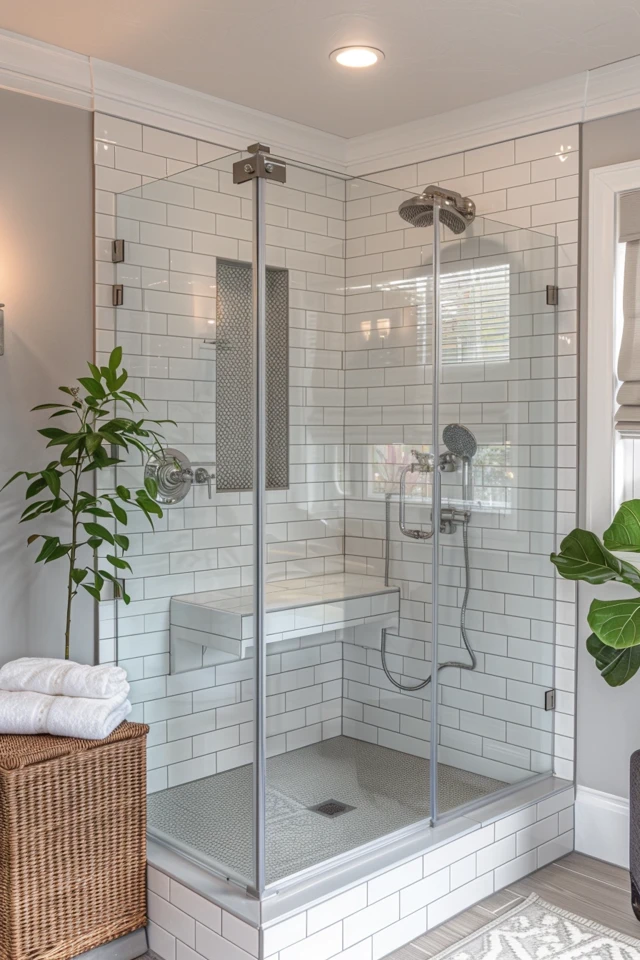
When selecting floor tile, ignore the aesthetic for a moment and look at the specs. You need a high Coefficient of Friction (COF) rating. Small format tiles, like penny rounds or 1-inch mosaics, are excellent for shower floors because the frequent grout lines provide natural traction.
Designer’s Note: Never use polished large-format marble on a shower floor. It becomes an ice rink when wet. If you want the marble look, use a honed finish cut into a smaller mosaic pattern for grip.
Grout Considerations
Grout is the nemesis of a clean shower. To minimize scrubbing, choose large-format tiles (12×24 inches or larger) for the walls. This drastically reduces the amount of grout lines you need to scrub.
For the grout itself, I always recommend epoxy grout or a high-quality urethane grout rather than standard cement-based grout. Epoxy is waterproof and stain-resistant right out of the bucket, meaning it won’t turn yellow or black over time.
2. Shower Enclosures and Layout Configurations
The footprint of your shower dictates comfort. While building codes often allow for a 30×30 inch shower, I consider that unusable for an adult.
Sizing Rules of Thumb
Aim for a minimum footprint of 36×36 inches for a comfortable standing experience. If you have the space, a 42×60 inch footprint (standard tub size) feels luxurious and allows room for a bench.
The Curbless (Zero-Entry) Shower
Eliminating the step-over curb creates a seamless look that makes small bathrooms feel larger. This is also a crucial design element for “aging in place,” allowing for wheelchair or walker accessibility down the road.
To achieve this, your contractor must lower the subfloor or raise the rest of the bathroom floor to create a gradual slope toward the drain. The standard slope is 1/4 inch per foot to ensure proper drainage without feeling like you are standing on a hill.
Glass Options
– Frameless Glass: This uses heavy, tempered glass (usually 3/8 or 1/2 inch thick) held in place by minimal clips. It is the gold standard for high-end design as it keeps sightlines open.
– Semi-Frameless: A more budget-friendly option that still offers a clean look but uses metal framing around the perimeter.
– Crittall or Grid Style: Black metal grids on glass are trendy, but be careful. Ensure the grid is printed on the outside of the glass or sandwiched between panes. You do not want a 3D metal grid inside the shower collecting soap scum.
Common Mistakes + Fixes:
Mistake: Placing the shower door where it hits the toilet or vanity.
Fix: Always measure the “swing” of the door. A standard shower door is 24 to 28 inches wide. If space is tight, use a sliding glass door or a fixed glass panel with an open entry (walk-in style).
3. Fixtures and Plumbing Logic
The hardware is the engine of your shower. It needs to look good, but more importantly, it needs to deliver water reliably and comfortably.
The Valve is Vital
The valve is the part of the plumbing hidden behind the wall. Do not buy a cheap valve online. Stick to major brands (Kohler, Moen, Delta, Brizo) because you want parts to be available 10 years from now.
I recommend a thermostatic valve over a pressure-balance valve. A thermostatic valve has two handles: one for volume (how much water) and one for temperature. You can set your preferred temperature and leave it there, turning the water on and off without finding the “sweet spot” every day.
Showerhead Combinations
In a “dream shower,” a single wall-mounted head is rarely enough.
– The Rainhead: Mounted from the ceiling, this provides a gentle, soaking experience. However, it is difficult to rinse shampoo out of long hair with just a rainhead.
– The Handheld: This is mandatory in my designs. Mounted on a sliding bar, it allows you to clean the shower easily, wash pets, or rinse off without getting your hair wet.
Placement Standards
Mount a standard showerhead at 80 to 84 inches off the finished floor. This accommodates tall users without being unreachable for shorter ones.
Install the valve controls at a height of 36 to 48 inches. crucially, place the valve near the entrance of the shower, not directly under the showerhead. You should be able to turn the water on and let it warm up without getting blasted by cold water.
4. Storage: Niches and Benches
Nothing ruins a beautiful aesthetic faster than plastic shampoo bottles cluttering the floor. Built-in storage must be planned during the framing stage.
The Recessed Niche
Avoid corner shelves; they look dated and crowd your elbows. A recessed niche set between the wall studs is the professional solution.
Positioning the Niche
Do not put the niche on the main plumbing wall if you can help it. Vent pipes and water lines often crowd that cavity, making it difficult to get a good size.
– Height: The bottom of the niche should be roughly 48 to 54 inches off the floor.
– Size: Make it tall enough. Family-size shampoo pump bottles can be 12 inches tall. Aim for a niche height of 14 inches.
– Styling: Use the same stone as your vanity countertop for the bottom shelf of the niche. It is a solid piece (no grout lines), which prevents mold growth where water sits.
Benches and Ledges
If you have a small shower (under 36 inches deep), do not build a tiled bench. It takes up too much standing room. Instead, use a folding teak bench that mounts to the wall. It provides a seat when needed but folds flat when not in use.
For larger showers, a floating bench made of quartz or stone looks modern and airy. Even if you don’t sit, a bench provides a necessary ledge for shaving legs or storing extra products.
5. Lighting and Ventilation
Lighting in showers is often an afterthought, resulting in a dark, cavernous feel. Because the shower is an enclosed space, it blocks the ambient light from the rest of the room.
Waterproof Lighting
You need a recessed can light rated for “wet locations” directly inside the shower. I typically place this close to the wall so the light washes down the tile, highlighting the texture of the stone or ceramic.
Color Temperature
Ensure your shower bulb matches the rest of the bathroom. I recommend 3000K (Kelvin). This is a crisp, clean white that isn’t too blue (like a hospital) or too yellow (which makes white tile look dingy). High CRI (Color Rendering Index) is also important—aim for 90+ so skin tones look natural.
Ventilation Mechanics
Mold grows where moisture lingers. A high-quality exhaust fan is mandatory.
– Sizing: You need 1 CFM (Cubic Feet per Minute) of ventilation for every square foot of bathroom area.
– Placement: Ideally, place the fan on the ceiling between the shower and the toilet.
– Timers: Install a humidity-sensing switch or a timer. This ensures the fan runs for 20-30 minutes after you leave the room, fully drying out the air.
Designer’s Secret: If you want a moody, spa vibe, install a waterproof LED strip light inside the top of your shower niche. It provides a soft, ambient glow perfect for late-night showers.
Final Checklist: What I’d Do in a Real Project
If I were managing your renovation, here is the cheat sheet I would use to ensure success.
1. Verify the Drain Location
Before buying tile, confirm where the drain is. If it is in the center, you need mosaic tile to slope the floor properly. If you use a linear drain (trench drain) against the wall, you can use large-format tile on the floor.
2. Check the Water Pressure
If you plan to run a rainhead, a handheld, and body sprays simultaneously, you need to ensure your home’s water pressure (PSI) and supply line size (usually 3/4 inch) can handle the volume.
3. Glass Support Blocking
Before the tile goes up, ask your contractor to install wood blocking in the wall where the heavy glass door hinges will attach. You do not want to rely on anchors in drywall to hold a 100-pound glass door.
4. The Flood Test
Demand a “flood test” before the tile is installed. The contractor should plug the drain and fill the shower pan liner with water for 24 hours to ensure there are no leaks.
FAQs
What is the best way to keep glass shower doors clean?
The best defense is a squeegee. Use it after every single shower. It takes 30 seconds and prevents hard water spots from etching the glass. You can also apply a hydrophobic coating (like Rain-X for showers) that helps water bead off.
Can I mix metal finishes in the shower?
Yes, but be intentional. A common pairing is Matte Black for the door hardware and Polished Nickel or Brass for the plumbing fixtures. Just make sure the “undertones” match. Don’t mix a vintage brass with a modern chrome; the styles will clash.
How much does a steam shower add to the cost?
A steam shower is a significant investment. Beyond the generator ($1,500 – $3,000), you must vapor-proof the entire shower (ceiling included), slope the ceiling so condensation doesn’t drip on you, and use a fully sealed glass enclosure with a transoms. Expect it to add $5,000 to $8,000 to the project minimum.
Is a tub-shower combo ever a good idea?
For resale value, you generally want at least one bathtub in the house (usually for washing children). If you only have one bathroom, keep the tub-shower combo. If you have a separate guest bath with a tub, feel free to convert the master into a large, luxury walk-in shower.
Conclusion
Creating a dream shower is about balancing the romance of the design with the reality of water management. It requires thinking about how the space feels when you are barefoot, how the light hits the walls at 6 AM, and how easy it is to wipe down on a Sunday morning.
By prioritizing high-quality valves, choosing maintenance-friendly materials, and planning for storage, you can build a space that lasts for decades. Don’t let the technical details overwhelm you—take them one step at a time. The result will be a daily retreat that adds value to your home and your well-being.
Picture Gallery


