
Transform Your Space with Pool Enclosure Ideas
Imagine stepping out of your back door into a private oasis where the weather is always manageable, and the bugs are never invited. A well-designed pool enclosure does more than just keep leaves out of the water; it effectively adds an entire room to your home’s footprint. It bridges the gap between the comfort of your interior living room and the refreshing freedom of the outdoors.
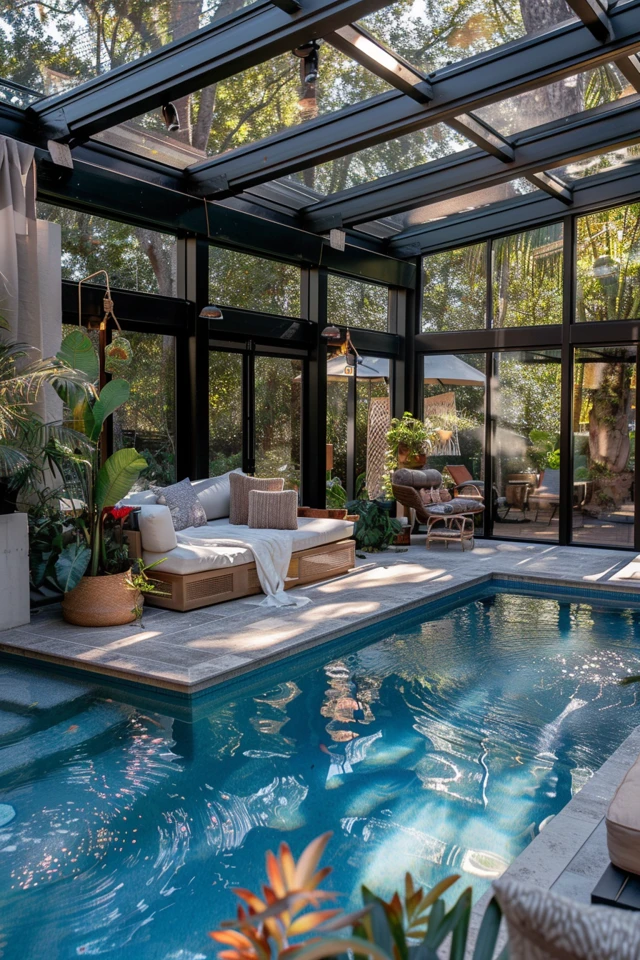
However, many homeowners treat enclosures as purely utilitarian structures, resulting in boxy, uninspired cages that detract from the landscape. I have seen countless beautiful pools hidden behind clunky aluminum frames that clash with the home’s architecture. For a visual dose of inspiration, be sure to check out the Picture Gallery at the end of this blog post.
In this guide, I will walk you through how to approach pool enclosures from a design perspective, treating them as architectural extensions rather than afterthoughts. We will cover structural styles, layout zones, material selections, and the crucial details that turn a screened-in pool into a luxury retreat.
1. Choosing the Right Structure: Form Meets Function
The first step in planning your enclosure is determining the shape and material that complements your home’s roofline. You generally have two main categories: screen enclosures (common in humid climates like Florida) and glass enclosures (conservatories or solariums for cooler climates).
If you are opting for a screen enclosure, avoid the standard “box” shape if your budget allows. A Mansard roof style, which slopes upward from the edges to a flat top, feels much more spacious than a flat roof. It creates a vaulted ceiling effect that makes the area feel less confined.
For glass enclosures, look into retractable systems. These telescoping structures allow you to slide the segments open on sunny days and close them tight during rain or snow. This versatility essentially gives you an indoor pool and an outdoor pool in one investment.
Designer’s Note: The View Killer
A common mistake I see is thick structural beams placed right at eye level. When sitting on your patio furniture, the horizontal support beam often cuts right through your view of the garden.
The Fix: Ask your contractor for “picture window” configurations. These use stronger vertical supports to eliminate the lower horizontal chair rail, giving you an unobstructed panoramic view.
2. Zoning Your Deck: Layouts and Walkways
An enclosure creates a defined boundary, which means your furniture layout requires precision. You cannot simply scatter chairs around; you need distinct zones for dining, lounging, and drying off.
Start by establishing your traffic flow. You need a clear pathway from the house door to the pool steps. I recommend a minimum clearance of 36 inches for main walkways to prevent people from squeezing past furniture or accidentally brushing against the screen.
Keep furniture away from the “splash zone.” I advise keeping upholstered lounging furniture at least 6 to 8 feet away from the water’s edge. This protects your fabrics from chlorinated water and keeps the walking path clear for wet swimmers.
Defining the Dining Area
If you plan to eat inside the enclosure, place the dining table closer to the house entrance. This reduces the distance you have to carry food and dishes. Ensure you have 30 inches of clearance behind every dining chair so guests can slide out without hitting a wall or falling into the pool.
Common Mistakes + Fixes
Fix: Use painter’s tape to map out the furniture footprint on the deck before buying. If you can’t walk around it comfortably, scale down.
Mistake: Blocking the pool entry.
Fix: Never place loungers directly in front of the pool stairs or ladder. Keep safety access wide open.
3. Hardscaping and Flooring Transitions
The flooring inside your enclosure sets the tone for the entire space. Because the enclosure filters sunlight and blocks some airflow, your choice of material impacts safety and maintenance.
Travertine pavers are a top choice for enclosed pool decks. They stay relatively cool underfoot and absorb water instantly, which prevents puddles. If you prefer a seamless look, match your indoor tile with an outdoor-rated porcelain paver in the same tone to blur the line between inside and out.
Pay attention to slip resistance. Indoors, a polished finish is fine, but inside a wet pool enclosure, you need a high grip rating. Look for tiles with an R10 or R11 slip resistance rating to ensure safety when children are running around with wet feet.
Designer’s Rule of Thumb: Drainage
Enclosures can trap humidity and slow down evaporation. Ensure your deck slopes away from the house at a rate of 1/4 inch per foot. This prevents standing water against your foundation and helps keeping the deck dry and mold-free.
4. Lighting the Enclosure for Evening Ambiance
Lighting a pool enclosure is tricky because you cannot easily hide wires, and you want to avoid reflections on the screens or glass. The goal is to create a soft glow, not a stadium effect.
Avoid high-voltage floodlights attached to the house. They create a harsh glare against the screen mesh, turning your view into a black mirror at night. Instead, focus on low-voltage landscape lighting placed in the planters around the perimeter inside the enclosure.
String lights are a classic, budget-friendly option. String them in a zig-zag pattern across the upper beams of the enclosure. Ensure they are commercial grade and rated for wet locations, as humidity inside an enclosure is high.
Sconces and Task Lighting
Install wall sconces on the exterior wall of the house facing the pool. These provide the necessary task lighting for the dining area. Choose fixtures that direct light downward (dark sky compliant) to maintain a cozy atmosphere.
What I’d Do in a Real Project
Layer 2: Up-lighting on potted palms in the corners of the enclosure.
Layer 3: Dimmable warm-white string lights (2700K color temperature) overhead for parties.
5. Softening the Edges: Decor and Landscaping
Enclosures are inherently industrial, composed of metal beams and mesh or glass. To make the space feel like a home, you must introduce soft textures and organic shapes.
Bring plants inside the enclosure. Potted palms, ferns, and bromeliads thrive in the humid, filtered light environment. Place large pots in the corners to hide the rigid angles of the metal structure.
Use outdoor rugs to define your seating areas. A rug grounds the furniture and adds a layer of comfort over hard pavers. Look for polypropylene rugs, as they are mold-resistant and can be hosed down easily.
Managing Privacy
Screens offer bug protection, but they don’t offer visual privacy. If your enclosure faces a neighbor, plant dense hedging outside the enclosure structure. Areca palms or Podocarpus planted along the perimeter outside the screen create a lush green “wallpaper” that blocks prying eyes without taking up deck space.
Pro Tip: Curtain Logic
You can install outdoor curtains along the beams of the enclosure. Use weighted hems to keep them from blowing into the pool. This adds a resort-like cabana feel and provides adjustable privacy.
Final Checklist: The Project Planner
Before you break ground or buy furniture, run through this designer’s checklist to ensure you haven’t missed a critical detail.
1. Check the Orientation
Determine where the sun hits your deck. If you have a western exposure, the afternoon sun will be brutal. You may need to incorporate a solid roof section or automated solar shades into the design.
2. Verify the Door Swing
Ensure your screen doors swing out away from the pool deck. This preserves precious floor space inside the enclosure and is generally a safety code requirement.
3. Select the Mesh Carefully
If you have pets, standard fiberglass screen will tear. Specify “pet screen” or heavy-duty polyester mesh for the lower panels. It is thicker and withstands claws, though it is slightly darker.
4. Plan for Power
Do not forget outlets. You will need them for plugging in phones, blending margaritas, or powering a TV. Installing outlets on the house wall is easy; getting power to the far side of the enclosure requires conduit work before the deck is poured.
5. Measure for Scale
Dining: Allow 10×10 feet for a standard 6-person round table.
Lounging: Allow 8×10 feet for a sofa and two chairs.
* Clearance: Maintain 3 feet of walking space around any furniture grouping.
FAQs
Does a pool enclosure reduce the water temperature?
Yes, a screen enclosure typically lowers the pool temperature by about 5 to 10 degrees Fahrenheit because it blocks direct solar heat and reduces UV rays. If you like a very warm pool, you might need a heater or a solar blanket during transition months.
How do I clean a high pool enclosure?
Algae and pollen will eventually accumulate on the beams and screens. I recommend hiring a professional pressure washing service once a year. They use a “soft wash” technique with mild chemicals to clean the mesh without blasting holes in it.
Do I need a permit for a pool enclosure?
Absolutely. An enclosure is a structural addition that must withstand wind loads (especially in hurricane zones). You will need a building permit, engineering drawings, and a survey showing you are within your property setbacks.
Can I add an enclosure to an existing pool deck?
Yes, provided you have a proper footer. The aluminum or steel posts require a concrete footing to anchor into. If your current deck is thin pavers over sand, a contractor will need to pour new concrete footers at the attachment points.
Conclusion
A pool enclosure is a significant investment that fundamentally changes how you use your backyard. It transforms a seasonal amenity into a year-round living space. By focusing on the flow of traffic, the quality of materials, and the softness of the decor, you can avoid the “caged” look and create a true extension of your home.
Remember that the structure is just the skeleton. The real design magic happens when you layer in the lighting, the lush plants, and the comfortable furniture that invites you to stay outside long after the sun goes down. Treat it like a living room, not just a pool cover, and you will enjoy the returns for years to come.
Picture Gallery


