
Transform Your Space with Under Deck Bar Ideas
The space beneath a second-story deck is often the most underutilized square footage in a home. For many homeowners, it becomes a dark catch-all for gardening tools, old bicycles, or stray leaves. However, with the right planning, this area offers immense potential as a sheltered outdoor entertainment zone.
Turning this “dead space” into an under-deck bar provides a unique advantage: built-in weather protection. Unlike a standalone pergola or an open patio, your ceiling is already constructed. This natural shade and shelter make it the perfect candidate for an outdoor kitchen, bar, or lounge area that extends your living space significantly.
If you are looking for visual inspiration, you can jump right to the Picture Gallery at the end of this blog post. But if you are ready to start planning the logistics, materials, and layout, keep reading. We are going to cover the specific architectural and design considerations required to build a bar that lasts.
1. Establishing the Foundation: Drainage and Ceiling Systems
Before we pick out barstools or counter materials, we have to address the most critical element of an under-deck build: water management. If the deck above has gaps between the boards, rain and spilled drinks will fall directly onto your new bar area. This is the number one reason these projects fail or rot prematurely.
You have two main options for handling the ceiling. The first is an under-deck drainage system using troughs and downspouts. These systems catch water that falls through the deck boards above and channel it into a gutter system, keeping the space below bone dry. This allows you to install electrical fixtures and finish the ceiling with beadboard or wood soffits.
The second option, which is more budget-friendly but less polished, is to leave the rafters exposed. If you choose this route, you cannot install cabinetry or electrical appliances directly under the drip lines. This limits your layout significantly.
Designer’s Note: The “Dry Zone” Rule
In my projects, I always insist on a full drainage system if the client wants cabinetry. Without it, moisture gets trapped behind the cabinets, leading to mold and warped wood within two seasons. If you are on a tight budget, install corrugated metal or fiberglass panels on a slope between the joists to divert water away from the house foundation.
2. Layout Logic and Spatial Planning
Designing an outdoor bar requires different spatial rules than an indoor kitchen. The flow of traffic is usually less defined, and you need to account for people gathering around the perimeter.
The Galley vs. The L-Shape
For narrower spaces, a galley style works best. This involves a single straight run of cabinets and countertops against the house wall or a retaining wall. This maximizes the open floor space for additional seating or a dining table.
If you have a larger footprint, an L-shaped bar is superior for social interaction. It creates a defined “bartender” zone and allows guests to sit on two sides, making conversation easier.
Critical Measurements for Comfort
When laying out your bar, use these standard interior design measurements to ensure the space is functional:
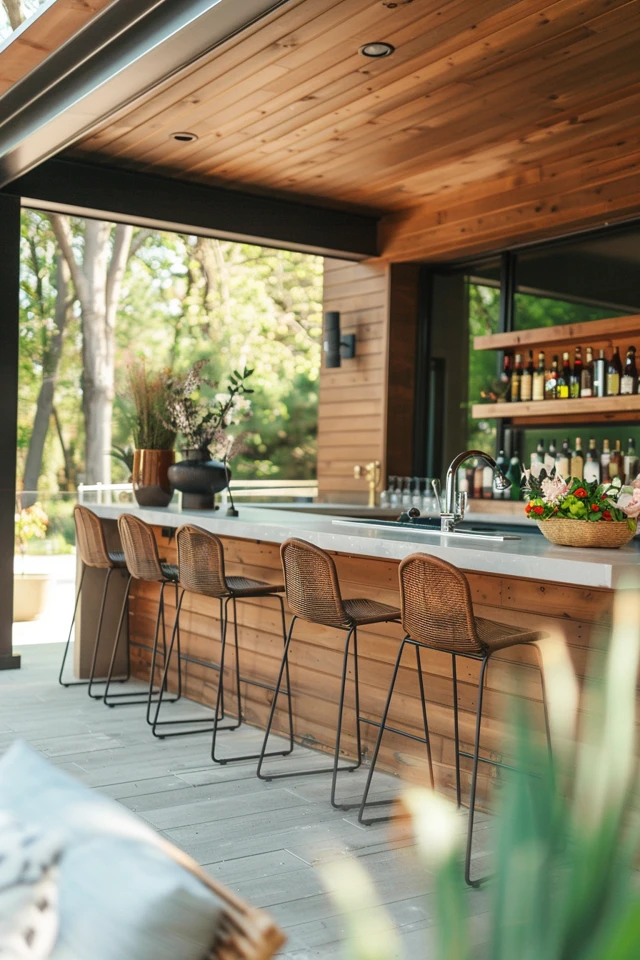
- Standard Bar Height: Build your upper bar ledge at 42 inches high. This is comfortable for standing and leaning.
- Counter Prep Height: If you are including a sink or prep area, keep that lower surface at 36 inches (standard kitchen height).
- Bar Overhang: You need a minimum of 10 to 12 inches of overhang for knee clearance. Anything less and your guests will be knocking their knees against the wall.
- Walkway Clearance: Leave at least 36 to 48 inches of clearance behind the bar stools. You need room for people to scoot back without blocking the path for others.
3. Selecting Weatherproof Materials
The biggest mistake I see in DIY outdoor bars is using indoor-grade materials. The environment under a deck is damp, prone to temperature swings, and accessible to insects. Durability must be your top priority.
Cabinetry Options
Avoid standard plywood or particle board entirely. Even with a good paint job, they will swell with humidity.
- Stainless Steel: This offers a sleek, modern look and is impervious to rot. However, it can get hot and requires maintenance to prevent surface rust or “tea staining.”
- Marine-Grade Polymer (HDPE): This is often the best choice for residential projects. It looks like painted wood but is actually a high-density plastic that can be hosed down and never rots.
- Masonry/Stone: Building the structure out of concrete block and facing it with stone veneer is the most durable option. It gives a solid, built-in look that anchors the space.
Countertop Surfaces
For the bar top, you need a surface that is non-porous and UV stable.
- Granite: Choose a honed or leathered finish rather than polished. Polished granite can cause blinding glare when the sun hits it at a low angle.
- Concrete: A poured concrete top is trendy and durable, but it must be sealed properly to prevent wine and citrus stains.
- Tile: Large format porcelain tile is excellent for freezing climates. Avoid small tiles with lots of grout lines, as grout is the weak point for moisture intrusion.
4. Lighting and Electrical Plans
Under-deck spaces are naturally dark, even during the day. Proper lighting transforms the area from a cave into a lounge.
Layering Your Light
You need three layers of light: task, ambient, and accent.
- Task Lighting: Install wet-rated recessed can lights or puck lights directly over the work surface. You need to see what you are pouring or chopping.
- Ambient Lighting: Dimmable string lights zigzagged across the ceiling are a cost-effective way to create a warm glow.
- Accent Lighting: Consider LED tape lighting under the bar overhang. It looks high-end and helps guests see where to place their knees and feet.
Electrical Safety
You must hire a licensed electrician for this phase. All outlets must be GFCI (Ground Fault Circuit Interrupter) protected. You will likely need dedicated circuits if you plan to run a beverage fridge, an ice maker, and a blender simultaneously.
5. Flooring and Hardscaping
You cannot build a bar directly on grass or dirt. You need a level, stable surface that drains well.
Concrete Pads
A poured concrete slab is the most practical solution. It is easy to clean, creates a flat surface for furniture, and prevents weeds. You can stamp or stain concrete to mimic stone or wood.
Pavers
Interlocking pavers are another great option. They allow for some water permeability. However, if your bar is heavy (like a stone masonry bar), you need to ensure the base beneath the pavers is compacted properly to prevent settling.
Decking
Some homeowners choose to build a ground-level deck under the upper deck. While this looks nice, be careful with height. You need to maintain at least 7 to 8 feet of head clearance. Building a raised floor might make the ceiling feel oppressive.
What I’d Do in a Real Project: The Flooring Hierarchy
If budget allows, I prefer large-format natural stone pavers (like bluestone) set on a concrete base. It provides the stability of concrete with the aesthetic texture of stone. If you are renting or on a budget, an outdoor-rated area rug over a compacted gravel bed can work for a casual, bohemian vibe, though it won’t support heavy cabinetry.
Common Mistakes + Fixes
Even seasoned renovators make mistakes when moving the kitchen outdoors. Here are the most frequent errors I encounter and how to fix them.
Mistake 1: Forgetting the Winter Plan
The Issue: You install plumbing for a sink but don’t plan for freezing temperatures. Pipes burst in January.
The Fix: Install a shut-off valve inside the house for the outdoor water line. Design the plumbing so it can be gravity-drained or blown out with compressed air at the end of the season.
Mistake 2: Ignoring Ventilation
The Issue: You box in a beverage fridge tightly with cabinetry to make it look built-in. The fridge overheats and dies because the compressor can’t vent.
The Fix: Buy “outdoor rated” or “front venting” appliances. If you use a standard unit, leave at least 2 inches of air gap on all sides and install a vent grate in the cabinetry.
Mistake 3: Poor Rug Sizing
The Issue: Buying a rug that is too small for the seating area.
The Fix: The rug should extend at least 24 inches past the bar stools. You want the stool legs to stay on the rug when a guest pulls the chair out to sit down.
Final Checklist: Project Management
Use this checklist to keep your under-deck bar renovation on track.
Phase 1: Planning
- Measure vertical clearance (aim for 8 feet).
- Check local building codes regarding plumbing and electrical.
- Determine the water management system for the deck above.
Phase 2: Rough-In
- Install under-deck drainage system.
- Pour concrete patio or lay pavers.
- Run electrical and plumbing lines to the bar location.
Phase 3: Construction
- Install ceiling finish (beadboard, PVC, or soffit).
- Build or install bar cabinetry structure.
- Install countertop.
Phase 4: Finish
- Connect sink and faucets.
- Install light fixtures and fans.
- Place appliances (fridge, kegerator).
- Style with weather-resistant bar stools and decor.
Frequently Asked Questions
Do I need a permit for an under-deck bar?
Yes, in most municipalities. If you are adding electrical wiring, plumbing, or a permanent structure like a stone bar, a permit is usually required. Always check with your local building department to avoid fines or insurance issues later.
How do I keep the space bug-free?
Since you have a ceiling, you can actually screen in the under-deck area. Installing a track screen system allows you to enclose the space during mosquito season. Alternatively, install high-velocity outdoor ceiling fans. Moving air is the best natural deterrent for flies and mosquitoes.
Can I use an indoor fridge outdoors?
Technically, yes, but it won’t last long. Indoor fridges are not insulated well enough to hold temperature when it’s 90 degrees outside, and the steel exterior will rust. An outdoor-rated fridge has a more powerful compressor and a stainless steel grade (usually 304) that resists corrosion.
What is the best way to heat the space?
Flush-mount electric infrared heaters are the gold standard for under-deck spaces. They can be recessed into the ceiling so they aren’t an eyesore. Unlike propane towers, they direct heat efficiently downward and aren’t affected by wind.
Conclusion
Creating an under-deck bar is one of the most rewarding home improvement projects because it unlocks space you already own. It changes the way you host, moving the party from a crowded kitchen to the open air. By focusing on the “boring” basics first—drainage, durable materials, and proper layout dimensions—you ensure that your new lounge area is not just beautiful for a season, but functional for years to come.
Whether you go for a simple tiki bar vibe or a full masonry outdoor kitchen, the key is to respect the environment. Build for the weather, plan for the flow of people, and light it well. Your under-deck area is waiting to become the favorite room in your house—it just happens to be outside.
Picture Gallery


