
Transform Your Space with Unique Selfie Wall Ideas
Creating a dedicated space for photos in your home or business is about more than just painting a wall a bright color. It is about understanding the intersection of lighting, texture, and spatial awareness to create a composition that flatters the subject. A successful selfie wall serves as a focal point in the room even when a camera isn’t pointed at it.
I remember working on a project for a boutique salon where the owner wanted a “viral moment” in the waiting area. We initially focused solely on the wallpaper, but the photos kept coming out flat and unflattering because the downlighting cast harsh shadows on clients’ faces. We pivoted to integrate front-facing diffused lighting and textural layers, and suddenly, the space transformed into a marketing machine. If you are looking for specific visual examples of these concepts, make sure to check out the Picture Gallery at the end of this post.
In this guide, I will walk you through professional design strategies to build a backdrop that looks high-end in person and spectacular on screen. We will cover lighting physics, material durability, and the exact measurements you need to make the space functional.
1. Establishing the Foundation: Lighting and Location
Before you pick a paint color or a prop, you must determine where the wall goes and how it is lit. This is the single most critical factor in whether a selfie wall gets used or ignored. The best backdrop in the world will fail if the subject looks dark or grainy.
The Golden Rule of Orientation
Never place your selfie wall on a wall that contains a window. Backlighting a subject creates a silhouette effect, darkening the face and blowing out the background. Instead, position your feature wall opposite a natural light source. The window light should hit the subject’s face directly.
If you are designing in a windowless room, or for nighttime use, you need to replicate this effect artificially. Relying on ceiling recessed cans is a common mistake. Overhead lighting casts shadows under the eyes and nose, creating “raccoon eyes.”
Lighting Specifications and Measurements
You need eye-level, diffused lighting. Sconces placed on either side of the focal point work wonders.
- Height: Mount sconces so the center of the bulb is roughly 60 to 66 inches off the floor. This aligns with the average human face.
- Color Temperature: Aim for 2700K to 3000K bulbs. This warm white range is universally flattering for skin tones. Anything over 4000K will look clinical and blue.
- CRI (Color Rendering Index): Look for bulbs with a CRI of 90 or higher. This ensures colors (makeup, clothes, and wall paint) look accurate and vibrant.
Designer’s Note: The Ring Light Hack
In commercial spaces or teen bedrooms, we often hide a permanent ring light behind a piece of decor or integrate it into a mirror. If you don’t want visible tech, install a “wall washer” track light on the ceiling directed at the wall, but pair it with a floor lamp nearby to fill in facial shadows.
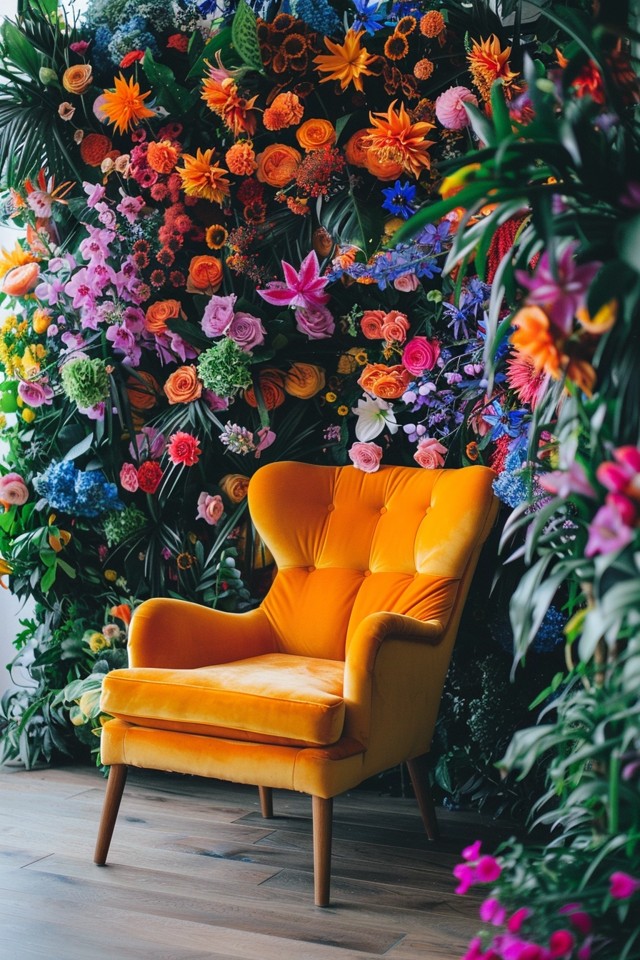
2. The Living Wall: Biophilic Design and Greenery
Greenery adds life, texture, and a sense of freshness to photos. However, the difference between a high-end living wall and a cheap-looking plastic backdrop is all in the density and material selection.
Real vs. Artificial Constraints
Real living walls require plumbing for irrigation and specialized grow lights if natural light is insufficient. For most residential clients and renters, high-quality faux greenery or preserved moss is the practical choice.
Preserved Moss Panels
This is my top recommendation for low-maintenance impact. Preserved moss is real moss that has been treated with glycerin to maintain its softness and color without needing water or light.
- Acoustics: Moss is an excellent sound absorber, making it functional for home offices or busy cafes.
- Installation: These usually come in 12×12 inch or 24×24 inch tiles. You can adhere them directly to plywood backing.
- Longevity: Keep them out of direct, harsh sunlight to prevent fading. They typically last 5-7 years.
Achieving Realistic Faux Greenery
If you opt for faux boxwood or tropical panels, density is key. You should not be able to see the plastic grid behind the leaves.
- The “Fluff” Factor: When you buy boxwood panels, they arrive compressed. You must spend time fluffing every branch.
- Layering: Don’t just use the base panels. Buy separate stems of faux ferns, monstera leaves, or florals and zip-tie them into the grid to create 3D depth.
- Depth Rule: The foliage should extend at least 3 to 4 inches off the wall to create dynamic shadows.
Common Mistakes + Fixes
Mistake: Stopping the greenery halfway up the wall.
Fix: A selfie wall needs to extend above the head of the tallest person and below their waist. I recommend taking the greenery from the floor to at least 7 feet high. If budget is an issue, start the greenery 24 inches off the floor (below camera frame for a waist-up shot) and go to 8 feet.
3. Textural Architecture: Wood Slats and Molding
Texture always photographs better than flat paint. Architectural elements add depth and shadow lines that change as the sun moves throughout the day. This creates a dynamic backdrop that feels expensive and permanent.
Vertical Wood Slats
This mid-century modern look is incredibly popular because it adds warmth and verticality, making ceilings look higher.
- Material: You can buy pre-made acoustic slat wood panels (wood veneer over black felt). These are DIY-friendly and cut with a standard circular saw.
- Sizing: Standard slats are usually 1 to 1.5 inches wide with a 0.5-inch gap. This ratio reads well on camera without creating a “strobing” effect.
- Finish: Use a matte polyurethane. Glossy finishes will reflect the camera flash or ring light, creating hot spots in the photo.
Picture Frame Molding
For a classic, Parisian apartment vibe, applied molding is timeless. It provides a structured grid for photos.
- Scale: Plan your boxes so the top rail of the lower box sits around 30 to 32 inches off the floor (chair rail height). The upper box should frame the head and torso.
- Spacing: Keep 3 to 4 inches of space between boxes and between the molding and the ceiling/baseboards.
- Monochromatic Paint: Paint the wall, the trim, and the baseboards the exact same color in a matte or eggshell finish. This creates a sophisticated, unified backdrop where the texture is subtle.
What I’d Do in a Real Project
If I were designing a rental apartment, I would skip the permanent wood installation. Instead, I would use high-quality peel-and-stick wallpaper that mimics a textured surface, such as grasscloth or a hyper-realistic concrete finish. While it lacks the physical depth, the visual texture still creates a better photo than a plain white wall.
4. The Mirror Selfie Station
The “mirror selfie” is a genre of its own. Designing a space for this requires managing what is seen in the reflection. This is the hardest selfie wall to execute because you have to design the wall behind the mirror and the wall opposite the mirror.
Mirror Selection and Placement
You need a mirror that captures the full outfit without distortion.
- Size Matters: A floor mirror should be at least 64 inches tall and 30 inches wide. Wider is generally better for fitting multiple people.
- The Lean: Leaning a mirror against the wall creates a flattering, slightly upward angle that elongates the legs. Secure it with an anti-tip kit.
- Organic Shapes: Asymmetrical or “blob” mirrors are trending. They act as art pieces when not in use.
Managing the Reflection
Stand where the mirror will go and look at what is behind you. That is your background.
- Declutter: Ensure the reflection doesn’t show a messy kitchen, a pile of laundry, or an unmade bed.
- The “Back” Drop: The wall opposite the mirror becomes the true selfie wall. Consider painting that opposing wall a deep, moody color or adding artwork, as that is what will appear behind your body in the photo.
Designer’s Note: Lighting the Mirror
Do not rely on the ceiling light behind the user; it creates a silhouette. The light needs to be hitting the user’s front (the side facing the mirror). If possible, place a floor lamp to the side of the mirror or use LED tape light behind the mirror glass for a glowing, backlit effect that separates the mirror from the wall.
5. Neon and Statement Lighting Art
Neon signs have dominated Instagram for years, but the trend is shifting toward more integrated, artistic lighting applications. The goal is to use light as a sculptural element.
Neon Sign Placement
If you are using a neon sign (or the safer, cheaper LED faux-neon), placement is critical.
- Height: The center of the sign should be at eye level, roughly 60 to 65 inches off the floor. If it’s too high, people have to crane their necks or angle the camera up, which is rarely flattering.
- Background: Neon pops best against dark backgrounds or heavy textures like the greenery or wood slats mentioned earlier. Neon on a white wall creates a washed-out look.
Cord Management
Nothing ruins a high-end look faster than a dangling black power cord.
- New Construction: Install a recessed outlet directly behind where the sign will hang.
- Retrofit: If you can’t move the outlet, paint the cord the exact same color as the wall. Alternatively, hide the cord behind a vertical element like a wood slat or a dense line of greenery.
Linear LED Designs
For a futuristic or gaming-inspired room, use rigid LED channels with diffusers.
- Geometry: Create geometric shapes (hexagons, chevrons) directly on the wall.
- Diffusion: Always use a milky white diffuser cover on the aluminum channel. Naked LED tape looks cheap and creates harsh dots of light in photos.
Final Checklist: Before You snap the Photo
Use this checklist to ensure your design is ready for execution.
- Light Test: Have you taken a test photo at the time of day you plan to use the space most?
- Glare Check: Is there a window opposite the wall causing a glare on mirrors or glossy surfaces?
- Height Check: Is the focal point (neon sign, art, mirror center) at 60-66 inches?
- Background Audit: For mirror walls, is the reflection clear of clutter?
- Outlet Access: Do you have power nearby for ring lights or phone chargers?
- Safety: Are mirrors anchored? Is the greenery fire-retardant (if commercial)?
Frequently Asked Questions
How do I make a selfie wall in a rental?
Focus on peel-and-stick options and lightweight props. Peel-and-stick wallpaper in bold prints is excellent. For texture, use removable mounting tape to hang lightweight acoustic felt panels. A large floor mirror is also a great rental-friendly option because it requires no holes in the wall.
What is the best paint finish for a photo wall?
Matte or flat enamel is the absolute best for photography. It absorbs light rather than reflecting it, which smooths out the skin and hides wall imperfections. Avoid semi-gloss or high-gloss paints, as they create harsh hotspots from flashes and ring lights.
How big does the wall need to be?
You don’t need a massive wall. A standard photo captures an area about 4 to 6 feet wide. A small alcove, a hallway end, or a 4-foot section of a bedroom wall is sufficient. Just ensure you have enough room to step back about 5 to 6 feet to take the photo.
How do I clean a greenery wall?
Faux greenery collects dust. Use a can of compressed air (like you use for keyboards) to blow dust out of the crevices once a month. For deeper cleaning, you can use a Swiffer duster or a vacuum with a soft brush attachment on the lowest suction setting.
Conclusion
Creating a unique selfie wall is about blending the technical requirements of photography with the aesthetic principles of interior design. It transforms a static corner of your home or business into an interactive experience. By prioritizing lighting, layering textures, and paying attention to scale and proportion, you can build a backdrop that feels authentic and inviting.
Remember that the best designs often evolve. Start with your base layer—be it paint, wood, or greenery—and then layer in your lighting and props. Test the space with your camera phone as you go. What looks good to the eye might look different through a lens. With these guidelines, you are well on your way to creating a space that captures memories and stops the scroll.
Picture Gallery


