
Treehouse Decorating Ideas: My Creative Oasis
There is something universally enchanting about a treehouse. As a designer, I have found that these elevated spaces are rarely just about play; they are about disconnecting from the noise of ground-level life. Whether you are retrofitting a childhood fort or building a sophisticated architectural retreat, the interior design requires a specific mindset. You are dealing with a structure that sways, breathes, and exists in direct conversation with nature.
The goal is to create a sanctuary that feels safe, cozy, and inspiring without overwhelming the small footprint. I approach treehouse projects similarly to designing a yacht or a tiny home. Every square inch must earn its keep, and materials must be durable enough to withstand humidity and temperature shifts. The aesthetic should honor the surroundings, blurring the line between the indoors and the canopy outside.
This guide will walk you through professional strategies for layout, lighting, and textiles specifically for treehouses. If you are looking for visual inspiration to jumpstart your project, be sure to scroll down to the Picture Gallery at the end of the blog post.
1. Defining the Aesthetic: Biophilic Design Principles
Before buying a single pillow, you need a clear design direction. In a standard living room, you might fight the architecture, but in a treehouse, you must lean into it. I almost always recommend a “biophilic” approach. This means the design connects the occupant directly to nature through color, texture, and pattern.
When I select a color palette for a treehouse, I use the 60-30-10 rule but adapted for the outdoors.
- 60% Dominant Color: This should usually be wood or a neutral tone that matches the tree bark. If you paint the walls white, it can feel too sterile and stark against the leaves. I prefer warm greys, taupes, or leaving the natural wood grain exposed with a clear sealant.
- 30% Secondary Color: Pull this directly from the canopy. Deep forest greens, moss tones, or sky blues help the structure recede visually into the branches.
- 10% Accent Color: This is where you add your personality. Burnt orange, mustard yellow, or a deep slate blue can add sophistication without clashing with the environment.
Designer’s Note: The “Tree Trunk” Rule
In many designs, a branch or the main trunk actually passes through the interior space. Do not try to cover this up or paint it. I treat the living tree as a sculptural art piece. However, you must leave a “gasket” or flexible space around the floor and ceiling penetrations. Trees grow and sway; if you frame tightly against the bark, you will damage the tree and warp your structure.
Common Mistakes + Fixes
Mistake: Using high-gloss finishes.
Fix: High-gloss paint reflects too much light and highlights imperfections in rustic lumber. Always use matte or eggshell finishes for walls, and satin for trim. This absorbs light and creates a softer, more organic feel that feels “quiet” to the eye.
2. Layout and Space Planning for Small Footprints
Treehouses are notoriously tight on square footage. A standard size is often around 8×8 or 10×10 feet. If you treat this like a normal room and buy standard furniture, you will run out of space immediately. You need to focus on scale and multi-functionality.
The Theory of Circulation
In a tiny room, traffic flow is everything. You need a minimum of 24 inches of clearance to walk comfortably between furniture pieces. If you can’t achieve that with a standard armchair, you need to switch to a slipper chair (armless) or built-in seating.
What I’d Do in a Real Project
If I were designing a 10×10 creative studio in a tree, I would avoid freestanding bulky furniture entirely.
- Built-in Bench: I would construct a bench along one wall. This anchors the room and prevents furniture from “floating” or tipping if the treehouse sways.
- Storage Integration: The space underneath the bench seat is prime real estate. I use piano hinges on the seat to create lift-top storage for cushions, art supplies, or blankets.
- Wall-Mounted Desk: Instead of a four-legged desk, I use a drop-leaf table mounted to the wall. When you need floor space for yoga or stretching, the desk folds down flat.
Weight Distribution
This is a safety constraint unique to treehouses. You cannot pile a heavy sleeper sofa, a cast-iron stove, and a bookshelf filled with encyclopedias in one corner.
- Balance: Distribute heavy items to opposite sides of the room.
- Structural Loading: Place the heaviest items (like a sleeper sofa or a writer’s desk) closer to the main structural supports or the tree trunk, rather than in the center of the floor span.
3. Textiles and Soft Goods: Cozy but Durable
The biggest challenge in a treehouse is moisture. Even if your roof is perfect, treehouses are uninsulated or lightly insulated structures that experience high humidity. If you bring in a standard indoor cotton rug or down-filled pillows, they will inevitably smell like mildew within a season.
You must shop in the “Outdoor” or “Performance” categories. Fortunately, textile technology has improved immensely. You can find outdoor fabrics that feel soft to the touch, not plastic-y.
Rug Selection
Floors in treehouses can be drafty. A rug is essential for acoustic dampening and warmth.
- Material: Look for 100% polypropylene or PET (recycled polyester). These materials are hydrophobic, meaning they don’t absorb water. You can hose them off if they get muddy.
- Sizing: In a small room, you don’t want a “postage stamp” rug floating in the middle. For an 8×8 room, aim for a 6×6 square rug or a 5×7 rectangular rug. Leave about 12 inches of wood floor visible around the perimeter to make the room feel larger.
Upholstery and Cushions
For built-in benches or chairs, use solution-dyed acrylic fabrics (like Sunbrella). The color goes all the way through the fiber, so it won’t fade from the dappled sunlight coming through the windows.
- Foam choice: If the treehouse isn’t climate-controlled, use “reticulated” foam (quick-dry foam) for cushions. It allows water and air to pass through, preventing mold growth inside the seat.
- Storage: I always advise clients to have a watertight deck box or a plastic bin inside the bench storage. During the off-season or heavy storms, soft goods go in the bin.
4. Lighting the Canopy: Ambiance vs. Safety
Lighting a treehouse is magical, but it requires careful planning regarding power sources. Bad lighting can make a small space feel like an interrogation room or a dark cave. You need three layers of light: ambient, task, and accent.
The Power Source Dilemma
Before selecting fixtures, determine your power situation.
- Hardwired: The best option but requires a licensed electrician to run a conduit up the tree. This allows for standard outlets and switches.
- Battery/Rechargeable: A viable option for low-use treehouses. There are excellent LED sconces now that attach magnetically and recharge via USB.
- Solar: Good for exterior safety lights, but often too dim or unreliable for interior task lighting.
Layering the Light
1. Ambient Light (General):
Avoid recessed can lights; they are too modern and difficult to install in thin roofs. Instead, use string lights draped across the ceiling beams.
Designer Tip: Choose “warm white” bulbs (2700K to 3000K). Anything higher (4000K+) will look blue and clinical, ruining the cozy vibe.
2. Task Light (Specific):
If you are reading or drawing, string lights aren’t enough. Use a clamp-on architect lamp attached to a shelf or a rechargeable table lamp.
3. Exterior Safety Light:
You must light the ladder, stairs, or bridge. Solar-powered step lights are perfect here. Place one on every other riser. It creates a welcoming glow and prevents accidents.
Common Mistakes + Fixes
Mistake: Over-lighting the exterior.
Fix: You don’t want to look like a landing strip. Too much light causes light pollution and disturbs the wildlife in the tree. Use downward-facing fixtures with shields to keep the light focused on the deck, not the sky.
5. Window Treatments and Privacy
Privacy in a treehouse is interesting. You are high up, so you are shielded from street view, but you might be visible to neighbors’ second-story windows. Furthermore, without curtains, a treehouse can feel like a “fishbowl” at night when the lights are on.
Hardware Challenges
Treehouses shift. If you install a rigid curtain rod wall-to-wall, it might buckle when the tree sways in a storm.
- The Solution: Use short rods over individual windows or tension wires that have a bit of give.
- Material: Use rust-proof hardware (stainless steel or brass). Standard curtain rods will rust quickly in the humidity.
Fabric Choices
I recommend sheer linens or open-weave cotton blends.
- Why Sheer? You want to see the leaves even when the curtains are drawn. Heavy velvet or blackout curtains feel too suffocating in a small, aerial space.
- Tie-backs: These are mandatory. On a breezy day, you want the curtains secured tightly so they don’t flap around and knock over vases or tea cups. Velcro tie-backs are safer than cords for children’s spaces.
Final Checklist: The Treehouse Ready-Check
Before you declare your creative oasis finished, run through this designer’s checklist to ensure longevity and comfort.
Structural & Safety
- Inspect the floor-to-tree and roof-to-tree connections; ensure gaskets are intact.
- Check that railings are at least 36 inches high (42 inches is better for adults).
- Ensure the spacing between railing balusters is less than 4 inches (to prevent kids or pets from slipping through).
- Verify that the ladder or stairs have non-slip treads installed.
Interior Setup
- Position heavy furniture near the structural supports/trunk.
- Verify all rugs are outdoor-rated (polypropylene).
- Test the “sit lines”—when seated, can you see out the window, or are you staring at a wall?
- Secure lightweight decor with museum putty to prevent sliding during wind.
Comfort & Utility
- Stock a watertight container with blankets and pillows.
- Install a battery-operated fan for airflow on stagnant summer days.
- Place a small fire extinguisher near the exit (essential for wood structures).
- Verify all light bulbs are warm white (2700K).
FAQs
Q: How do I keep bugs out of my decorated treehouse?
A: It is impossible to keep every bug out, but you can minimize them. Screen every window and vent; do not rely on glass alone. Seal gaps around the floor and roof with expandable foam or caulk. Avoid leaving food inside overnight. I also recommend wiping down surfaces with peppermint oil mixed with water; it’s a natural deterrent for spiders and mice.
Q: Can I put a real bed in a treehouse?
A: Yes, but weight is the concern. A traditional mattress is heavy. I recommend a high-quality futon mattress or a high-density memory foam topper on a built-in platform. This reduces weight significantly. If you use a real bed frame, ensure it is anchored to the floor so it doesn’t “walk” when the house moves.
Q: How do I decorate without nailing into the tree?
A: Never nail decor directly into the tree bark; it introduces disease. If you need to hang lights or art on the tree part itself, use specialized “tree-hugger” straps that rely on friction and expand as the tree grows. For the structure you built, feel free to use nails, but adhesive hooks (like heavy-duty Command strips) are great for lightweight items and don’t compromise the waterproofing of the walls.
Q: What is the best flooring for a treehouse interior?
A: I prefer natural wood tongue-and-groove, sealed with a marine-grade spar urethane. Avoid carpet (it holds moisture) and avoid floating laminate (it will buckle with humidity changes). If you need a softer surface, use interlocking foam tiles (great for kids) or large outdoor area rugs that can be removed and cleaned.
Conclusion
Designing a treehouse is one of the most playful exercises in interior design. It forces you to prioritize what actually matters: a comfortable place to sit, good light, and a view of the leaves. By focusing on weather-resistant materials and smart space planning, you can create a creative oasis that lasts for years rather than a single season.
Remember that this space is living. It will sway in the wind, it will creak, and the light will change dramatically with the seasons. Your decor should be flexible enough to adapt to these changes. Start with the basics—a good rug, a comfortable chair, and warm lighting—and let the tree dictate the rest.
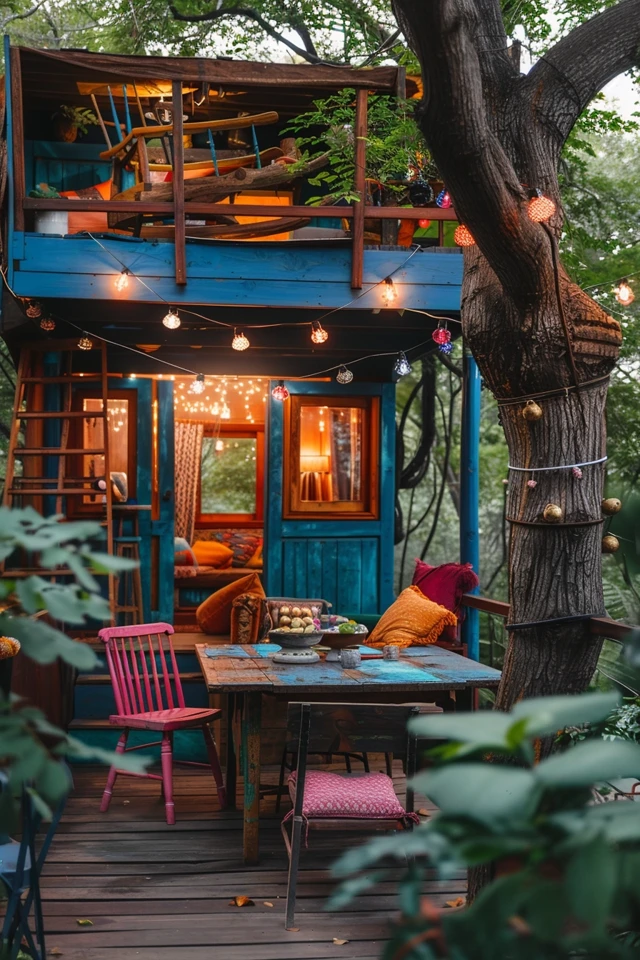
Picture Gallery


