
Unfinished Basement Gym Ideas to Energize Your Space
Turning a dark, concrete-filled basement into an inspiring home gym often feels like an impossible renovation project. You might see exposed pipes and dusty floors and assume you need thousands of dollars in drywall and electrical work before you can even buy a dumbbell. However, the “industrial” aesthetic is actually a massive trend in interior design right now, and an unfinished basement is the perfect canvas for it.
You do not need to finish the walls or hide every single joist to create a professional-grade workout space. By embracing the raw elements of the room and layering in strategic lighting, flooring, and zoning, you can build a gym that feels intentional rather than incomplete. It is about working with the architecture you have rather than fighting against it.
If you are looking for visual inspiration, be sure to scroll to the bottom of this post to see a complete Picture Gallery of these ideas coming to life.
1. Assessing the “Raw” Canvas and Moisture Control
Before bringing in equipment, you must address the physical reality of an unfinished basement. The biggest enemy of basement gyms is not the lack of drywall; it is moisture. If your space smells musty or feels damp, your equipment will rust and your time down there will be unpleasant.
Start by performing a simple moisture test on your concrete slab. Tape a 2-foot by 2-foot square of clear plastic sheeting to the floor and leave it for 48 hours. If the concrete is dark or there are water droplets under the plastic when you peel it up, you have moisture moving through the slab.
If moisture is present, you cannot lay rubber mats directly on the concrete. You will need a sub-floor moisture barrier or dimpled underlayment to allow airflow. Ignoring this step is the number one reason basement gyms develop mold issues later on.
Once moisture is managed, clean the space thoroughly. Concrete dust is pervasive and bad for your lungs during cardio. Use a shop vacuum with a HEPA filter to clean the joists and walls, then scrub the floor with a concrete cleaner.
Consider sealing the concrete floor even if you plan to cover it. A clear masonry sealer locks down the dust and makes the space feel cleaner instantly. It is an inexpensive weekend project that pays off by keeping your equipment dust-free.
2. The Foundation: Selecting the Right Flooring
The most critical design element in an unfinished gym is the flooring. Because you are working over concrete, standard foam puzzle mats are rarely sufficient. They often slide around, crumble under heavy weights, and provide zero thermal insulation against the cold slab.
For a true gym feel, I always recommend rubber horse stall mats or high-density commercial rubber rolls. These are typically 3/4-inch thick. This thickness protects your joints during plyometrics and protects your dropped weights from cracking the concrete foundation.
If you are on a budget or renting, horse stall mats (usually 4 feet by 6 feet) are the best value. They are heavy enough that they do not require adhesive, which means you can take them with you when you move.
For a more polished look, consider interlocking rubber tiles, but ensure they are at least 8mm thick. Anything thinner will curl at the edges over time. If your gym is for yoga or pilates, you might layer a large area rug over the rubber flooring to soften the visual and tactile experience.
Designer’s Note: The Cold Floor Factor
In my years designing home gyms, the most common complaint I hear post-installation is that the room is too cold to use in winter. Concrete sucks the heat right out of a room.
Real-world lesson: Do not skip the underlayment if you live in a cold climate. A simple layer of cork underlayment or specialized gym sub-flooring adds a thermal break. It makes floor exercises like crunches or stretching significantly more comfortable.
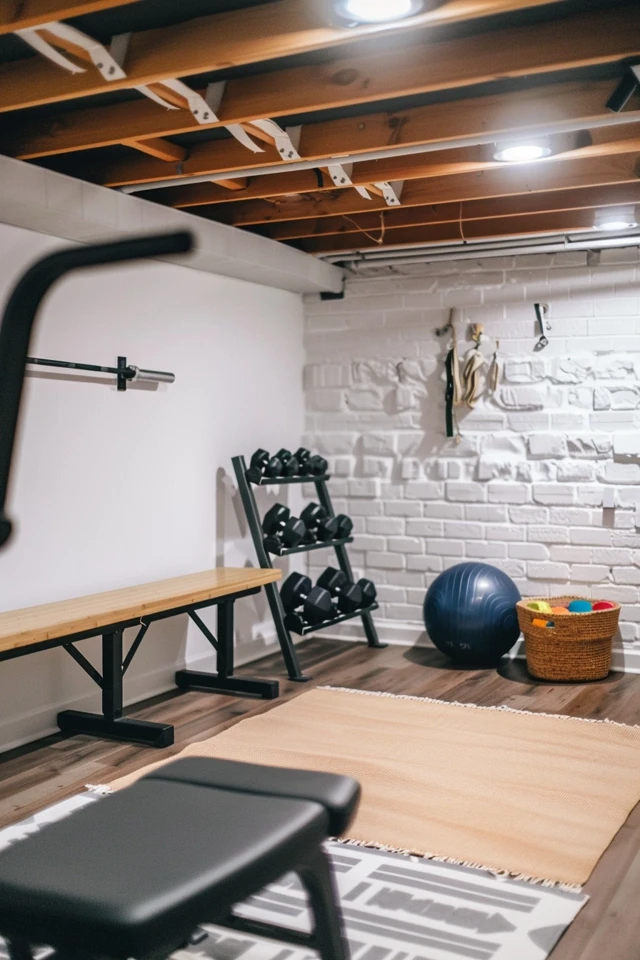
3. Lighting: transforming the Dungeon
Unfinished basements are notorious for having a single, sad lightbulb dangling from the ceiling. Lighting is the single most effective tool for changing the mood of a space, especially when you lack finished walls.
Avoid warm, yellow lighting (2700K or 3000K) in a workout space. It can make a basement feel sleepy and dim. Instead, aim for 4000K to 5000K LED bulbs. This “daylight” temperature mimics natural light and boosts energy levels.
Since you likely have exposed joists, you have a perfect mounting surface for clamp lights or industrial shop lights. You do not need an electrician to hardwire recessed lighting. Plug-in LED linkable shop lights are lightweight and can be hung with chains from the joists.
Layer your lighting to define zones. Use bright overheads for the lifting area, but consider adding dimmable string lights or LED strips along the perimeter for a yoga or cool-down zone. This allows you to switch gears mentally when the workout is winding down.
Common Mistakes + Fixes
Mistake: Relying on floor lamps.
Fix: Floor lamps take up valuable floor space and create trip hazards with cords. Always mount lights to the ceiling or walls in a gym setting.
Mistake: Using fluorescent tubes.
Fix: Old fluorescents hum and flicker, which causes eye strain. Swap them for LED tubes that fit standard fixtures or replace the fixtures entirely.
4. Zoning and Layout Logic
In an open, unfinished basement, clutter is visually overwhelming. Without walls to separate the furnace or the holiday storage bins from your treadmill, the space can feel chaotic. You need to create distinct zones using furniture placement and flooring transitions.
Position your cardio equipment—treadmills, ellipticals, bikes—facing into the room or toward a TV, never facing a blank concrete wall. Facing a wall makes a room feel smaller and the workout feel longer.
Leave adequate clearance for safety. For a treadmill, you need at least 6 feet of open space behind the machine in case you fall. For weight lifting, ensure you have a 5-foot radius around your bench for safe barbell movement.
Use open shelving units to create physical barriers without blocking airflow or light. Heavy-duty metal rack shelving fits the industrial vibe perfectly. Fill these shelves with towels, water bottles, and small weights to create a “gym wall” that blocks the view of the water heater.
If you have support columns in the middle of the room, do not view them as obstacles. Wrap them in mirrors or use them as anchor points for resistance bands and suspension trainers (like TRXs). This turns a structural annoyance into a functional station.
5. Aesthetic Upgrades for Unfinished Walls
You do not need drywall to make walls look good. In fact, painting exposed concrete walls is a fantastic way to brighten the space. Use a masonry paint in a crisp white to reflect light and make the basement feel larger.
If painting the walls isn’t an option, consider using textiles. heavy canvas drop cloths make excellent, inexpensive curtains. You can hang them from the floor joists using tension rods or stapling them directly to the wood to create a soft, neutral backdrop that hides ugly pipes or insulation.
Mirrors are essential for form correction and for bouncing light around a dark room. However, gluing mirrors to uneven concrete is risky. Instead, use a “leaning” method with large framed mirrors securely anchored to the wall with safety straps, or mount frameless mirrors onto a plywood backing that is then screwed into the concrete.
Don’t forget the ceiling. A popular designer trick for unfinished basements is “blacking out” the ceiling. By using a flat black dry-fall paint on the joists, pipes, and ductwork, you make the visual clutter disappear. The ceiling feels higher because your eye doesn’t catch on the details.
What I’d Do in a Real Project: Mini Checklist
If I were walking into your unfinished basement today to set up a gym with a $2,000 budget, here is exactly how I would prioritize the spend:
1. Clean and Seal ($100): Scrub everything. Apply a concrete dustproofer/sealer to the floor.
2. Lighting ($200): Install six 4-foot LED linkable shop lights (4000K temp) hung from joists.
3. Flooring ($600): Purchase horse stall mats for the heavy lifting zone. Use cheaper carpet tiles for the walkway/warm-up area to save money.
4. Mirrors ($150): Buy two large frameless door mirrors and mount them side-by-side on a sheet of plywood.
5. Climate ($250): Buy a high-quality dehumidifier. This is non-negotiable for odor and rust prevention.
6. Decor ($100): Hang canvas drop cloths to hide the HVAC unit. Add a large whiteboard for tracking workouts.
7. Equipment (Remaining budget): Focus on the essentials (rack, bar, plates) rather than expensive cardio machines initially.
Final Checklist for Your Gym Build
Before you call the project done, run through this final check to ensure safety and functionality.
- Air Quality: Is there a working dehumidifier running to keep humidity below 50%?
- Clearance: Is there vertical clearance for overhead presses? (Watch out for low-hanging ducts).
- Power: Are all extension cords heavy-duty gauge and taped down to prevent tripping?
- Safety: Is the heavy bag or suspension trainer mounted to a structural joist (not just blocking)?
- Connectivity: Is the Wi-Fi signal strong enough for streaming workouts or music? (You may need a mesh extender).
- Emergency: Do you have a carbon monoxide detector installed? (Basements with furnaces need this).
Frequently Asked Questions
Can I put a heavy gym rack on a floating floor?
Yes, but stability is key. If you are using puzzle mats, the rack might wobble. It is safer to cut out the mats where the rack feet sit so the rack rests directly on the concrete, or use solid rubber stall mats which act like a solid floor.
How do I stop the “basement smell”?
The smell is almost always mildew or mold. A dehumidifier is the first defense. Secondly, ensure you have airflow. If you don’t have windows, run a fan during workouts. Using an air purifier with a HEPA filter also helps remove dust and spores.
What is the minimum ceiling height for a basement gym?
Ideally, you want 7 feet. However, you can work with lower ceilings (6.5 feet) if you modify your movements. You might have to do seated shoulder presses instead of standing ones. Always measure your tallest piece of equipment (usually an elliptical or treadmill) and add your height plus 6 inches.
Is it safe to drill into the concrete floor?
Generally, yes, but you must be careful of radiant heating pipes or tension cables if your home uses them. For most standard slabs, drilling a few inches to anchor a squat rack is fine. However, a weighted rack usually doesn’t need bolting down unless you are moving serious weight.
Conclusion
Creating a gym in an unfinished basement is one of the most practical ways to add value to your home and your lifestyle. It removes the friction of driving to a health club and gives purpose to a neglected area of your house. The key is to stop waiting for the “perfect” renovation budget.
By focusing on the essentials—moisture control, proper rubber flooring, and bright lighting—you can create a space that is rugged, functional, and inviting. The industrial aesthetic works in your favor here, turning exposed beams and concrete walls into design features rather than eyesores. Start with the floor, light it up, and get moving.
Picture Gallery


