
Unlocking Speakeasy Basement Bar Ideas for Your Home
There is something inherently magical about walking down a flight of stairs and transporting yourself into a completely different era. The speakeasy aesthetic, born from the Prohibition era of the 1920s, relies on secrecy, moodiness, and intimacy. Unlike a standard open-concept family room, a basement speakeasy should feel like a discovered treasure, wrapped in shadows and rich textures.
Designing this space requires a shift in mindset from traditional residential logic. You aren’t trying to make the room feel bright and airy; you are actively trying to control the light and close the space in to create a “hug.” It is about creating a destination within your own home where the outside world melts away the moment you pour a drink.
Whether you are working with a sprawling unfinished basement or carving out a nook in a finished rec room, the principles of design remain the same. To see exactly how these moody spaces come together, be sure to check out the Picture Gallery at the end of the blog post.
1. Mastering the Moody Palette and Lighting
The single biggest failure point in DIY basement bars is lighting that is too bright, too cool, or too evenly distributed. A speakeasy lives in the shadows. You want to create pools of light rather than general illumination.
Start by banning standard overhead “can” lights unless they are on a high-quality dimmer and placed strategically away from seating areas. Instead, rely on layers of accent lighting. Wall sconces are your best friend here. They wash light down the walls, highlighting texture without hitting you in the eye.
When choosing light bulbs, pay attention to the Kelvin scale. For a residential speakeasy, you want 2200K to 2700K. Anything higher than 3000K will look like a dentist’s office and kill the vibe immediately.
Choosing Your Paint Colors
Fear is the enemy of a good speakeasy design. Many homeowners hesitate to paint a basement dark because they worry it will feel like a cave. In this specific design style, a cave is a good thing.
Designer’s Rule of Thumb: When painting a room dark, paint the ceiling and the trim the same color as the walls. This technique, known as color drenching, blurs the boundaries of the room. It actually makes low basement ceilings feel higher because your eye doesn’t stop at a stark white line.
Consider these color families for maximum impact:
- Deep Charcoal or Onyx: Provides a neutral backdrop that lets brass fixtures pop.
- Hunter or Forest Green: Pairs beautifully with brown leather and walnut wood.
- Oxblood or Burgundy: Creates an incredibly warm, vintage energetic feel.
- Navy or Midnight Blue: Offers a classic club feel that works well with cooler metal finishes.
2. The “Secret” Entrance and Layout Logic
To truly unlock the speakeasy vibe, the entrance matters. If you walk through a standard white 6-panel door, the illusion breaks before you even enter. The entry sets the psychological stage for the experience.
If your budget and structural framing allow, a hidden door is the gold standard. Murphy doors disguised as bookshelves are popular for a reason—they work. However, if a hidden door isn’t feasible, consider a heavy velvet curtain pulled across the opening. This dampens sound and adds an immediate tactile element.
Zoning and Flow Measurements
Space planning in a basement often involves dodging support columns and HVAC ductwork. Instead of fighting these, incorporate them into your bar design. A structural column can become the corner post of your bar or be wrapped in brick to look like an intentional architectural feature.
Key Layout Measurements:
- The Bartender’s Aisle: You need a minimum of 36 inches (3 feet) between the backbar and the front bar. If you have appliances opening into this aisle, aim for 42 inches to avoid collisions.
- Bar Overhang: For comfortable seating, the bar top should overhang the front wall by 10 to 12 inches. Anything less and your guests will bang their knees.
- Seating Clearance: Allow 24 inches of width per bar stool so guests aren’t elbowing each other.
- Walkway Behind Stools: Ensure there is at least 30 to 36 inches of clearance behind occupied stools for traffic flow.
3. Layering Rich Textures and Materials
A speakeasy should engage the sense of touch. If everything is smooth drywall and new polyester, it will feel sterile. You want materials that feel established, worn, and expensive (even if they aren’t).
Brick and Stone:
If you don’t have existing exposed brick, thin-set brick veneer is a fantastic alternative. It takes up less than an inch of floor space but adds immense character. For a grittier industrial look, consider a “German smear” mortar wash to age the brick instantly.
Wood Finishes:
Avoid light, Scandinavian-style woods. Lean toward walnut, mahogany, or stained oak. If you are building the bar yourself, using reclaimed wood can save money and add instant history. However, seal the bar top thoroughly. Alcohol is a solvent and will strip wax finishes; use a high-quality polyurethane or epoxy for the horizontal surfaces.
Metal Accents:
Unlacquered brass is the premier choice for this aesthetic because it develops a patina over time. It gets darker and richer the more it is touched. Use brass for foot rails, cabinet hardware, and light fixtures. Copper and matte black are also solid choices, but try to stick to one dominant metal to keep the look cohesive.
Designer’s Note: The Acoustics Problem
Here is the lesson I learned the hard way on an early project: Basements are echo chambers. Concrete floors and drywall bounce sound around aggressively. In a small, intimate bar, you don’t want voices to clamor.
The Fix: You must add soft goods.
- Use a vintage wool rug in the lounge area.
- Install acoustic panels on the ceiling (you can paint them black to hide them).
- Use velvet or heavy linen for any drapery.
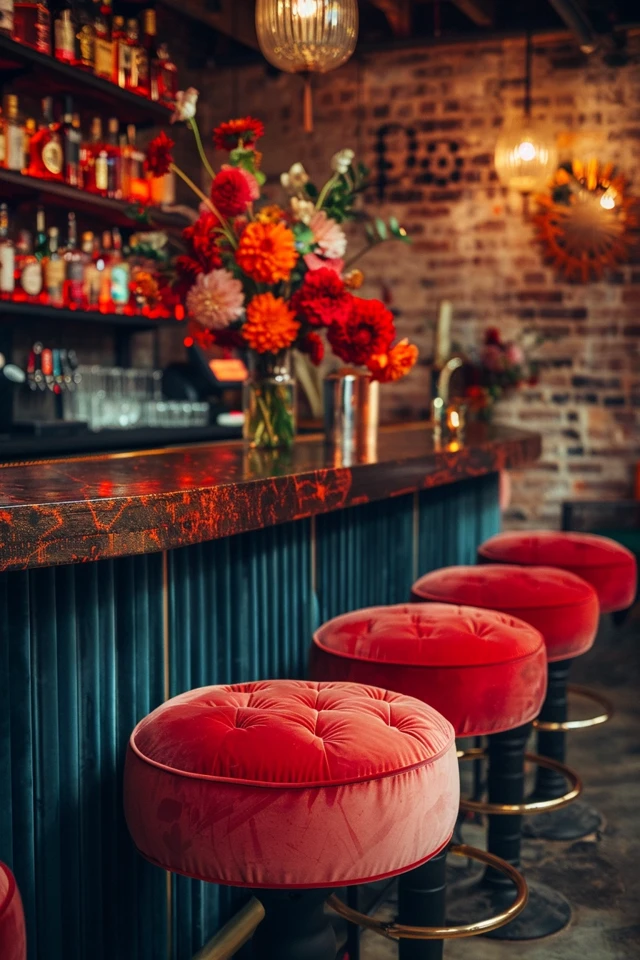
- Choose upholstered bar stools rather than metal or wood seats.
4. Designing the Backbar and Storage
The backbar is the focal point of the room. It is where you display your collection and set the tone. Functionally, it needs to work hard, but aesthetically, it needs to look like an art installation.
Avoid standard kitchen cabinetry uppers. They look too heavy and domestic. Instead, opt for open shelving made of glass or heavy wood with substantial brackets.
Mirror Magic:
Using an antiqued or “smoked” mirror as the backsplash for your shelving is a pro move. It reflects the amber glow of your liquor bottles and makes a small, dark basement feel twice as deep. Standard clear mirrors can feel too bathroom-like; the antiqued finish creates mystery.
Refrigeration and Plumbing
If you are running plumbing for a wet bar, the sink should be small and deep—a prep sink size. You don’t need a double-bowl kitchen sink.
For appliances like wine fridges or beverage centers, panel-ready options are ideal because they disappear into the cabinetry. If you use a glass-front fridge, be mindful of the internal light. A bright blue LED light inside a fridge can ruin the warm 2700K lighting scheme of the room. Look for units with warm internal lighting or the ability to turn the light off.
5. Furnishing for Intimacy and Comfort
Furniture selection tells your guests how to behave in the space. Low, lounge-style furniture encourages relaxing and staying awhile. Rigid furniture encourages a quick drink and an exit.
For the lounge area adjacent to the bar, look for a Chesterfield sofa or deep leather club chairs. Leather is durable, cleans up easily after spills, and smells great. If you have pets (or messy friends), distressed leather is forgiving; scratches just add to the patina.
The Bar Stool Debate
Buying bar stools is where many homeowners make a critical error regarding height.
Common Mistake: Buying “bar height” stools for a “counter height” surface, or vice versa.
- Counter Height: The surface is 36 inches high (standard kitchen height). You need stools with a seat height of 24 to 26 inches.
- Bar Height: The surface is 42 inches high (standard commercial bar height). You need stools with a seat height of 30 inches.
Always measure from the floor to the underside of the counter, then subtract 10 to 12 inches to find your ideal seat height. This ensures plenty of legroom.
What I’d Do in a Real Project: A Mini Checklist
If I were designing a speakeasy basement for a client tomorrow, this is the exact formula I would use to ensure success:
- Ceiling: Paint the exposed joists and ductwork Matte Black (Sherwin Williams Tricorn Black) to gain height without drywalling.
- Walls: Install picture frame molding (wainscoting) and paint the entire wall a deep plum or navy in a Satin finish.
- Flooring: Luxury Vinyl Plank (LVP) in a herringbone pattern. It’s waterproof (crucial for basements) but looks high-end.
- Countertop: Leathered Black Granite or Soapstone. It feels amazing to the touch and hides fingerprints.
- Lighting: Two sconces flanking the backbar mirror, and under-shelf LED tape light to illuminate the bottles.
- Decor: I would scour antique shops for old books, a vintage rotary phone, and unmatched crystal decanters.
Final Checklist for Your Speakeasy Build
Before you buy your first gallon of paint, run through this summary to keep your project on track.
1. Check your moisture levels.
Basements can be damp. Ensure your foundation is sealed and run a dehumidifier if necessary before bringing in expensive wood cabinetry.
2. Plan your electrical rough-in early.
You need outlets for the fridge, the icemaker, and convenient USB outlets for guests to charge phones at the bar.
3. Select durable fabrics.
Use performance velvet or top-grain leather. Avoid linen or light cottons that will stain with red wine spills.
4. Plan for trash.
It is the most forgotten element. dedicated a pull-out cabinet for a trash bin so it isn’t sitting out in the open.
5. Test your paint.
Dark colors look drastically different in a basement with no natural light than they do in the hardware store. Buy samples and paint large swatches on the wall.
FAQs
How much does it cost to build a basement speakeasy?
A DIY dry bar (no plumbing) using stock cabinets can be done for $2,000–$5,000. A fully contracted wet bar with custom cabinetry, plumbing, and electrical work usually ranges from $15,000 to $30,000+ depending on finishes.
Do I need a sink (wet bar) or can I do a dry bar?
You do not strictly need a sink. A dry bar is perfectly functional for mixing drinks if you have a kitchen upstairs. However, a sink adds significant convenience for washing glasses and dumping ice, and it increases the resale value of the home more than a dry bar.
How can I make my low basement ceilings look higher?
As mentioned, paint the ceiling dark. Also, keep furniture low-profile. Low-backed sofas and chairs increase the vertical void space, tricking the eye into thinking the ceiling is higher than it is. Vertical striped wallpaper or vertical shiplap can also help elongate the walls.
What is the best flooring for a basement bar?
Luxury Vinyl Plank (LVP) or engineered hardwood are the best options. They handle humidity changes better than solid hardwood. Tile is durable but can be cold; if you use tile, consider installing radiant floor heating mats underneath for comfort.
Conclusion
Creating a speakeasy in your basement is about more than just a place to store liquor. It is an exercise in atmosphere and storytelling. By controlling the light, embracing dark and rich colors, and prioritizing comfortable textures, you can turn an underutilized storage space into the most popular room in your house.
Remember that this style thrives on imperfection. A little bit of wear on the leather, a dull shine on the brass, and a moody shadow in the corner are exactly what make the space feel authentic. Take your time with the layout, measure your clearances twice, and don’t be afraid to go darker with your paint than you think you should. The result will be a timeless escape right beneath your feet.
Picture Gallery


