
Upcycling Charm: Old Bicycle Garden Ideas
Introduction
There is something inherently nostalgic about a vintage bicycle. It evokes memories of lazy summer afternoons, the freedom of childhood, and a slower pace of life that many of us try to recapture in our home environments. When you take that mechanical nostalgia and combine it with the organic beauty of a blooming garden, you create a focal point that is both whimsical and structured.
However, integrating a bicycle into a landscape design requires more than just leaning a rusty frame against a tree. If you are looking for visual inspiration regarding placement and color, don’t miss the curated Picture Gallery at the end of this article. To make it look intentional rather than like forgotten junk, we have to apply specific design principles regarding color, stability, and scale.
In my years as a designer, I have found that upcycled garden features often spark the most conversation during backyard gatherings. This guide will walk you through the practical steps of preparing, painting, planting, and placing an old bicycle so it becomes a stunning, permanent fixture in your landscape.
Preparing the Frame: Structural Integrity and Safety
Before we get to the pretty flowers, we have to deal with the mechanics of the bike. The biggest mistake homeowners make is assuming the bike is “garden ready” just because it is old. You must remove the grease and chain oil first.
Use a heavy-duty degreaser on the chain, gears, and pedals. If you leave this oil on, it can seep into the soil and harm your plants, or prevent your paint from adhering properly. Once degreased, give the entire frame a rigorous scrub with warm, soapy water and a stiff-bristled brush.
Next, address the rust. While some rust adds character, structural rust can cause the bike to collapse under the weight of wet soil and heavy pots. Use a wire brush or 80-grit sandpaper to remove loose flakes. If you want to keep the “patina” look, seal the rust with a clear matte polyurethane coat to stop the corrosion from spreading.
Stabilizing the Bike
A bicycle filled with soil-heavy baskets is top-heavy and dangerous if not secured. A kickstand is never enough support for a garden display, especially if you have pets or children running around.
Designer’s Note: In my projects, I never rely on the bike’s own balance. I always create a subterranean anchor. The most effective method is to use U-shaped rebar landscaping staples. Drive them at least 10 inches into the ground over the bottom bracket (where the pedals attach) or over the bottom of the wheel rims.
If the bike is placed on a patio or hardscape, you cannot use stakes. In this case, you must create a wider base. I recommend welding or bolting the axles to a flat steel plate, or wedging the tires firmly between heavy decorative stones or concrete planters to lock them in place.
Choosing a Color Palette and Finish
The color you choose for your bicycle planter will dictate the mood of the entire garden corner. As with interior design, we look at the surroundings to determine the best approach.
If your garden is chaotic, wild, and full of multicolored cottage flowers, a white or cream bicycle acts as a neutral “pause.” It provides a clean structure that lets the flowers shine without adding visual clutter.
Conversely, if your landscaping is heavy on evergreens, ornamental grasses, or monochromatic shrubs, a bright pop of color is necessary. A fire-engine red, electric teal, or sunny yellow bike becomes a sculptural art piece against the green backdrop.
Application Techniques
Spray paint is the most practical choice for the tubular frame of a bike. However, application matters.
- Prime first: Use a metal-bonding primer. Vintage bikes often have a mix of steel, aluminum, and chrome. Primer ensures an even topcoat.
- Thin coats: Apply three thin coats rather than one thick one. Drips on a bike frame are very noticeable and hard to sand out.
- The Finish: I generally recommend a satin or semi-gloss finish. High gloss can look too “plastic” in a natural setting, while flat matte attracts dirt and is harder to spray clean with a hose.
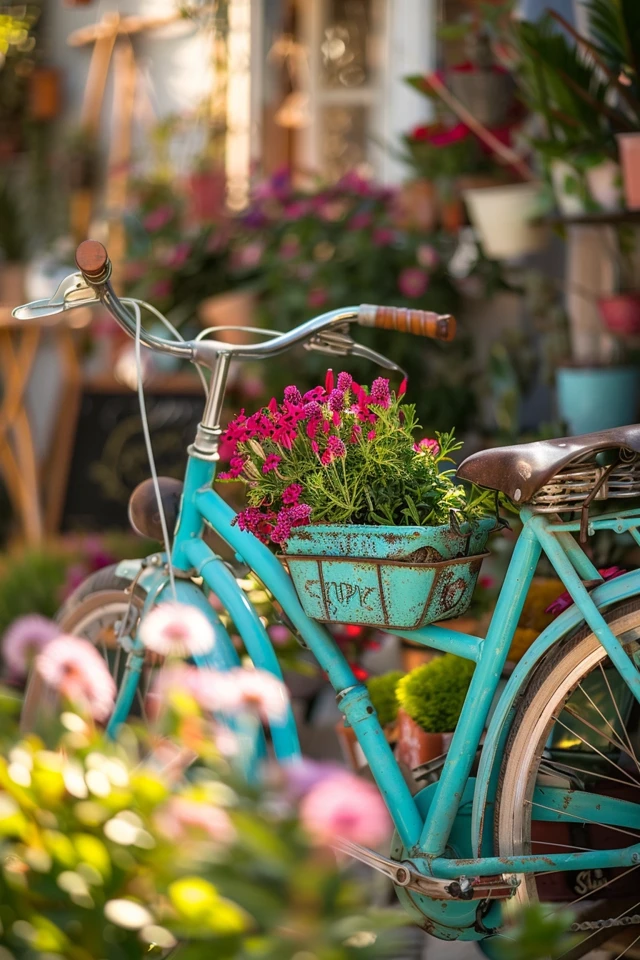
Selecting the Right Vessels: Baskets and Panniers
The “vessels” are the containers attached to the bike that will hold your plants. The traditional front basket is the most obvious choice, but it is rarely enough to create a lush look.
To create visual balance, you need weight on the back of the bike as well. I recommend installing rear pannier baskets or mounting a wooden crate over the rear tire. This creates symmetry and allows you to plant roughly the same volume of flowers on both ends.
Drainage and Liners
This is the most critical technical detail. Most vintage bike baskets are wire or wicker, which cannot hold soil on their own. You must line them.
Cocoa fiber liners (coco liners) are the industry standard. They look natural and hold soil while allowing excess water to drain freely. If you use a wooden crate or a solid metal bucket, you must drill at least four 1/2-inch drainage holes in the bottom. Without drainage, the roots will rot within two weeks.
Scale and Proportion
The size of the basket must relate to the size of the bike. A tiny wire basket on a large men’s cruiser looks comical.
- Front Basket: Should be at least 12 inches wide and 8 inches deep to support a healthy root system.
- Rear Crate: Can be larger, up to 14 inches wide. Deeper containers (8-10 inches) require less frequent watering, which is vital for above-ground containers exposed to wind and sun.
Strategic Planting for “The Thriller, Filler, Spiller” Effect
Designing the plant layout for a bicycle is similar to designing a window box. Because the bike is a hard, linear object with spokes and bars, you want plants that soften these edges.
I strictly follow the “Thriller, Filler, Spiller” formula for these small containers.
- The Thriller: This is your height. Place a spikey grass or a tall geranium in the center or back of the basket. It draws the eye up.
- The Filler: These are mounding plants that fill the mid-ground. Impatiens, begonias, or petunias work well here to hide the soil surface.
- The Spiller: This is essential for bike planters. You want trailing plants that hang down over the sides of the basket and potentially weave through the spokes.
Best “Spiller” Plants for Bikes
- Sweet Potato Vine: Fast-growing and comes in bright lime green or deep purple.
- Creeping Jenny: Excellent for partial shade; the chartreuse color pops against dark metal frames.
- Ivy: A classic choice for a vintage look. You can train ivy to wrap around the handlebars or frame.
- Lobelia: Creates a waterfall of intense blue color, perfect for smaller baskets.
Common Mistake + Fix:
Mistake: Underestimating water needs. Baskets on bikes are surrounded by air flow on all sides, meaning they dry out twice as fast as ground plants.
Fix: Mix water-retaining hydro-gel crystals into your potting soil before planting. This reduces watering frequency from twice a day to once a day during peak summer heat.
Placement and Integration in the Landscape
Where you put the bike is just as important as how it looks. A common error is placing the bike “floating” in the middle of a large lawn. This lacks context and makes the bike look like an obstacle for the lawnmower.
Anchoring the View
Place the bike near a vertical element to ground it. This could be against a wooden fence, leaning near a tree trunk, or positioned next to a garden shed. The vertical element provides a backdrop that frames the bike.
Surface Considerations
If you place the bike directly on grass, the tires will eventually sink, and the grass will grow up through the spokes, making maintenance a nightmare.
What I’d do in a real project: I create a small “pad” for the feature. I remove the sod in a rectangle slightly larger than the bike (about 3 feet by 6 feet). I lay down landscape fabric and cover it with crushed gravel or river rock. This creates a designated stage for the sculpture, makes weed whacking easier, and keeps the metal rims out of the damp soil.
Sight Lines
Consider the view from inside your home. A bicycle planter creates a lovely silhouette. Position it so the profile of the bike is visible from your kitchen window or patio door. Avoid angling it straight on; a 45-degree angle or a full side profile usually offers the most pleasing composition.
Seasonal Updates
One of the benefits of a bicycle garden feature is its versatility through the seasons. You don’t have to put it away when summer ends.
Fall: Remove the summer annuals. Fill the baskets with hay or straw. Place pumpkins and gourds in the baskets and around the base of the tires. Wrap faux autumn leaf garlands around the top tube.
Winter: If you live in a snowy climate, clear coat the metal to protect it. Fill the baskets with cut evergreen boughs, pinecones, and birch logs. Weaving battery-operated, outdoor-rated fairy lights through the wheels creates a magical effect against the snow.
Spring: Fill the baskets with cold-hardy pansies or forced tulip bulbs as soon as the frost breaks. This signals the start of the new growing season.
Final Checklist: The Designer’s Standard
Before you consider your project complete, run through this checklist to ensure longevity and professional aesthetics.
- Prep: Is all grease removed from the chain and gears?
- Rust: Is existing rust sanded down or sealed with a clear coat?
- Drainage: Do all containers (baskets, crates) have holes or permeable liners?
- Stability: Is the bike staked into the ground or bolted to a base? (Push it gently; if it wobbles, it’s not safe).
- Tires: Are the tires inflated? (Flat tires look sad). If they won’t hold air, fill them with expanding foam spray to keep their shape.
- Scale: Does the bike look proportional to the space?
- Hydration: Is the soil amended with moisture-retaining crystals?
FAQs
Q: Can I use a child’s bicycle?
A: Yes, children’s bikes (especially tricycles) are charming in smaller flower beds or near entryways. However, because they are lower to the ground, use smaller plants like succulents or pansies so the flowers don’t overwhelm the small frame.
Q: How do I stop the tires from rotting?
A: Rubber degrades in sunlight. Apply an automotive rubber protectant spray once a season. Alternatively, if the rubber is too far gone, remove the tires completely and paint the metal rims a contrasting color for an industrial, skeletal look.
Q: Can I plant directly in the bike frame tubes?
A: Generally, no. The tubes are too narrow to hold enough soil for root survival, and they heat up rapidly in the sun, which cooks the roots. Stick to attached baskets and containers.
Q: What if I don’t have a basket?
A: You can get creative. Use hose clamps to attach galvanized buckets, wooden wine crates, or even old metal mailboxes to the rear rack or handlebars. Just ensure they have drainage holes.
Conclusion
Transforming an old bicycle into a garden feature is one of the most rewarding weekend projects you can undertake. It saves a piece of history from the landfill and adds a layer of story and personality to your outdoor space.
By following the rules of stability, scale, and proper planting preparation, you move beyond a simple DIY craft and create a genuine landscape design element. The key is in the details: the preparation of the metal, the selection of the color, and the health of the plants.
When done correctly, your upcycled bicycle will not just be a planter; it will be a landmark in your garden that evolves with the seasons. It invites you to stop, look, and appreciate the blend of mechanical history and natural beauty.
Picture Gallery


