
Title: Utah Xeriscape Ideas for Water-Wise Gardens
Introduction
Designing a garden in Utah presents a unique set of challenges that go beyond simple aesthetics. Between the scorching dry heat of July and the heavy snow loads of January, your outdoor space needs to be resilient, functional, and beautiful. For a visual dose of inspiration, be sure to check out the curated Picture Gallery at the end of the blog post.
Many homeowners hear “xeriscape” and immediately picture a barren wasteland of gravel and a solitary cactus. That is actually “zero-scaping,” and it is the opposite of what good design should achieve. True xeriscaping involves lush, drought-tolerant planting, smart irrigation, and creating outdoor rooms that extend your living space.
In my years as a designer, I have learned that the key to a successful Utah landscape is working with the high-desert environment rather than fighting against it. By selecting native plants and using local stone, you create a home that feels grounded in its setting while significantly lowering your water bill.
1. Master the Art of Hydro-Zoning
The most critical step in planning a water-wise garden is hydro-zoning. This is a layout strategy where you group plants based on their water and sunlight requirements. It prevents the common mistake of over-watering drought-tolerant plants just to keep a thirsty neighbor alive.
Zone 1: The Oasis Zone
This is the area closest to your house, usually surrounding the patio or deck. Because it is highly visible and easily accessible, this is where you place plants that need regular water. I often use pots and planters here for high-maintenance annuals. This keeps the water use contained and creates a lush focal point right where you sit.
Zone 2: The Transition Zone
Moving away from the house, this zone blends moderate water use with drought tolerance. This area usually benefits from runoff from the roof or patio. Native ornamental grasses and hardy perennials thrive here. Design this space to bridge the gap between the manicured look of the house and the wilder edges of the property.
Zone 3: The Native Zone
The furthest area from the water source should be devoted to plants that can survive on rainfall alone once established. In Utah, this includes tough natives like Sagebrush, Rabbitbrush, and Penstemon. This zone requires the least maintenance but provides essential habitat for local pollinators.
Designer’s Note: The “Rule of Three”
When arranging plants within these zones, avoid planting one of everything. It creates a chaotic, polka-dot effect. Instead, plant in odd-numbered clusters (3, 5, or 7).
Grouping three Russian Sages together creates a drift of color that reads as a deliberate design choice. It also makes maintenance easier since you are treating a clump as a single unit rather than hunting for individual stems.
2. Hardscaping: The Backbone of the Design
In interior design, flooring dictates the flow of a room; in landscape design, hardscaping does the same. Because xeriscaping reduces the amount of lawn, your hardscape materials become the dominant visual element.
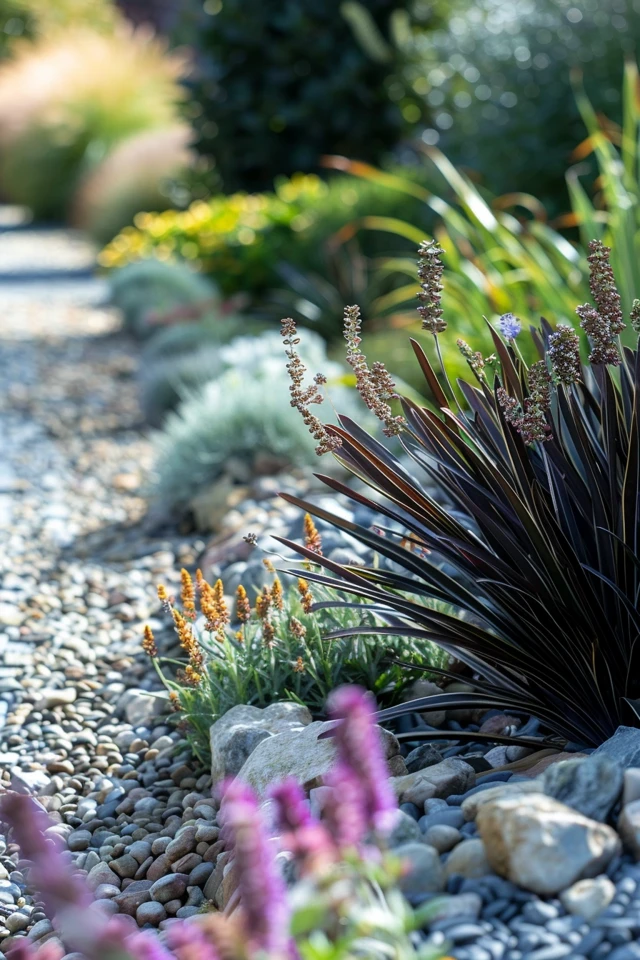
Choosing the Right Stone
Utah landscapes look best when using materials native to the region. I recommend red sandstone or warm-toned quartzite to complement the natural soil colors. Avoid stark white marble chips or black lava rock. White rock reflects too much heat, burning plant leaves, while black rock absorbs heat and cooks the root systems.
Scale and Proportion
A common error in DIY landscaping is making walkways too narrow. A primary path should be at least 48 inches wide to allow two people to walk side-by-side comfortably. Secondary paths can be 30 to 36 inches wide.
If you are using flagstone pavers, ensure the gaps between stones are no wider than 2 to 3 inches. Any wider, and it becomes difficult to move furniture or walk in heels. Fill these gaps with decomposed granite (DG) or polymeric sand to lock them in place and prevent weeds.
Common Mistakes + Fixes
Mistake: Laying gravel directly on top of soil without a barrier or base.
Fix: Always excavate 3 to 4 inches of soil first. Lay down a commercial-grade landscape fabric (not the cheap plastic stuff), then a layer of road base, and finally your decorative gravel. This ensures stability and prevents the rocks from sinking into the Utah clay.
3. Selecting Plants for the High Desert
Utah is generally USDA Hardiness Zone 5 to 7, depending on your elevation. You need plants that can handle 100-degree summers and sub-zero winters.
The Structural Shrubs
Start with your “furniture” plants—the large shrubs that provide structure.
- Curl-Leaf Mountain Mahogany: An evergreen native that can be pruned into a small tree or hedge. It requires almost zero water once established.
- Gro-Low Sumac: excellent for ground cover on slopes. It turns a brilliant red in the autumn.
- Cliffrose: Offers creamy yellow flowers and a sweet fragrance in the spring.
Color and Texture
To avoid a garden that looks brown for half the year, layer in perennials with long bloom times.
- Munstead Lavender: Thrives in alkaline soil and provides that classic English garden feel with a fraction of the water.
- Russian Sage: Provides a hazy purple texture that softens the hard edges of stone walls. Give this plant plenty of room; it can easily spread to 4 feet wide.
- Red Yucca: Adds architectural interest with its spikey leaves and tall flower stalks. It is a hummingbird magnet.
Grasses for Movement
Static gardens feel heavy. Grasses catch the wind and add movement.
- Karl Foerster Grass: The gold standard for vertical accents. It stays upright even under snow.
- Blue Fescue: Great for small mounding borders along walkways.
What I’d Do in a Real Project: Winter Interest
I always plan for winter views. When the garden is covered in snow, you need shapes that poke through. I leave ornamental grasses uncut until late February. The dried stalks look sculptural against the white snow and provide shelter for birds. I also incorporate Red Twig Dogwood, which reveals bright red stems after its leaves drop.
4. Creating Outdoor Living Rooms
Xeriscaping is not just about plants; it is about expanding your livable square footage. We treat the patio exactly like a living room, just without the ceiling.
Defining the Space
Without walls, you need other cues to define the area. I often use an outdoor rug to ground the seating arrangement. For Utah’s intense UV rays, look for UV-stabilized polypropylene rugs. They resist fading and can be hosed off.
Ensure the rug is large enough that the front legs of all furniture pieces sit on it. For a standard conversation set, an 8×10 rug is usually the minimum size.
Furniture Selection
Avoid dark metal furniture if it will be in direct sun; it becomes dangerously hot. I prefer teak or powder-coated aluminum in lighter colors.
If you are renting or on a budget, you don’t need built-in masonry. A simple decomposed granite pad framed with steel edging creates a professional-looking “floor” for a fire pit area. It costs a fraction of pouring concrete.
Shade Strategies
In Utah, shade is non-negotiable. If you don’t have a covered patio, use a cantilever umbrella or install a shade sail.
Pro Tip: Position your shade structure to block the late afternoon western sun, which is the harshest and hottest part of the day.
5. Irrigation and Soil Prep
This is the unglamorous part of design that dictates the longevity of your investment. Utah soil is notoriously heavy in clay, which drains poorly and suffocates roots.
Amending the Soil
Before planting a single thing, you must amend the soil. I recommend tilling in 3 to 4 inches of expanded shale or organic compost to a depth of 6 to 8 inches. This creates pockets for air and water to move through the clay.
Drip vs. Spray
Switching from spray heads to drip irrigation is the single most effective water-saving move. Drip lines deliver water directly to the base of the plant, reducing evaporation and weed growth.
For rocky or xeriscaped beds, use inline drip tubing (often brown or black) with emitters spaced every 12 or 18 inches. Cover the tubing with mulch to protect it from the sun and hide it from view.
Mulch Matters
In a xeriscape, mulch is insulation. It keeps the soil cool in summer and warm in winter.
For planting beds, I prefer a heavy shredded bark mulch applied 3 to 4 inches deep. It knits together and resists blowing away in canyon winds. Avoid “dyed” mulches (red or black), which look artificial and fade quickly.
Final Checklist: The Designer’s Approach
If I were consulting on your property today, this is the exact order of operations I would follow. Use this checklist to keep your project on track.
Phase 1: Analysis & Prep
- Map out sun patterns (where does the shadow fall at 5 PM?).
- Test soil drainage (dig a hole, fill it with water, see how fast it drains).
- Kill existing grass. Sod cutting is fastest; sheet mulching (cardboard + mulch) is easiest but takes months.
Phase 2: Hardscape & Infrastructure
- Install retaining walls, patios, and large boulders first.
- Run irrigation mainlines and electrical conduit for lighting.
- Install edging to separate gravel areas from planting beds. Steel edging offers the cleanest modern line.
Phase 3: Planting & Finish
- Place plants while they are still in pots to check spacing.
- Stand back and view from the kitchen window (your primary view).
- Plant high to allow for settling (keep the root flair slightly above grade).
- Run drip lines to each plant.
- Apply 3-4 inches of mulch or rock top dressing.
FAQs
Can I xeriscape if I have dogs?
Absolutely. However, you need to choose your ground cover carefully. Rounded river rock (3/4 inch to 1 inch) is gentle on paws, whereas crushed gravel has sharp edges. Avoid cocoa mulch, which is toxic to dogs. Many homeowners opt for a small patch of drought-tolerant buffalograss specifically for pets, surrounding it with xeriscaping.
Will removing my lawn lower my property value?
In the past, perhaps. Today, a well-designed water-wise landscape often increases value. It signals “low maintenance” to potential buyers. The key is “well-designed.” A yard of just weeds and dirt will lower value, but a curated landscape with defined outdoor living areas adds significant appeal.
How much maintenance does a xeriscape really need?
It is low maintenance, not “no maintenance.” You will still need to weed, especially in the first two years while plants fill in. You will also need to prune shrubs once a year in late winter or early spring. However, you eliminate the weekly chore of mowing and edging, which saves roughly 20-30 hours of labor per summer.
My HOA requires a percentage of turf. What do I do?
Check the specific language of your bylaws. Many Utah HOAs are revising rules to allow for “water-wise landscaping” provided it covers a certain percentage of the ground (usually 50-75% plant coverage at maturity). You can often present a professional plan showing mature plant sizes to get approval.
Conclusion
Embracing a xeriscape design in Utah is about shifting your perspective on what a garden should be. It is moving away from the thirsty, high-maintenance English cottage ideal and leaning into the rugged, architectural beauty of the West.
By focusing on hydro-zoning, investing in proper soil preparation, and treating your outdoor space with the same design rigor as your living room, you create a sanctuary that thrives in our climate. The result is a home that feels seamlessly connected to its environment—and a summer schedule that isn’t dictated by lawn mowing.
Picture Gallery


