
Warm Up Your Space: Fireplace Accent Wall Ideas
The fireplace is rarely just a heat source; in most homes, it is the undisputed anchor of the living room. However, I often walk into homes where the fireplace feels like an afterthought, floating on a blank white wall or looking undersized for the room. An accent wall is the most effective tool in a designer’s kit to correct scale issues, add architectural interest, and inject personality into a space.
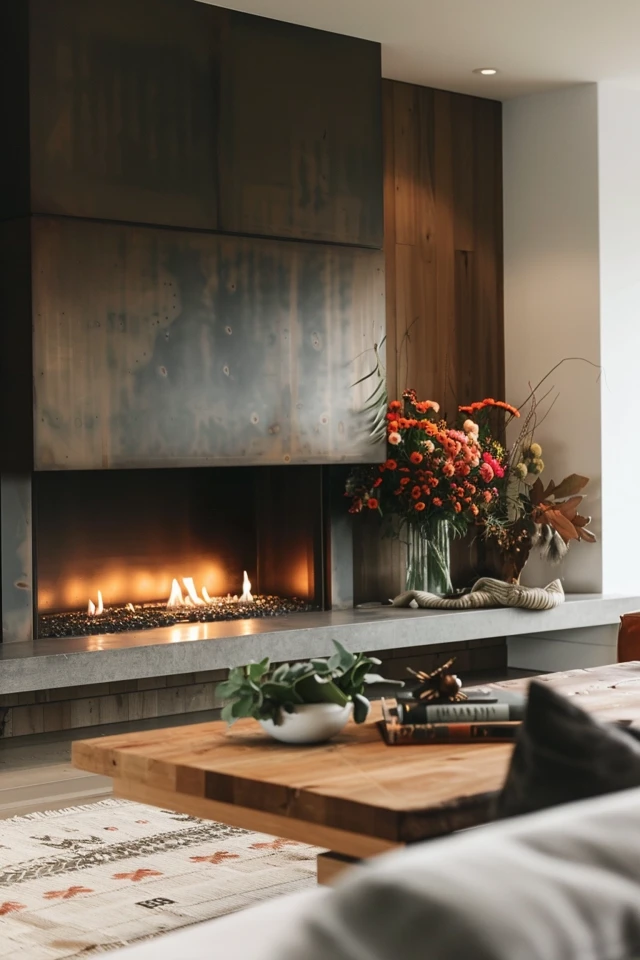
When I design a fireplace wall, I am looking for a balance between texture, warmth, and durability. It is not just about slapping some paint on the drywall; it is about creating a focal point that draws the eye and grounds your furniture layout. Whether you are dealing with a standard builder-grade gas insert or a vintage brick hearth, the surrounding wall is where the real design magic happens.
For a huge dose of visual inspiration, scroll down to the curated Picture Gallery at the end of this blog post.
1. Material Matters: Stone, Tile, and Slab
Selecting the right cladding material is the first decision that sets the tone for the entire room. In my projects, I categorize materials by the “vibe” they create: rustic, transitional, or modern.
Natural Stone and Ledger Panels
For a rustic or organic modern look, stacked stone or ledger panels are the go-to standard. They add incredible depth because of their irregular surface. When using ledger stone, I always recommend taking the stone all the way to the ceiling. Stopping halfway up creates a visual “stumpiness” that lowers the perceived height of the room.
Porcelain and Ceramic Tile
If you want something cleaner, large-format porcelain tile is a fantastic option. Currently, I am specifying a lot of 24″ x 48″ tiles that mimic the look of concrete or oxidized metal. These large tiles mean fewer grout lines, which makes the wall look less busy and more expensive.
Slab Stone (Marble, Quartzite, Granite)
This is the luxury choice. A book-matched marble slab creates a stunning piece of natural art. However, it requires precise fabrication. You must consider the weight; your wall framing may need reinforcement to hold a heavy slab.
Designer’s Note:
Always request “non-combustible” adhesive and grout when tiling a fireplace surround. Standard thin-set can fail over time due to the heat cycles of the fireplace, causing tiles to pop off.
Common Mistakes + Fixes:
- Mistake: Using busy, small-scale mosaic tiles on a massive wall. This creates a dizzying “grid” effect that looks dated.
- Fix: Stick to tiles larger than 12 inches on at least one side. If you love a small mosaic, limit it to the immediate surround (the 6-12 inches directly around the firebox) and use a calmer material for the rest of the wall.
2. The TV Dilemma: Integration vs. Concealment
The most common question I get is: “Can I put the TV above the fireplace?” The honest answer is yes, but with strict caveats regarding ergonomics and heat safety.
The Height Issue
Ideally, the center of a TV screen should be at eye level when seated, which is roughly 42 to 48 inches from the floor. A fireplace mantel is usually 54 to 60 inches high. This means your TV ends up too high, leading to neck strain.
To solve this, I often recess the TV niche into the wall so the screen sits flush. I also highly recommend mounting hardware that allows the TV to pull out and drop down over the mantel when in use. Brands like MantelMount are standard in my designs for this exact reason.
Heat Management
Electronics hate heat. If you have a wood-burning fireplace or a high-output gas unit, you need a mantel that acts as a heat deflector. The mantel should extend at least 8 inches from the wall to divert rising heat away from the screen.
The “Frame” Solution
If the TV must be there, make it look like art. The Samsung Frame TV is an industry favorite because it displays art when off and has a matte finish. When I use these, I often build a custom frame around the TV that matches the millwork of the accent wall, effectively camouflaging the technology.
What I’d do in a real project:
- Check the manufacturer’s clearance requirements for the specific fireplace model before framing the wall.
- Install a “smurf tube” (conduit) behind the drywall from the TV location to a side cabinet. This allows you to thread HDMI cables through later without cutting into the wall.
- Ensure the electrical outlet is recessed so the TV bracket can sit flat against the wall.
3. Expanding the Footprint: Built-ins and Millwork
A fireplace accent wall should rarely be just the width of the fireplace itself. To make a room feel grand, we want to expand the visual footprint horizontally. This is usually achieved through built-ins or millwork that spans the entire wall.
Symmetry vs. Asymmetry
Symmetry (matching shelves on both sides) is traditional and formal. It brings a sense of calm and order. However, if your fireplace is off-center—common in mid-century homes—embrace asymmetry. Put a low bench with wood storage on the long side and a piece of statement art on the short side.
Measurement Rules for Shelving
When designing built-ins, depth is critical.
- Base Cabinets: Should be 18 to 24 inches deep to store board games, blankets, and AV equipment.
- Upper Shelves: Should be shallower, typically 12 to 14 inches. This step-back prevents the room from feeling closed in.
- Vertical Spacing: Allow 12 to 15 inches of height between shelves. Adjustable shelves are always better than fixed ones because your decor needs will change.
Millwork Textures
If open shelving feels like too much dusting, consider cladding the flanking walls in shiplap, tongue-and-groove, or vertical board-and-batten. Painting the millwork the same color as the fireplace wall creates a seamless, sophisticated block of color.
Designer’s Note:
Do not push the built-ins right up against the fireplace surround. Leave a “breathing room” gap of at least 4 to 6 inches of drywall or stone between the side of the fireplace material and the start of the cabinetry. This separation makes the design look intentional rather than crowded.
4. Paint and Color: The Budget-Friendly Transformation
You do not need to spend thousands on stone to have an incredible accent wall. Paint is transformative, provided you choose the right finish and color.
The Power of “Color Drenching”
A current trend I love is “color drenching.” This involves painting the fireplace bump-out, the baseboards, the mantel, and even the flanking built-ins all the same color. This monochromatic look is incredibly chic and creates a unified texture.
Choosing the Right Sheen
The sheen of the paint is as important as the color.
- Matte/Flat: great for hiding imperfections in drywall, but difficult to clean. I avoid this if you have a real wood-burning fire due to soot.
- Eggshell/Satin: The sweet spot. It has a slight glow and is wipeable.
- Semi-Gloss: Save this for the mantel and trim only. Using this on a large wall can cause glare from lighting, which looks cheap.
Dark vs. Light
Dark colors (charcoal, navy, forest green) make a fireplace recede visually, which can make a TV look less obtrusive. Light colors (creams, warm greys) highlight the texture of the material. If you have a beautiful brick texture, painting it white will highlight the shadows in the mortar lines.
Common Mistakes + Fixes:
- Mistake: Painting the brick but leaving the inside of the firebox the original dirty beige color.
- Fix: Use high-heat spray paint (specifically formulated for grills or engines) in matte black to spray the inside of the firebox. This makes the fire pop and makes the unit look brand new.
5. Lighting the Wall: The Secret Ingredient
You can install the most expensive stone in the world, but if you do not light it properly, it will look flat. Lighting is what brings out the texture and drama of an accent wall.
Wall Grazing
This is the technique of placing recessed lights close to the wall to highlight texture. I typically place gimbal (adjustable) LED recessed cans about 12 to 18 inches away from the fireplace wall. I angle the light to wash down the face of the stone or tile. This creates shadows that emphasize the 3D nature of the material.
Sconces
Wall sconces add a layer of jewelry to the space. I like to place them flanking the fireplace or above the built-ins.
- Height: Mount sconces roughly 60 to 66 inches from the floor to the center of the junction box.
- Scale: Ensure the sconce is not too small. A fixture that is 12 to 18 inches tall usually has the right presence for a living room.
Picture Lights
If you are not using a TV, a large piece of art is mandatory. A picture light mounted above the art elevates the look instantly. It implies that the art is important. Wireless, battery-operated picture lights are a great solution if you cannot run hardwiring through existing brick.
Designer’s Note:
Pay attention to color temperature. For a living room, I insist on 2700K or 3000K LED bulbs. Anything higher (4000K+) will look like a hospital and will make wood tones and stone look sterile and cold.
6. Styling the Hearth and Mantel
The final layer of design is the decor. This is where many homeowners get stuck, leading to clutter or bareness.
The Triangle Rule
When styling a mantel, imagine a triangle. You want a high point (usually the art or mirror in the center) and visual weight tapering down to the sides. Alternatively, create an asymmetrical triangle: a tall vase on one side, stepping down to smaller objects, with the other side left relatively open for breathing room.
Layering
Don’t just line things up in a row like toy soldiers. Overlap objects. Lean a smaller frame against a larger mirror. Place a small bowl in front of a larger vase. This creates depth.
Hearth Styling
If you have a raised hearth, it is a great place for functional decor.
- Textiles: A woven basket with rolled throw blankets adds softness to hard stone.
- Wood: Even if you have a gas fireplace, a stack of birch logs looks sculptural and organic.
- Floor Pillows: If the hearth is low, oversize floor cushions can invite extra seating and soften the transition to the floor.
Rug Placement
The rug defines the living zone relative to the fireplace. The front legs of your sofa and chairs should sit on the rug. Ideally, leave about 12 to 18 inches of bare floor between the hearth and the edge of the rug. This prevents the space from feeling choked and keeps flammable textiles at a safe distance.
Final Checklist: Planning Your Project
Before you buy a single tile or gallon of paint, run through this checklist to ensure your project runs smoothly.
1. Code Check
- Check your local building codes regarding “clearance to combustibles.”
- Measure the required distance from the firebox opening to the mantel and any wood framing.
2. Power Plan
- Locate existing outlets. Do they need to move?
- Do you need a clock outlet (recessed) for a TV?
- Are you adding hardwired sconces? This requires an electrician before drywall.
3. Material Selection
- Bring samples home. Look at them in daylight and at night with artificial light.
- Confirm the weight of the material. Can your existing wall support it, or do you need to add blocking?
4. Layout Tape-Out
- Use blue painter’s tape to outline the TV, the mantel, and any built-ins on the wall.
- Sit on your sofa. Does the TV height feel comfortable? Does the mantel feel too high?
5. Order of Operations
- Demo -> Electrical/Framing -> Drywall -> Paint (Ceilings/Adjacent walls) -> Flooring/Hearth -> Cabinet Install -> Stone/Tile Install -> Final Touch-ups.
FAQs
Can I put shiplap or wood directly around the fireplace opening?
Generally, no. Most building codes require a non-combustible material (tile, stone, metal) for a specific distance around the firebox opening (often 6 to 12 inches, depending on the unit). Wood can be used outside of this “clearance zone.” Always check the manual for your specific fireplace insert.
I am renting. How can I update my ugly fireplace?
Peel-and-stick tile is risky because of the heat, which can melt the adhesive. A better option is styling diversion. Use a large, beautiful piece of art or a mirror to cover the upper wall. Place a high-quality fireplace screen in front of the opening to hide the interior. Use battery-operated sconces to add lighting without wiring.
How do I clean soot off a brick fireplace?
A mixture of warm water and mild dish soap usually works for light cleaning. For heavy soot, you can make a paste of baking soda and water. Scrub with a stiff-bristle brush (not wire, which can damage the brick surface) and rinse with a sponge. Avoid harsh acids on natural stone as they can etch the surface.
What is the best size for a mantel?
A mantel should generally be wider than the firebox but does not need to span the whole wall. A good rule of thumb is for the mantel to extend 6 to 12 inches past the firebox opening on each side. The depth is usually 6 to 8 inches to allow for decor.
Conclusion
Transforming your fireplace wall is one of the highest-impact projects you can undertake in your home. It changes the focal point from a simple utility to a design statement. Whether you choose the rugged warmth of stacked stone, the sleek modernity of large-format tile, or the architectural charm of custom millwork, the goal is to create a space that feels intentional and inviting.
Remember to prioritize scale and lighting. A beautiful material can look lackluster if it is poorly lit or if the proportions are off. Take your time with the layout, tape everything out, and do not be afraid to mix textures. Your living room is where life happens—make sure the backdrop is worthy of the memories.
Picture Gallery


