
Wood Soffit – Ideas for Elegant Home Exteriors
When we think about curb appeal, we usually fixate on the obvious elements: siding color, the front door, or the landscaping. However, the most transformative detail is often the one right above your head. The soffit—the underside of your roof overhang—is a massive surface area that is frequently neglected or covered in cheap, perforated vinyl.
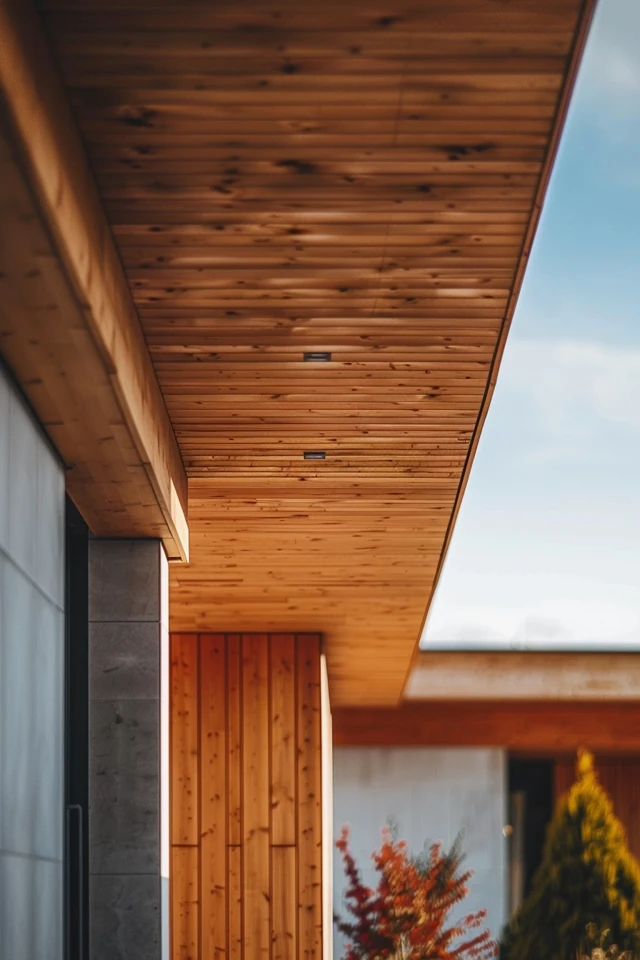
I have worked on countless exterior renovations where the clients felt their home looked “generic” but couldn’t pinpoint why. The moment we swapped out white aluminum for warm, natural tongue-and-groove cedar, the entire architecture shifted from builder-grade to custom luxury. It acts as a warm ceiling for your outdoor spaces, reflecting light and adding organic texture to the facade.
This guide will walk you through everything you need to know about designing with wood soffits, from selecting the right timber species to mastering lighting placement. For plenty of visual inspiration, don’t miss the curated Picture Gallery at the end of this article.
Why the Soffit Matters in Exterior Design
In architectural design, we refer to the soffit as the “fifth facade.” It is visible from the street, but it is even more prominent when you are standing on your porch or patio. It bridges the gap between the architecture of the house and the roofline.
Wood soffits provide a critical visual break. If you have a home with dark brick, stone, or stucco, a wood overhang introduces warmth and softness that prevents the exterior from feeling cold or industrial. It creates a psychological sense of shelter.
From an interior design perspective, I love using wood soffits to blur the line between indoors and outdoors. If your living room features a wood ceiling or heavy beams, continuing that same wood material through the window onto the exterior soffit creates a seamless visual extension. This trick makes your interior rooms feel significantly larger.
Designer’s Note: The Scale Rule
One lesson I learned early in my career involves the direction of the wood planks. If you have a narrow roof overhang (under 18 inches), run the boards parallel to the wall (horizontally) to make the overhang feel substantial.
However, for deep overhangs or covered porches (over 3 feet deep), run the boards perpendicular to the wall (pointing outward). This draws the eye out toward the view and prevents the “bowling alley” effect that happens when long boards run the length of a long house.
Selecting the Right Wood Species
Choosing the material for your soffit is not just about color; it is about survival. This wood will be subjected to humidity, indirect rain, and extreme temperature fluctuations. Using interior-grade lumber here is a recipe for warping and rot within two years.
Here are the top three species I specify for clients, ranked by performance and aesthetics.
1. Western Red Cedar
This is the gold standard for exterior millwork. It is naturally resistant to rot, decay, and insect attacks due to its natural oils and tannins. It is lightweight, which makes it easier for contractors to install overhead without fatigue.
- Aesthetics: It ranges from amber to reddish-brown. You can get “Clear” grades (no knots) for a modern look or “Knotty” grades for a rustic, cabin aesthetic.
- Finish: It takes stain beautifully but will turn silvery-grey if left unsealed.
2. Cypress
Cypress is often called “the eternal wood” because of its incredible water resistance. It is slightly harder than cedar and has a distinct grain pattern that looks stunning when clear-coated. It is particularly popular in the Southern United States due to its humidity tolerance.
- Aesthetics: It has a lighter, more yellow-honey tone compared to the redness of cedar.
- Finish: Because it is oily, it requires an oil-based primer or stain. Water-based finishes sometimes struggle to adhere to fresh cypress.
3. Hemlock
Hemlock is a cost-effective alternative to cedar. It is strong and has a very uniform, pale texture. However, it is not as naturally rot-resistant as cedar or cypress.
- Aesthetics: Very light, almost blonde wood with a subtle grain.
- Caveat: You must seal Hemlock on all six sides (front, back, edges, and ends) before installation. If you skip this, it will absorb moisture and cup. I generally only recommend this for covered porches where rain never hits.
The High-End Alternative: Thermowood or PVC
If you love the look of wood but hate maintenance, consider thermally modified wood (like ash or pine cooked at high heat to remove moisture) or high-end PVC composites like jagged-grain “wood” products.
Modern composites from high-end brands are nearly indistinguishable from real timber from the street. They never need staining, won’t rot, and pests can’t eat them. For clients with second homes or rental properties, I almost always push for a high-quality composite to eliminate maintenance calls.
Design Profiles and Layouts
The profile of the board determines the texture of the ceiling. The days of simple plywood sheets are gone; today, we use individual planks to create rhythm and shadow lines.
Tongue and Groove (T&G) V-Joint
This is the most classic application. The boards lock together, but the edges are chamfered (beveled) to create a “V” shape where they meet. This hides any slight expansion or contraction of the wood.
- Best for: Traditional, Craftsman, and Colonial homes.
- Sizing: I prefer a 1×6 inch board (which has a 5-inch reveal). 1×4 boards can look too busy on a large house.
Flush Joint (Penny Gap)
For modern homes, we want sleek lines. A flush joint profile minimizes the gap between boards, creating a smooth, flat surface. Sometimes we install this with a “nickel gap” or “penny gap,” which is a deliberate, square-edged space between boards.
- Best for: Mid-century Modern, Scandinavian, and Contemporary minimalist homes.
- Warning: The installation must be perfect. Any crooked board is immediately obvious in a flush joint application.
Board and Batten
While usually used for siding, board and batten can be applied to soffits for a very rustic, farmhouse texture. It involves wide flat boards with narrow wooden strips covering the seams.
- Best for: Farmhouses, Barn conversions, and sprawling ranch homes.
- Scale: This is heavy visually. Only use this on high porches or large overhangs, otherwise, it feels oppressive.
Common Mistakes + Fixes
Even with expensive materials, a project can fail if the details aren’t handled correctly. Here are the issues I see most often during renovations and how to correct them.
Mistake 1: The Ugly Vent Problem
The Issue: You spend thousands on beautiful cedar, and the contractor cuts jagged holes to install cheap, white plastic circular vents. It ruins the aesthetic immediately.
The Fix: Roofs need to breathe, so venting is non-negotiable. Instead of plastic circles, use a continuous strip vent. Even better, have your carpenter install a “hidden vent” detail where the wood planks are spaced slightly apart at the edge of the fascia to allow air intake without any visible metal grates.
Mistake 2: Ignoring the Fascia Color
The Issue: The soffit is wood, but the fascia (the outward-facing board the gutters attach to) is painted a stark white. This creates a high-contrast stripe that disjoints the roof from the wall.
The Fix: Paint the fascia a dark color (charcoal, bronze, or black) or wrap it in a matching wood material. Dark fascia boards recede visually, allowing the beautiful wood soffit to be the star of the show. If you have bronze windows, match the fascia to the windows.
Mistake 3: Poor Lighting Placement
The Issue: Installing recessed “can” lights directly in the center of the walkway or too close to the wall.
The Fix: See the section below for specific lighting rules.
Lighting Your Wood Soffit
Lighting wood soffits is my favorite part of the exterior design process. The warm glow of light bouncing off natural timber creates an ambiance that paint simply cannot replicate.
Color Temperature is Critical
When lighting wood, you must use a Warm White bulb, typically 2700K to 3000K. Do not use 4000K or 5000K (Daylight) bulbs.
Cooler blue light (4000K+) flattens the grain and makes the wood look gray or sickly green. 3000K pulls out the ambers, reds, and golds in cedar and fir.
Recessed Cans vs. Linear LEDs
For a traditional look, 4-inch recessed LED gimbals are standard. They should be rated for “wet locations” (or at least “damp locations” if fully covered).
For a modern look, I am increasingly specifying linear LED tape lights hidden in a channel. We recess an aluminum channel into the wood so the light source is flush. This creates a solid line of light that looks incredibly high-end.
Pro Placement Rules
- Spacing: Space recessed lights roughly 5 to 6 feet apart for general porch lighting. Putting them every 3 feet creates a “landing strip” effect that is too bright.
- Wall Washing: If you want to highlight the texture of your exterior stone or brick walls, place the lights 12 to 18 inches away from the wall. This is called “grazing.”
- Avoid Glare: If the soffit is low (8 feet or under), ensure the light fixture has a “deep baffle.” This means the bulb is recessed deep inside the housing so you don’t get blinded when looking up.
Finishes and Long-Term Maintenance
The number one hesitation clients have regarding wood soffits is maintenance. “Will I have to get on a ladder and stain this every year?”
The honest answer is: it depends on exposure. Since soffits are protected by the roof, they receive very little direct UV sunlight and almost no direct rain. This means they last 3 to 4 times longer than wood siding.
Clear Sealers vs. Stains
I usually recommend a semi-transparent penetrating stain rather than a clear coat or varnish.
Clear coats (varnish/urethane) sit on top of the wood. Eventually, they will peel and flake, requiring you to sand the wood overhead before refinishing. That is a nightmare job.
Penetrating oils soak into the wood. When they fade after 5 or 7 years, you simply clean the wood and apply a fresh coat of oil. No sanding required. Look for products containing trans-oxide pigments, which act as sunscreen for the wood.
The “Pre-Finish” Strategy
What I’d do in a real project: I never let the painter stain the wood after it is installed. It is messy, and they will inevitably miss the tongue/groove area. As the wood shrinks in the winter, raw unstained stripes will appear between the boards.
Always have the wood “pre-finished” on the ground (staining all sides) before installation. This ensures total protection and a flawless look.
What I’d Do: A Real-World Checklist
If I were managing your exterior renovation, here is the chronological checklist I would follow to ensure success:
- Assess Ventilation: Calculate the Net Free Area (NFA) needed for intake ventilation based on your attic size. Determine if we can use hidden vents or if we need strip vents.
- Choose Material: Select Clear Vertical Grain (CVG) Cedar for a refined look or Knotty Cedar for a rustic look. Confirm availability, as lumber shortages are common.
- Mock-up: Buy three different stain samples (Natural, Pecan, and Dark Walnut). Apply them to a scrap piece of the actual wood you bought. Hold it up overhead in the shade—colors look different looking up than looking down.
- Electrical Rough-In: Map out lighting locations. Ensure wires are run before the wood goes up.
- Pre-Finish: Stain the boards on sawhorses in the garage or yard. Let them dry for 48 hours.
- Install: Use stainless steel nails. Galvanized nails can react with cedar and leave ugly black bleeding streaks.
- Lighting Trim: Install the light trims last to cover the cut edges of the wood.
Frequently Asked Questions
How much does a wood soffit cost compared to vinyl?
You should budget significantly more. While vinyl soffit material might cost $2–$4 per square foot, real cedar can range from $7–$15 per square foot for the material alone. Labor for wood installation is also higher because it requires carpentry skills, not just siding installation skills. Expect the total project cost to be 3x that of vinyl.
Can I install wood soffit over existing aluminum or plywood?
Technically, you can install wood over plywood if the plywood is structurally sound and dry. However, you must ensure you aren’t blocking existing vents. I usually recommend removing the old material to inspect for roof leaks, rot, or bird nests before covering it up with expensive wood.
Does wood soffit attract pests?
Bees and wasps love protected overhangs regardless of the material. However, carpenter bees can bore into wood. If you live in an area prone to carpenter bees, use Cedar or Cypress (which are naturally repellant) and ensure the wood is sealed. Keep an eye out for perfectly round 1/2-inch holes and plug them immediately if seen.
Conclusion
Upgrading to a wood soffit is one of the highest-impact investments you can make for your home’s exterior. It adds a layer of custom craftsmanship that sets your property apart from the standard builder-grade homes on the block.
While it requires a higher upfront budget and more thoughtful planning regarding lighting and ventilation, the payoff is immediate. It warms up the entryway, connects the indoors to the outdoors, and increases perceived value.
Whether you choose a sleek, clear cedar for a modern renovation or a rustic, knotty pine for a farmhouse porch, the key is proper sealing and professional installation. Treat the exterior ceiling with the same care as your interior floors, and it will serve as a welcoming canopy for decades.
Picture Gallery


