
5 Tips for Designing the Perfect Home Bar
There is something undeniably sophisticated about having a dedicated spot in your home for entertaining. A well-designed home bar changes the energy of a room, acting as a magnet for guests and a relaxing ritual spot for homeowners. It signals that you value hospitality and taking a moment to unwind.
However, designing a functional bar requires much more than just sticking a wine fridge in a corner cabinet. You have to consider plumbing, electrical loads, specific bottle heights, and durable materials that can handle citrus and spills. As a designer, I treat bar areas like miniature kitchens; the ergonomics have to be perfect, or you simply won’t use it.
Whether you are remodeling a basement, claiming a closet, or building a custom joinery piece in your living room, the principles remain the same. If you are looking for visual inspiration, jump to the extensive Picture Gallery at the end of this post.
1. Define the Location and Flow
The first step in any design project is determining how the space interacts with the rest of the home. You want the bar to be accessible but not in a major traffic jam.
If you are planning a wet bar (one with a sink), you generally need to be near existing plumbing lines to keep costs down. This often dictates the location more than anything else.
For dry bars, you have more flexibility. I love tucking these into alcoves, under staircases, or transitioning spaces between the kitchen and dining room.
Critical Dimensions and Spacing
- Walkway Clearance: Ensure you have at least 36 to 42 inches of clearance behind the bar if people will be standing there mixing drinks.
- Seating Space: If you plan to have barstools, you need 24 inches of width per person for comfortable seating.
- Knee Space: For bar-height counters (42 inches high), aim for 12 inches of overhang. For counter-height (36 inches high), 15 inches is ideal.
Designer’s Note: The “Traffic Jam” Effect
One lesson I learned early in my career involved placing a bar too close to the kitchen entry. Whenever the hosts made drinks, they blocked the food service path. Always visualize the flow of a party. The bar should pull people away from the kitchen work triangle, not into it.
Common Mistakes + Fixes
- Mistake: Placing the bar on carpet.
- Fix: Spills are inevitable. Always use a hard surface flooring like wood, tile, or stone for at least 3 feet in front of the bar area.
- Mistake: Ignoring proximity to the seating area.
- Fix: Ensure the bar feels connected to where people will sit and drink. It shouldn’t feel like a punishment to go get a refill.
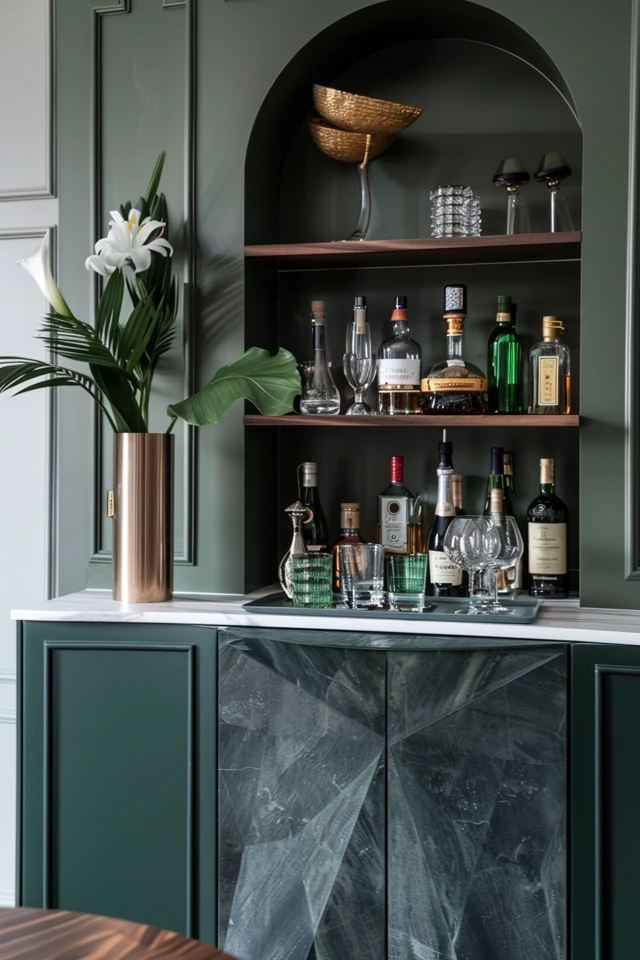
2. Master the Cabinetry and Storage Logic
Cabinetry for a home bar is not the same as kitchen cabinetry. The storage requirements are highly specific to liquor bottles, glassware stems, and bar tools.
Standard kitchen shelves are often adjusted for plates and food boxes. In a bar, you need to measure your tallest bottles. Most standard spirits are around 11 to 13 inches tall.
However, if you buy premium tequilas or tall vodka bottles, these can easily reach 15 or 16 inches. I always specify adjustable shelving in lower cabinets to accommodate “magnum” sizes or unusually shaped decanters.
Drawer vs. Door Strategy
- Use Drawers for Tools: Shallow top drawers are essential for corkscrews, muddlers, napkins, and coasters.
- Use Doors for Bottles: Pull-out vertical drawers (like spice racks but larger) are fantastic for liquor storage because you can see labels from the top or side without reaching into the back of a dark cabinet.
- Glassware Display: Upper cabinets with glass fronts are classic. If using open shelving, ensure the shelves are at least 12 inches deep to hold larger red wine glasses safely.
What I’d Do in a Real Project
If space allows, I always include a dedicated “prep pull-out.” This is a narrow slide-out cutting board installed right above the waste bin. It allows the client to slice limes and lemons without dirtying the main countertop, and sweeps the rinds directly into the trash below.
3. Select Bomb-Proof Materials
This is the most common area where homeowners make expensive regrets. Alcohol, citrus juice, and red wine are aggressive substances.
Natural marble, particularly Carrara or Calacatta, is calcium-based. When acidic lemon or lime juice touches it, it creates a chemical reaction called “etching.” This leaves a dull, white mark that cannot be wiped away.
If you are a perfectionist, avoid polished marble for your bar top. It will patina and show wear very quickly.
Recommended Materials
- Soapstone: This is my top pick for moody, dark bars. It is chemically inert, so acids won’t bother it. It scratches, but those can be oiled out or sanded down.
- Quartz: Engineered quartz is non-porous and highly resistant to staining and etching. It is the practical choice for high-traffic bars.
- Leathered Granite: If you want natural stone, choose a dark granite with a “leathered” or matte finish. It hides water rings and fingerprints beautifully.
The Backsplash Opportunity
Since bar areas are usually smaller than kitchens, this is the place to splurge on expensive tile or slab backsplashes. You might only need 10 to 15 square feet.
Designer’s Note: The Mirror Trick
In small, windowless bar nooks, I almost always use an antiqued mirror as the backsplash. It doubles the visual depth of the cabinetry and reflects the sparkle of the glassware and bottles, making the space feel twice as big and much moodier.
4. Layer Your Lighting for Ambience
Lighting makes or breaks a home bar. You are designing for evening use, so the lighting needs to be moody, warm, and dimmable.
Never rely solely on overhead recessed cans (pot lights). They cast harsh shadows on guests’ faces and feel too clinical for a cocktail setting.
The Three Layers of Bar Light
- Task Lighting: Use LED strip lighting under the upper shelves or cabinets. This lights up the countertop for mixing drinks without ruining the vibe.
- Ambient Lighting: Wall sconces or small pendants add a decorative glow. If using pendants, hang them so the bottom of the fixture is 30 to 36 inches above the counter.
- Accent Lighting: If you have glass-front cabinets, install interior cabinet lighting. This turns your glassware into a sparkling focal point.
Kelvin Temperature Matters
Stick to 2700K (warm white) or even 2400K for bar areas. Anything higher (3000K+) will look too blue and energetic. You want the light to mimic the glow of a candle or a high-end lounge.
Common Mistakes + Fixes
- Mistake: Forgetting the dimmer switch.
- Fix: Put every single light source on a separate dimmer. This gives you total control over the atmosphere.
- Mistake: Glare from mirrored backsplashes.
- Fix: If you use a mirror backsplash, ensure your under-cabinet lights have a diffuser channel so you don’t see the reflection of the individual LED dots.
5. Appliances and Hardware Selection
The difference between a wet bar and a dry bar usually comes down to appliances. If you are running plumbing and electrical, you need to select your gear before cabinetry production begins.
The Sink (Wet Bar)
You do not need a full-sized kitchen sink. A prep sink that is 15×15 inches is usually sufficient.
However, depth is important. Go for at least 8 or 9 inches deep so you can fill a pitcher or wash a tall glass without splashing water everywhere.
The Ice Maker Dilemma
Ice is the luxury item of home bars. However, under-counter ice makers are notoriously loud and expensive to maintain.
If you buy a dedicated ice maker, look for “clear ice” machines. They produce restaurant-quality cubes that melt slower. Note that these usually require a drain pump if you don’t have a floor drain nearby.
The Wine Fridge
Panel-ready appliances allow the fridge to blend in with your cabinetry. If you choose a stainless steel glass-front unit, ensure the interior racking pulls out smoothly.
Hardware and Faucets
This is the jewelry of the bar. I prefer unlacquered brass or polished nickel for bars. They feel substantial and classic.
Select a “bar faucet” with a high arc. This allows you to fit tall shakers and pitchers underneath the spout easily.
What I’d Do in a Real Project
I always check the door swing clearance on wine fridges. Many homeowners place a wine fridge next to a wall, only to realize the door can’t open past 90 degrees, trapping the slide-out racks inside. Always use a 2-3 inch filler strip between the appliance and the wall.
Final Checklist: Ready to Build?
Before you call the contractor or order cabinets, run through this final checklist to ensure you haven’t missed any critical details.
Planning Phase
- Have you decided between a wet bar (sink) or dry bar?
- Is there existing plumbing, or do you need a budget for running new lines?
- Have you measured your tallest liquor bottle and tallest wine glass?
Electrical & Lighting
- Are there outlets on the backsplash for blenders or phone chargers?
- Are all lights on dimmers?
- Is there a dedicated circuit for the wine fridge and ice maker (if required by code)?
Materials & Finishes
- Is the countertop material resistant to acid (or are you okay with patina)?
- Is the flooring in front of the bar water-resistant?
- Have you selected hardware that matches the scale of the cabinetry?
Ergonomics
- Is the bar height comfortable for your height?
- Is there enough overhang for knees if seating is included?
- Does the placement interfere with the natural traffic flow of the room?
FAQs
What is the standard height for a home bar?
There are two standard heights. “Counter height” is 36 inches, which matches standard kitchen counters. “Bar height” is 42 inches, which is higher and requires taller barstools. I generally prefer 36-inch counters for home bars as they feel more residential and open, whereas 42-inch tops can feel like a commercial restaurant.
Do I really need a sink in my home bar?
It depends on distance. If your bar is in the same room as your kitchen sink, you can skip it. However, if the bar is in a basement, upstairs game room, or totally separate living area, a sink is essential. Without one, you will constantly be carrying sticky glasses and buckets of ice through the house, which kills the convenience factor.
How much does a custom built-in bar cost?
This varies wildly based on finishes and labor. A DIY dry bar using semi-custom cabinets might cost $2,000 to $4,000. A fully custom wet bar with stone tops, plumbing, electrical work, and high-end appliances often ranges from $15,000 to $30,000+. The appliances and stone usually eat up the biggest portion of the budget.
Can I put a home bar in a rental?
Absolutely. For renters, I recommend a high-quality freestanding bar cart or a credenza. You can “hack” the look of a built-in by using two tall bookcases with a lower console in between. Use removable wallpaper behind the shelves to define the zone. Focus on great glassware and lighting (plug-in sconces or lamps) to set the mood without permanent construction.
What is the best depth for a home bar counter?
The standard depth for the lower cabinets and countertop is 24 to 25 inches. If space is tight, you can reduce this to 18 or 21 inches, but you will need to be careful with sink selection and appliance depth. Most under-counter wine fridges require full 24-inch depth.
Conclusion
Designing a home bar is one of the most fun projects you can undertake because it is purely about pleasure and hospitality. Unlike a laundry room or a mudroom, which are utilitarian workhorses, the bar is designed for enjoyment.
By focusing on the practical “boring” stuff first—clearances, shelf heights, and durable surfaces—you earn the freedom to have fun with the aesthetics. Use the tips above to create a space that functions as beautifully as it looks.
Remember to keep the scale appropriate for your home. A massive bar in a small room feels overwhelming, while a tiny cart in a huge great room feels lost. Balance is key.
Once the dust settles and the renovation is complete, the real reward is that first evening where you dim the lights, pull out a glass, and enjoy a drink in the comfort of your own home.
Picture Gallery


