
Cozy Up With River Rock Fireplace Ideas!
There is something undeniably nostalgic about a river rock fireplace. It immediately evokes memories of mountain lodges, lakeside cabins, and cozy evenings spent hiding away from the cold. While trends in tile and marble come and go, natural stone has a staying power that anchors a home with texture and history.
However, bringing this rustic element into a modern home can be tricky. I once had a client who inherited a massive 1980s river rock wall and wanted to tear it down because it felt dark and heavy. Instead of demolition, we adjusted the lighting, swapped the mantel, and changed the wall color, turning that “eyesore” into the home’s most stunning feature.
If you are planning a renovation or building from scratch, the goal is to balance the busy nature of the stones with the rest of your decor. If you are seeking visual inspiration, be sure to scroll down to our curated Picture Gallery at the end of this blog post.
Understanding Scale and Stone Selection
The first decision you make—and arguably the most critical—is the scale of the rocks. In interior design, scale refers to the size of an object relative to the room it inhabits. If you choose stones that are too small, the fireplace will look busy and chaotic, like a gravel driveway stuck to the wall.
Conversely, if the stones are massive boulders in a small living room, the feature will feel oppressive and top-heavy. For a standard 8-foot ceiling, I generally recommend a mix of stones ranging from 3 inches to 8 inches in diameter. This provides variety without overwhelming the eye.
When sourcing your material, you have two main options: natural river rock or cultured (manufactured) stone. Natural stone is heavy and requires a skilled mason to puzzle-piece together, but the color variation is unmatched. Cultured stone is lighter, easier to install, and often more budget-friendly, though you must be careful to avoid brands that look plasticky or repetitive.
The Art of Grouting: Deep Rake vs. Over-Grout
Many homeowners underestimate the power of grout. The mortar joints between your river rocks can completely change the aesthetic of the fireplace. In my projects, I usually choose between two distinct styles depending on the vibe the client wants.
The first is a “deep rake” joint. This is where the grout is scraped back, allowing the stones to protrude significantly. This creates deep shadows and highlights the roundness of the rocks, resulting in a very rustic, traditional cabin look.
The second style is “over-grouting” or a “flush joint.” This technique brings the mortar almost level with the face of the stones. It softens the texture, making the wall feel flatter and more like an old-world European cottage. If you want a brighter, softer look, use a light-colored mortar and over-grout the stones.
Designer’s Note: The “Messy Mason” Lesson
I learned this the hard way early in my career. I specified a river rock fireplace for a project but didn’t supervise the grouting process. The mason used a dark gray cement and let it smear messily over the beautiful tan stones, drying before it could be cleaned.
The result looked muddy and dark, ruining the natural warmth of the rock.
The Fix: Always ask your mason to create a “mock-up” board (usually 2×2 feet) before touching the actual fireplace. This lets you approve the stone mix, the grout color, and the depth of the joint. Never skip this step.
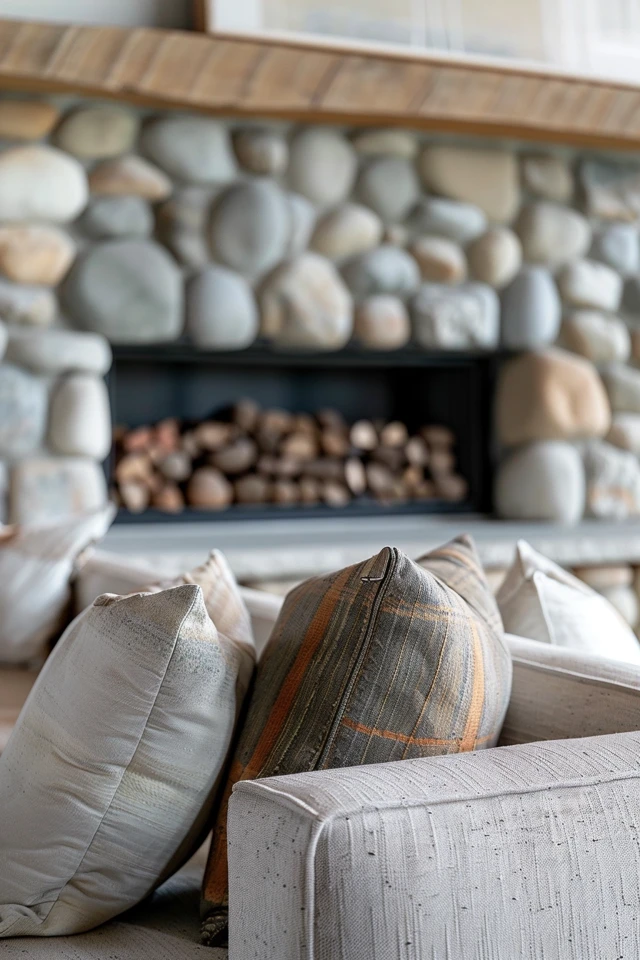
Mantels: The Visual Break
River rock is visually busy. To prevent it from becoming chaotic, you need a strong horizontal element to give the eye a place to rest. This is the job of the mantel.
For river rock, I almost always recommend a solid wood beam or a rough-hewn timber. The organic texture of wood complements the stone perfectly. A sleek, white painted MDF mantel often looks too delicate and disconnected against rugged stone.
If your style is more modern, consider a poured concrete mantel or a thick slab of bluestone. These materials have enough visual weight to stand up to the rock but offer cleaner lines.
Pro-Tip for Mantel Sizing:
- Depth: Your mantel should be at least 8 to 10 inches deep. River rock has an uneven surface, often protruding 2 to 4 inches from the wall. A shallow shelf will disappear.
- Height: A standard rule of thumb is to place the mantel 54 to 60 inches off the floor, assuming standard ceiling height.
- Clearance: Always check your local fire codes and the manufacturer’s manual for your insert. Combustible materials (wood) usually require 12 inches of clearance above the firebox opening.
Furniture Layouts for Heavy Texture
When you have a dominant focal point like a river rock fireplace, your furniture layout needs to respect it. The most common mistake I see is pushing furniture up against the walls, leaving a “dance floor” in the middle of the room that alienates the fireplace.
Create a floating conversation zone. Pull your sofa and chairs off the walls and group them around the hearth. The front legs of your sofa should sit on the area rug to anchor the space.
In terms of distance, aim to place the edge of your coffee table about 14 to 18 inches from the sofa. The coffee table should then be roughly 30 inches from the fireplace hearth (if you have a raised hearth). This allows for comfortable traffic flow without placing the furniture dangerously close to the heat source.
Because the fireplace is highly textured, keep your large upholstery pieces relatively simple. A solid linen sofa or a leather armchair works beautifully. Avoid busy floral patterns on furniture, as they will fight with the pattern of the stones.
Lighting Strategies to Enhance Depth
Lighting can make or break a stone fireplace. If you rely solely on a central ceiling fan light or pot lights in the center of the room, your beautiful stonework will look flat and dull.
To bring out the dimension of river rock, you need “grazing” light. This involves placing recessed lights or track heads in the ceiling, roughly 12 to 18 inches away from the face of the stone wall.
When you angle these lights down toward the stone, the beams hit the tops of the rocks and create shadows underneath. This highlights the three-dimensional quality of the material.
Temperature Matters:
- 2700K (Soft White): This creates a warm, golden glow that enhances the browns and tans in the stone. This is ideal for cozy living rooms.
- 3000K (Warm White): This is slightly crisper and more neutral. It works well if your stones are predominantly gray or white.
- 4000K+ (Cool White): Avoid this. It will make your cozy fireplace look like a sterile commercial space.
Flooring and Hearth Transitions
The transition between your floor and the fireplace is crucial. If you have a flush hearth (level with the floor), you need a non-combustible material extending into the room.
Slate, flagstone, or a single slab of honed granite are excellent choices for the hearth. They provide a smooth surface that contrasts nicely with the bumpy river rock.
If you have hardwood floors, ensure there is a clean transition. I often use a “header board” or a framed border around the hearth stone to separate it from the main flooring.
For rug selection, look for natural fibers like wool or jute. These materials have a texture that stands up to the visual weight of the rock. Ensure your rug is large enough that the furniture grouping feels cohesive. A 5×8 rug is almost always too small for a living room; look at 8×10 or 9×12 sizes.
Styling the Fireplace
Once the construction is done, styling is the final layer. Because the stone is the star, “less is more” is the best approach for decor.
Avoid lining up small tchotchkes across the mantel. They will get lost against the background. Instead, rely on scale. Use one large piece of art or a substantial round mirror.
A round mirror is particularly effective because the curve mimics the shape of the river stones, creating a subconscious harmony. Rectangular art can sometimes feel too rigid against the organic shapes of the rock.
If you want to place items on the hearth, consider a tall woven basket for blankets or a set of heavy iron fireplace tools. These items have the visual weight needed to sit next to stone.
Common Mistakes + Fixes
Mistake: The “Polka Dot” Look
This happens when a mason spaces out the large, colorful stones evenly, filling the gaps with tiny stones. It creates a distinct, unnatural pattern that the eye immediately tracks.
The Fix: Demand a random, organic layout. Cluster a few large stones together, then use medium ones. Avoid distinct rows or patterns.
Mistake: Ignoring the Returns
The “return” is the side of the fireplace structure. Sometimes, people stop the stone at the corner and paint the side drywall. This makes the stone look like a thin veneer stuck on the front.
The Fix: Wrap the stone around the corners and cover the sides (returns) completely back to the wall. This gives the illusion of a solid masonry chimney.
Mistake: Mounting the TV Too High
River rock fireplaces are often tall. Homeowners instinctively want to mount the TV above the mantel, often resulting in a screen that is 6 feet off the ground. This causes neck strain.
The Fix: If you must mount the TV over the fireplace, keep the mantel as low as code allows. Better yet, place the TV on a side console and let the fireplace be the quiet focal point.
Practical Maintenance and Cleaning
River rock is durable, but its uneven surface loves to collect dust. In a home with pets or high traffic, the tops of the stones will get fuzzy over time.
For routine cleaning, use a vacuum cleaner with a soft horsehair brush attachment. This is the most effective way to pull dust out of the deep crevices and grout lines.
Soot can also be an issue, especially with wood-burning units. If the stones above the firebox start to blacken, mix a solution of warm water and a small amount of mild dish soap (like Dawn). Use a stiff nylon brush to scrub the soot.
Important: Never use a wire brush on natural stone, as it can scratch the surface. Also, avoid harsh acidic cleaners or vinegar, which can etch certain types of stone and weaken the mortar.
What I’d Do in a Real Project: Mini Checklist
If I were designing your living room today, here is the exact order of operations I would follow to ensure success:
1. Assess the Subfloor
Real stone is heavy. Before buying materials, I would have a contractor verify that the floor joists can support the weight of a full masonry wall. If not, we switch to stone veneer.
2. Select the “Hero” Stone
I would take you to a stone yard to pick the specific palette. We would look for a mix of 70% earth tones (browns/tans) and 30% accent colors (grays/blues) to ensure it matches your furniture.
3. Plan the Electrical
Before a single stone is laid, we would run conduit for the TV (if applicable) and install the recessed lighting in the ceiling to ensure the grazing effect is perfect.
4. The Mantel Mock-up
I would hold up the actual wood beam against the framed wall to determine the perfect height before the mason starts. It is much harder to move the mantel once the stone is installed.
5. Seal the Stone
After installation and a 30-day cure time for the grout, I would apply a penetrating matte sealer. This doesn’t change the look but prevents soot and dust from staining the porous rock.
FAQs
Can I paint a river rock fireplace if I hate the color?
Yes, but proceed with caution. Once you paint stone, you cannot go back. Instead of opaque latex paint, which looks plastic, use a masonry stain or a “whitewash” technique (watered-down paint). This allows some texture and variation to show through.
Is river rock expensive compared to other finishes?
It is generally a mid-range option. It is usually more expensive than simple ceramic tile or drywall, but significantly cheaper than large-format marble slabs or intricate custom millwork. The cost is often in the labor, as placing round stones takes more time than stacking square bricks.
How do I hang art on a bumpy stone surface?
Do not try to use adhesive hooks; they won’t stick. You need to drill into the mortar joints (not the stone itself) using a masonry bit. Insert a lead or plastic anchor, then a screw. For very heavy mirrors, you may need to use a hammer drill to go into the stone, but mortar is easier to repair if you make a mistake.
Can I use river rock in a small room?
Absolutely. The key is to keep the mortar color close to the stone color. High contrast (like dark rocks with bright white grout) creates a busy pattern that shrinks a room. Low contrast (tan rocks with tan grout) creates a subtle texture that doesn’t overwhelm the space.
Conclusion
A river rock fireplace is more than just a heat source; it is an architectural feature that brings the grounding energy of nature indoors. Whether you are aiming for a rugged mountain lodge vibe or a sophisticated, organic modern aesthetic, the success of the design lies in the details.
By paying attention to scale, lighting, and the grout technique, you can ensure your fireplace feels timeless rather than dated. Remember to let the stone be the hero, keep your decor simple, and always test your grout color before committing.
Now, take a look at the gallery below to see how these principles come to life in real homes.
Picture Gallery


