
Driftwood Ideas for Garden: Creative Landscaping Tips
Introduction
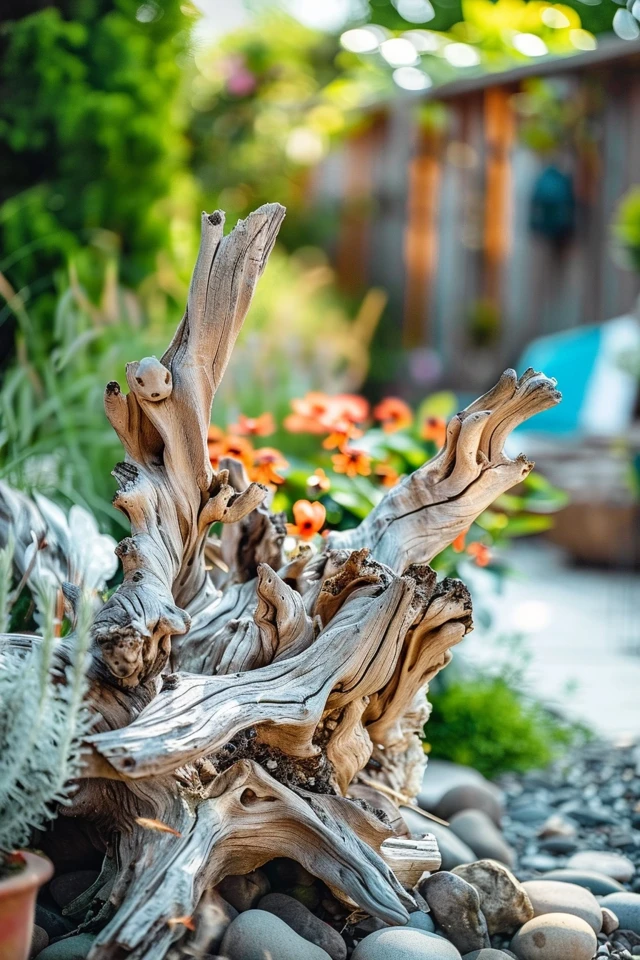
There is something inherently sculptural about driftwood. The sun-bleached hues and weathered textures provide a stunning contrast to the vibrant greens and colorful blooms of a living garden. In my design practice, I often use driftwood to soften the lines of modern hardscaping or to add a sense of history to a newly planted yard. It bridges the gap between the wild ocean and your curated backyard, creating an atmosphere that feels both organic and intentional.
I remember dragging a massive, twisted piece of cedar root off a beach in Oregon years ago, intending to use it for a client’s coffee table. However, once we got it back to the studio, we realized the scale was all wrong for the living room. We ended up placing it in the corner of their fern garden instead. It became the defining feature of the entire landscape, proving that sometimes nature dictates the design better than we do. If you are looking for visual inspiration, don’t miss our curated Picture Gallery at the end of this blog post.
Whether you have a massive stump or a pocketful of small branches, incorporating these pieces requires a bit of know-how regarding preservation and placement. This guide will walk you through how to source, prep, and style driftwood to transform your outdoor space.
1. Preparation and Preservation: Don’t Skip This Step
Before we get into styling, we have to talk about prep work. As a designer, the biggest failure I see in DIY driftwood projects is skipping the cleaning process. Wood found on the beach is often saturated with salt, which can leach into your soil and kill your plants.
If you find the wood in a river or forest, it may harbor pests, fungi, or termites that you definitely do not want near your home’s foundation. Proper preparation ensures your garden feature lasts for years rather than rotting away in a season.
Step-by-Step Preparation Guide:
- The Soak: Submerge the wood in fresh water for 3 to 5 days. This draws out the salt. Change the water daily until it remains clear.
- The Sanitize: Scrub the wood with a wire brush to remove loose debris. Then, soak it in a solution of 1 part bleach to 9 parts water for 24 hours to kill bacteria and insects.
- The Dry: Let the wood dry completely in direct sunlight. This can take anywhere from 3 days to two weeks depending on the thickness of the branch.
- The Seal: Apply a matte marine-grade varnish or a clear wood preserver. Avoid high-gloss finishes; they make the wood look plastic and artificial.
Designer’s Note:
If you plan to put air plants or sensitive ferns directly onto the wood, ensure the sealant is non-toxic once cured. I usually wait a full week after sealing before attaching any living elements to the structure.
2. Creating Vertical Architecture and Focal Points
In landscape design, we often talk about “bones.” The bones are the permanent structures that give the garden shape in winter when the flowers have died back. Large driftwood pieces serve as incredible bones.
Using a tall, interesting branch as a standalone sculpture creates a focal point that draws the eye upward. This is particularly effective in small, flat yards where everything is at ground level. Verticality makes a small space feel larger.
Rules of Thumb for Placement:
- The Rule of Thirds: Avoid placing your sculpture dead center in the yard. Place it off-center to create a dynamic view.
- Bury for Stability: For vertical pieces, bury at least 1/3 of the wood underground or anchor it to a concrete footing. If the piece is 6 feet tall, you want 2 feet in the ground for safety, especially in high-wind areas.
- Contrast is Key: Position pale, gray driftwood against a dark background. A dark green hedge, a charcoal fence, or a brick wall makes the weathered wood pop.
What I’d do in a real project:
I often use “ghost wood” (sandblasted branches, often Manzanita) to create an archway. By securing two tall vertical pieces and wiring a horizontal branch across the top, you frame a view. I then plant a climbing vine like Clematis or Jasmine at the base. The vine softens the wood, and the wood supports the vine.
3. The Driftwood Planter: Succulents and Air Plants
This is perhaps the most popular way to use driftwood, but it requires specific execution to keep the plants alive. Driftwood makes a natural container, but it rarely has adequate drainage on its own.
Hollow logs or pieces with deep crevices are ideal for succulents, bromeliads, and air plants (Tillandsia). These plants have shallow root systems and low water requirements, making them perfect candidates for wood planting.
How to Construct a Driftwood Planter:
- Identify the Pocket: Find a natural depression in the wood. If it isn’t deep enough, use a chisel or a drill with a spade bit to widen the cavity.
- Drainage is Non-Negotiable: You must drill small holes (1/4 inch diameter) through the bottom of the planting pocket. If water sits in the wood, it will rot the wood and drown the plant roots.
- The Medium: Don’t use standard potting soil. It stays too wet. Use a mix of sphagnum moss and cactus soil.
- Attaching Air Plants: For Tillandsia, you don’t need soil. You can use a dab of waterproof floral glue (E6000 works well) or fishing line to tie them onto the branches.
Common Mistake & Fix:
Mistake: Planting thirsty annuals like petunias in driftwood.
Fix: Driftwood dries out fast. Stick to drought-tolerant varieties like Sedum, Echeveria, or Sempervivum. If you must use thirsty plants, hide a plastic pot inside the hollow log to retain moisture.
4. The Stumpery: Building a Shade Garden Feature
A “stumpery” is a Victorian gardening concept that has made a huge comeback in modern sustainable design. It is essentially a rock garden, but built with logs, stumps, and driftwood instead of stone.
This is an excellent solution for the dark, damp corners of your yard where grass won’t grow. The rotting wood (over very long periods) creates a habitat for ferns, mosses, and hostas. It mimics the forest floor.
Designing Your Stumpery:
Start by piling your driftwood in an artistic, seemingly haphazard mound. Interlock the pieces so they are stable. You want to create plenty of nooks and crannies.
Fill the gaps with a mixture of compost and leaf mold. This provides a rich environment for shade-loving plants. Ferns are the natural choice here. I recommend combining evergreen ferns like the Sword Fern with delicate varieties like the Maidenhair Fern for textural contrast.
Lighting the Scene:
A pile of wood in a dark corner can look spooky at night if not lit properly. I always install low-voltage uplighting at the base of the largest stumps. The light catches the texture of the bark and creates dramatic shadows, turning a “pile of wood” into an art installation.
Real-World Constraints:
If you live in a very dry climate (like Arizona or Nevada), a mossy stumpery is hard to maintain. Instead, adapt the concept using sun-bleached driftwood and agave or ornamental grasses. Call it a “dry stumpery.” The aesthetic is similar—structural wood mixed with texture—but the plant palette changes to suit the environment.
5. Edging and Ground Control
Practicality is a massive part of landscape design. We need to separate the lawn from the flower beds to prevent grass from creeping in and to keep mulch from washing out. Driftwood offers a much more natural alternative to plastic edging or concrete pavers.
Using long, relatively straight pieces of driftwood as a border creates a relaxed, coastal vibe. This works exceptionally well for pathways filled with crushed shell or gravel.
Installation Tips for Borders:
- Trenching: Dig a shallow trench about 2 to 3 inches deep along the edge of your bed.
- Settling: Set the log into the trench. This ensures the wood looks like it has been there for years, rather than just dropped on top of the grass. It also prevents the log from rolling when you step near it.
- Pinning: For added security, drive 12-inch landscape staples or rebar into the ground behind the log to keep it pressed firmly against the garden bed.
Scale Considerations:
Ensure the diameter of the wood is substantial enough. A 2-inch branch will disappear once your plants grow. Aim for logs that are at least 6 to 8 inches in diameter. This provides a clear visual barrier and is high enough to hold back mulch.
Final Checklist: Before You Start
Here is the mental checklist I run through before installing any driftwood feature in a client’s garden.
- Source Check: Is it legally sourced? (Note: It is illegal to remove driftwood from many protected beaches. Check local regulations or buy from a supplier.)
- Prep Check: Has it been soaked and sealed?
- Stability Check: If it’s vertical, is it buried deep enough? If it’s horizontal, is it trenched?
- Plant Match: Have I paired the wood with plants that have compatible water needs?
- Drainage: Did I drill holes in the planting pockets?
FAQs
Q: Will driftwood attract termites to my house?
A: It can, if placed incorrectly. Never place unsealed driftwood directly against the siding or foundation of your home. Keep garden driftwood features at least 3 to 5 feet away from the main structure of the house, or place them on a patio/gravel area where termites cannot travel through the soil to reach them.
Q: How long will untreated driftwood last outside?
A: It depends on your climate. In a wet, humid climate, soft driftwood might rot in 2 to 3 years. In a dry, desert climate, it can last for decades. Hardwoods (like teak or cedar driftwood) last much longer than softwoods (like pine). Sealing the wood extends its life significantly.
Q: Can I use driftwood in a fish pond?
A: Yes, but be careful. You must boil the wood repeatedly to release tannins (which turn the water brown) and ensure all salt is removed. Salt can be deadly to freshwater fish. Buying pre-treated “aquarium safe” driftwood is often safer for ponds than using found wood.
Q: Where can I buy driftwood if I don’t live near a beach?
A: Many garden centers now carry “ghost wood” or grapewood branches. Aquarium supply stores are great for smaller, sculptural pieces. There are also reputable sellers on Etsy who ship sanitized driftwood specifically for décor.
Conclusion
Incorporating driftwood into your garden is about celebrating the imperfect. It brings a raw, elemental texture that manufactured materials simply cannot replicate. Whether you are building a dramatic stumpery in a shaded corner or simply lining a pathway with weathered logs, the key is to respect the material.
Clean it, seal it, and secure it well. If you follow the preparation steps and keep scale in mind, your driftwood features will not only survive the elements but will become the highlight of your landscape design. It connects your home to the natural world in a way that feels timeless and grounded.
Picture Gallery


