
Hi there! I’m so excited to share with you some amazing tips and tricks that I’ve learned from online interior design experts about creating stunning gallery walls for your home. As a homeowner, I’ve always believed that the walls of a house have the power to tell a story, to reflect our personality, and to bring joy every time we look at them.
But let’s be honest, the idea of putting together a gallery wall can be a little overwhelming. Where do you start? How do you choose the right pieces? How do you ensure that everything looks cohesive and visually appealing?
That’s where the expertise of online interior design comes in. With the rise of virtual interior decorating and e-design services, it’s now easier than ever to get professional guidance and create beautiful spaces in the comfort of your own home. These web-based room styling services provide digital decor consultation, internet-based interior design, virtual space planning, and so much more.
So, whether you’re a novice looking to dip your toes into the world of gallery walls or a seasoned decorator looking for fresh inspiration, I’m here to walk you through the process and help you create a gallery wall that will transform your space into a masterpiece.
Key Takeaways:
- Online interior design offers virtual tools and guidance to help create stunning gallery walls.
- Gallery walls have the power to tell a story and reflect your personality.
- Virtual interior decorating services provide digital decor consultation and web-based room styling.
- Creating a gallery wall can be overwhelming, but with expert tips, it becomes a fun and rewarding process.
- Transform your space into a masterpiece with the right online design platform and virtual home styling.

Laying out Your Gallery Wall Before Hanging It
Creating a stunning gallery wall requires careful planning and organization. Before you start hanging your artwork, it’s essential to lay out your gallery wall on the floor or tape off a box to visualize how it will look on the wall. This step allows you to experiment with different arrangements and find the perfect layout for your space.
To begin, measure the amount of space you want your gallery wall to fill. This will help you determine the dimensions and boundaries of your layout. With those measurements in mind, create a floor layout within that designated area. Arrange your artwork on the floor, positioning each piece as you envision it on the wall.
As you’re laying out your gallery wall, consider the placement and spacing of each piece. Aim for a balanced and visually appealing arrangement by spacing the artwork evenly. Generally, a space of around 3 inches between pieces works well, allowing each piece to stand out while maintaining a cohesive look.
Laying out your gallery wall beforehand has several advantages. It helps you avoid making unnecessary holes in your wall, allowing you to determine the best placement without the commitment of nails or hooks. Additionally, it ensures that your artwork looks good together, as you can easily swap out pieces or adjust the arrangement until you’re satisfied.
“Gallery wall layout is crucial in achieving a visually striking display of artwork. Taking the time to lay everything out on the floor allows you to experiment and find the perfect arrangement that reflects your style and personality.” – Interior Design Expert
Once you’ve finalized your gallery wall’s layout on the floor, you can then confidently transfer it to the wall. By following this methodical approach, you’ll have a gallery wall that not only showcases your cherished artwork but also creates a harmonious and captivating focal point in your space.
| Benefits of Laying Out Your Gallery Wall |
|---|
| Allows experimentation with art placement |
| Avoids unnecessary holes in the wall |
| Ensures a visually appealing and balanced arrangement |
| Allows for easy adjustments and changes |
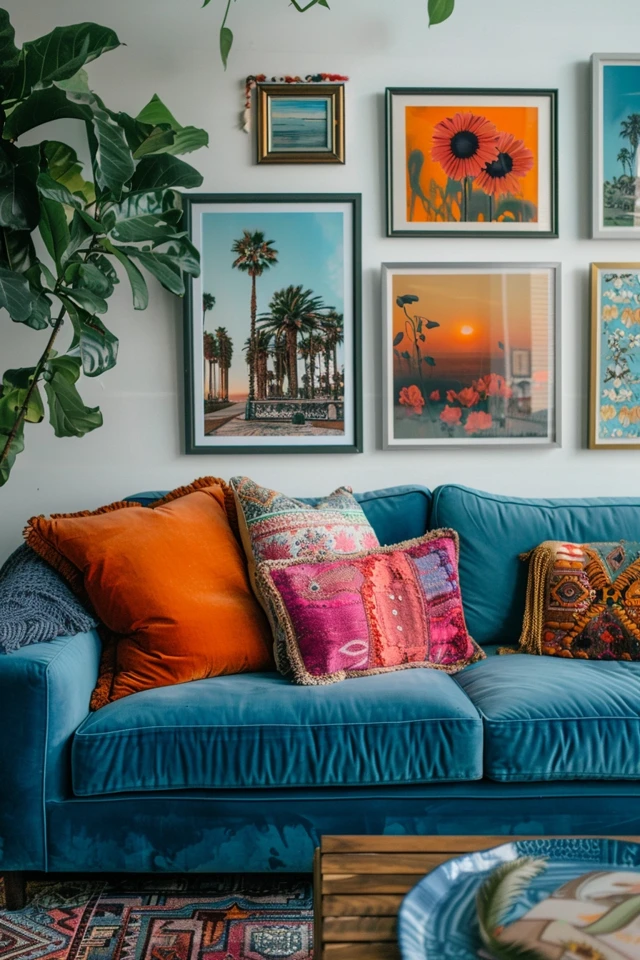
Creating a Cohesive Color Palette
While working on your gallery wall, one important aspect to consider is creating a cohesive color palette. Although it’s not a strict rule, a well-thought-out color scheme can enhance the overall look and feel of your wall. By selecting pieces with similar tones and intensities, you can achieve a curated and harmonious aesthetic.
For instance, you might choose to focus on neutrals, blues, and hints of gold for a vintage painting gallery wall. This combination of colors can evoke a sense of timeless elegance and sophistication.
Before transferring your art pieces to the wall, I recommend laying out your gallery wall on the floor and taking a photo for reference. This will help you visualize how the colors and pieces interact with each other. Pay attention to how the colors blend and complement one another. If any artwork stands out too much or feels out of place, you can make adjustments accordingly.
Creating a cohesive color palette is a valuable strategy that brings harmony and balance to your gallery wall. It enables you to curate a collection of artwork that tells a coherent visual story. Consider the mood and ambiance you want to create in the room, and let the color palette contribute to that overall atmosphere.
| Key Elements for Creating a Cohesive Color Palette |
|---|
| 1. Choose pieces with similar tones and intensities. |
| 2. Consider incorporating complementary colors. |
| 3. Experiment with different shades and hues of your chosen colors. |
| 4. Aim for a harmonious blend of colors, avoiding any harsh contrasts that may disrupt the overall flow. |
| 5. Take into account the existing color scheme of the room where the gallery wall will be displayed. |
By following these guidelines and carefully curating your color palette, you can transform your gallery wall into a captivating focal point that enhances your space.

Starting with Something Large and In Charge
To create a visually stunning gallery wall, it’s important to start with an anchoring piece. This large artwork will serve as the focal point around which you’ll build the rest of your gallery. Depending on the size of your collection, there are two placement options that work well:
- If you have a smaller collection, place the largest piece in one of the four outer corners of the wall. This helps draw attention to the artwork and adds balance to the overall composition.
- If you have a larger collection, position the biggest piece slightly off-center but towards the middle of the wall. This enables you to create a dynamic composition and allows for more flexibility when arranging the other pieces.
Now that you have your anchor piece in place, it’s time to add the remaining artworks. A popular technique is to place the second biggest piece diagonally from the largest piece. This creates an interesting visual flow and introduces depth to your gallery wall. You can then fill in the empty spaces between and around the larger pieces with smaller pieces, ensuring a balanced and cohesive arrangement.
By starting with something large and in charge, you create a gallery wall that commands attention and sets the tone for the rest of the art pieces.
Example Gallery Wall Layout
Here’s an example of how you can arrange your gallery wall with a large anchoring piece:
This layout demonstrates how the larger anchoring piece is strategically placed off-center, while the smaller pieces fill in the gaps. This arrangement creates a visually captivating gallery wall.
Mixing Horizontals and Verticals, and Using Pairs
When it comes to creating a visually captivating gallery wall, mixing horizontal and vertical pieces is key. By incorporating both orientations, you can bring dimension and balance to your display. To add an interesting contrast, if you have larger horizontal pieces, place a smaller vertical piece next to it. This pairing will create a dynamic visual effect and draw the viewer’s eye.
Another way to enhance the impact of your gallery wall is by creating grids. Grouping 2, 3, or 4 pieces together in a grid format adds structure and cohesion to your arrangement. This technique is particularly effective when working with smaller pieces that may get lost on their own. By clustering them in a grid, you create a mini collection that draws attention and showcases their individual beauty.
Now, let’s talk about frames. Mixing different frame styles can add a touch of excitement and personality to your gallery wall. This is especially true if you have a larger space or a variety of pieces with unique characteristics. Consider starting with three frame styles for a cohesive yet eclectic look. For example, a combination of white frames, black frames, and a wood option can bring diversity and visual interest to your display. Alternatively, you could experiment with two modern frames and one ornate frame style for an intriguing juxtaposition.
Example of Mixed Frames:
| Frame Style | Example |
|---|---|
| White Frames | |
| Black Frames | |
| Wood Option |
By incorporating horizontal and vertical pieces, creating grids, and utilizing mixed frame styles, you can unleash your creativity and take your gallery wall to new heights. These techniques allow you to experiment with different arrangements and compositions, ensuring your display is visually engaging and reflects your unique style.

Conclusion
Creating a stunning gallery wall may seem daunting at first, but with the right gallery wall advice and online interior design tips, you can easily transform your space. By following expert tips such as laying out your gallery wall on the floor and using a cohesive color palette, you’ll be able to curate a gallery wall that reflects your personal style and adds a touch of elegance to your home.
Don’t be afraid to get creative with the placement of your art pieces; this is what makes gallery walls unique and visually captivating. Experiment with mixing different frame styles to create an eclectic yet cohesive look. Whether you prefer a modern, minimalist style or a vintage-inspired aesthetic, there are endless possibilities to explore.
Remember, creating a gallery wall is all about self-expression and showcasing your favorite artwork or photographs. So, have fun with the process and let your creativity shine through. With these expert tips and tricks, you’ll have all the tools you need to confidently create a beautiful and personalized gallery wall that will become the focal point of any room.
FAQ
How can I create a gallery wall that perfectly suits my space?
Before hanging your gallery wall, it’s important to lay it out on the floor or tape off a box to visualize how it will look on the wall. Measure the amount of space you want your gallery wall to fill and create a floor layout within that area. This allows you to play around with the art placement and ensure that the pieces are spaced evenly, usually around 3 inches apart.
Why is it important to create a cohesive color palette for my gallery wall?
While it’s not a strict rule, creating a cohesive color palette for your gallery wall can give it a more curated and pulled-together look. Choose pieces that have similar tones and intensities to maintain a cohesive theme. For example, you can stick to neutrals, blues, and hits of gold for a vintage painting gallery wall. Once you’ve laid out your gallery wall on the floor, snap a photo for reference and start transferring the pieces to the wall, ensuring that the colors work well together.
How should I anchor my gallery wall?
To anchor your gallery wall, start by placing the biggest piece first. If you have a smaller collection, place the biggest piece in one of the four outer corners of the wall. If you have a larger collection, place the biggest piece off-center but towards the middle of the wall. This serves as the jumping-off point for placing the rest of the pieces. Try placing the second biggest piece diagonally from the biggest piece and fill in the empty space between and around them with smaller pieces. This creates a balanced and visually appealing gallery wall.
How can I make my gallery wall more interesting?
To keep your gallery wall interesting, mix horizontal and vertical pieces. If you have larger horizontal pieces, place a smaller vertical piece next to it for contrast. Creating grids within your gallery wall by grouping 2, 3, or 4 pieces together can also add visual interest and create a more pulled-together look. Don’t be afraid to mix different frame styles, especially if you have a larger space or more pieces. Start with three frame styles, such as white frames, black frames, and a wood option, or two modern frames and one ornate frame style for a cohesive yet eclectic look.
How can online interior design experts help with creating a gallery wall?
Online interior design experts can provide tips and tricks on how to create a stunning and personalized gallery wall in your home. From laying out your gallery wall on the floor to using a cohesive color palette and mixing different frame styles, these experts can guide you through the process and ensure that your gallery wall reflects your unique style and personality.