
Greenhouse Shelving Ideas: Maximize Your Space!
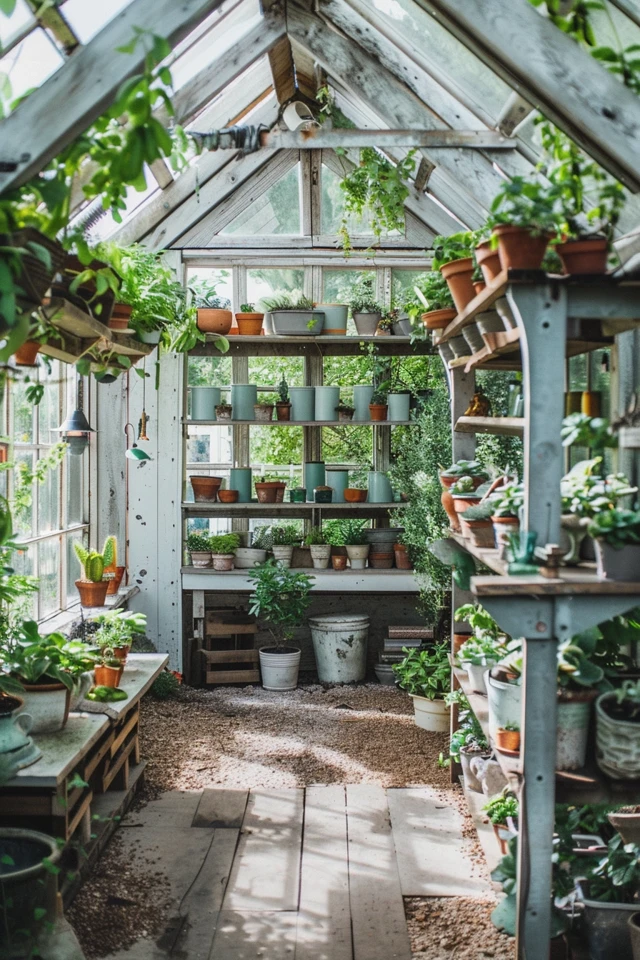
Designing a greenhouse is much like designing a kitchen; it requires a delicate balance between high-functioning utility and beautiful aesthetics. I often tell my clients that a greenhouse is not just a storage unit for plants, but a living room where nature is the primary resident. For plenty of visual inspiration on how to organize your green space, be sure to check out the Picture Gallery at the end of this post.
One of the most frequent issues I encounter in landscape interiors is the “floor trap.” Gardeners get so excited about buying new pots and flats that they cover every square inch of the ground, leaving no room to walk or work. This makes the space feel chaotic rather than restorative.
Effective shelving is the only way to reclaim that floor space while actually increasing your growing capacity. By thinking vertically and understanding the ergonomics of gardening, you can triple your square footage. Let’s look at how to structure your greenhouse shelves for maximum efficiency and style.
1. Zoning Your Layout for Workflow
Before you buy lumber or order metal racks, you must understand the flow of your greenhouse. In interior design, we use “zoning” to define areas of a room, and a greenhouse is no different. You generally need three zones: a potting zone, a propagation zone, and a display/storage zone.
If you skip this planning phase, you will end up with shelves that block your movement or cast shadows on sun-loving plants. Start by measuring your central aisle.
The Golden Rules of Aisle Width
- Minimum Clearance: You need at least 24 inches to walk comfortably without brushing against foliage.
- Wheelbarrow Access: If you plan to bring a wheelbarrow or large cart inside, you need a minimum of 30 to 36 inches.
- Turning Radius: Remember that carrying a tray of seedlings requires more elbow room than walking empty-handed.
The Layout Shapes
I usually recommend one of two layouts depending on the greenhouse footprint:
1. The U-Shape: This maximizes shelf space by wrapping around three walls. It is best for square greenhouses.
2. The Galley: This features two long runs of shelving on either side with a central aisle. This is best for narrow, rectangular structures.
Designer’s Note: The Shadow Factor
A common layout mistake is ignoring the arc of the sun. If you place deep, solid shelves on the south-facing wall, you might block light for plants on the north side or on the floor.
The Fix: Use wire shelving or widely spaced slats on your sun-facing walls. Save the solid wood shelves or potting benches for the north wall where shadows are less critical.
2. Selecting Materials: Wood vs. Metal vs. Composite
The material you choose sets the tone for the design and dictates the longevity of the build. Greenhouses are harsh environments for furniture. They are humid, prone to temperature swings, and constantly wet.
As a designer, I look for materials that patinate well or resist corrosion entirely. Here is the breakdown of what works best in a humid environment.
Cedar and Redwood Options
For a warm, organic look that feels like a traditional English conservatory, rot-resistant woods are the gold standard. Cedar and redwood contain natural oils that repel water and insects.
However, even these woods need maintenance. I recommend sealing them with a clear, marine-grade sealer every two to three years. If you use untreated pine to save money, it will likely warp and rot within two seasons unless heavily painted.
Aluminum and Galvanized Steel
If your aesthetic is more modern or industrial, metal shelving is the way to go. It is also the most practical choice for plant health.
- Airflow: Wire racks allow air to circulate under the pots, preventing root rot and fungal issues.
- Light Penetration: Light filters through the gaps, reaching the plants on the lower tiers.
- Hygiene: Metal is non-porous, making it easy to wipe down with a bleach solution to control pests.
Composite and Plastic
I generally advise clients to avoid cheap plastic shelving units found at big-box hardware stores. They tend to sag under the weight of heavy ceramic pots and become brittle in UV light.
However, high-quality resin or composite decking materials can be excellent for bench tops. They are impervious to water and easy to hose off. If you choose this route, ensure the frame is reinforced with wood or metal to prevent bowing.
3. Verticality and Overhead Solutions
Maximizing space means using the volume of the room, not just the perimeter. This is where we get creative with “dead space” that usually goes unused.
The High Shelf
I often install a narrow shelf about 12 to 18 inches below the roofline. This is the hottest part of the greenhouse, making it ideal for cacti or heat-loving tropicals.
Make this shelf narrow—about 6 to 8 inches deep—so you don’t bang your head on it. It serves as a great display area for trailing plants like String of Pearls, which create a living curtain without taking up bench space.
Integrated Hanging Rods
Instead of drilling individual hooks into the frame, run a galvanized pipe or a sturdy wooden dowel the entire length of the greenhouse peak.
This allows you to slide hanging baskets back and forth as needed. It mimics the functionality of a closet rod. Just be mindful of the weight; wet soil is heavy, so ensure the rod is anchored into the structural ribs of the greenhouse, not just the glazing bars.
Tiered Staging
A flat bench is fine, but a tiered “stadium seating” arrangement is better. By stepping your shelves like a staircase, every plant gets equal access to light.
Measurements for Tiers:
- Step Depth: 8 to 10 inches is usually sufficient for standard nursery pots.
- Step Height: A rise of 6 to 8 inches prevents the front plants from shading the back ones.
4. The Potting Bench: The Functional Hub
The potting bench is the kitchen island of the greenhouse. It is the command center. From a design perspective, this is where you can inject the most personality, but ergonomics must come first.
Ergonomics and Height
The standard counter height for a kitchen is 36 inches, and this holds true for a potting bench. If you are tall, go up to 38 or 40 inches. You should be able to work with your elbows at a 90-degree angle without hunching over.
I always include a “toekick” area or open space at the bottom front of the bench. This allows you to stand close to the work surface without stubbing your toes.
Storage Integration
Use the space under the potting bench for the unglamorous items. This is the place for heavy bags of soil, stacks of plastic pots, and fertilizers.
What I’d do in a real project: I typically use large, galvanized metal trash cans with lids under the bench to store soil. It keeps the potting mix dry, keeps rodents out, and looks tidy.
Sink or Soil Bin?
If you have plumbing, a sink is a luxury. If not, a “dry sink” acts as a great soil catch. I often cut a hole in the countertop and drop in a stainless steel hotel pan (from a restaurant supply store). You can sweep excess dirt into it while potting, and lift it out to dump it later.
5. Styling and Maintenance: The Designer’s Touch
Once the layout and materials are set, we look at the aesthetics. A greenhouse should feel cohesive. The visual noise of hundreds of different plant textures is enough; your hardscaping should be calm and orderly.
Visual Cohesion
One of the easiest ways to make a small greenhouse feel larger and more professional is to standardize your pots.
You don’t need to spend a fortune, but try to stick to one or two materials. For example, use only terracotta and galvanized metal. When the containers match, the eye skips over them and focuses entirely on the lush greenery.
Flooring Choices
The floor is the “fifth wall” of your design.
- Pea Gravel: Excellent for drainage and humidity. It allows you to spray the floor with water to cool the greenhouse down.
- Pavers: Provide a stable surface for shelving units so they don’t sink or wobble.
- Concrete: easy to clean but can look sterile. I often soften it with outdoor rugs made of recycled plastic, which are mold-resistant.
Lighting for Ambiance
Don’t limit your greenhouse use to daylight hours. I love stringing commercial-grade bistro lights along the ceiling ridge. It turns the greenhouse into a magical evening destination for a glass of wine, not just a workspace.
Solar-powered path lights staked into large pots can also add a gentle glow without requiring electrical wiring.
Common Mistakes + Fixes
Mistake: Solid Shelving Everywhere
The Fix: Using solid wood planks for every shelf stops air circulation. Cold pockets form in corners, leading to mildew. Use slatting with at least 1-inch gaps between boards.
Mistake: Overloading the Frame
The Fix: Many aluminum greenhouse kits have lightweight frames. Hanging 50 pounds of ferns from a single rafter can buckle the roof. Always add cross-braces or independent support posts for heavy loads.
Mistake: Wood Touching the Ground
The Fix: If you build wooden shelves, the legs act like straws, sucking moisture up from the wet floor. This causes rot. Always put metal feet, bricks, or rubber pads under the legs to break the contact with the ground.
Final Checklist: The Pro Approach
If I were consulting on your greenhouse today, here is the checklist we would run through before installing a single shelf:
1. Check the Floor Level: Is the ground flat? If not, you need adjustable feet on your shelving units.
2. Measure the Trays: Measure your seed trays first. Ensure your shelf depth fits them perfectly so you don’t waste 3 inches of space per shelf.
3. Plan for Drainage: Where does the water go when you water the top shelf? If it drips on the plants below, is that okay? (Orchids hate this; ferns might not mind). Consider installing drip trays or slanted corrugated roofing under shelves to divert water.
4. Leave Room for Growth: Are your shelves adjustable? Plants grow. Fixed shelves are a nightmare when your seedlings turn into tall tomato plants. Use adjustable tracking systems.
5. Secure to Wall: Tall, narrow shelves are tippy, especially on gravel. Always anchor them to the greenhouse frame for safety.
FAQs
How deep should greenhouse shelves be?
The standard depth for a lower or waist-height bench is 20 to 24 inches. This allows you to reach the back comfortably. For upper shelves (eye level or higher), keep them between 10 and 12 inches deep to ensure they don’t block the light for the plants below.
Can I use pressure-treated wood inside a greenhouse?
I generally advise against it, especially if you are growing edibles. Older pressure-treated wood contained arsenic, and while modern versions use copper, chemicals can still leach into the soil or off-gas in high heat. Cedar, redwood, or hemlock are safer, natural alternatives.
How much space do I need between shelves vertically?
This depends entirely on what you are growing. For seed starting, you only need about 10 to 12 inches. For mature houseplants, you might need 24 to 36 inches. This is why adjustable tracks (like twin-slot shelving) are the best investment for a serious gardener.
What is the best way to clean greenhouse shelves?
At the end of every season, remove all plants. Scrub wood or metal shelves with a mixture of hot water, mild dish soap, and a splash of vinegar or oxygen bleach. This kills overwintering pests and fungal spores. Let the greenhouse vent out and dry completely before restocking.
Conclusion
Creating a greenhouse that maximizes space is about respecting the geometry of the room and the biology of the plants. It requires a shift in mindset from “storage” to “display.” When you select durable materials, plan for vertical growth, and zone your work areas, the greenhouse becomes efficient and enjoyable.
Remember, the goal is to spend less time shuffling pots around to find space, and more time enjoying the act of growing. With the right shelving strategy, even a small 6×8 greenhouse can produce an abundance of life.
Picture Gallery


