
Innovative Ideas for Bathroom Ceilings to Inspire You
When we walk into a bathroom, our eyes usually dart to the vanity, the tile work, or the fixtures. The ceiling is often treated as an afterthought, slapped with a coat of standard white flat paint and ignored until a leak appears. In the interior design world, we refer to the ceiling as the “fifth wall,” and in a small space like a bathroom, it offers more design potential per square inch than almost anywhere else in the home.
I once worked on a powder room renovation where the client felt the space was too claustrophobic. Instead of tearing down walls, we lacquered the ceiling in a high-gloss navy blue; suddenly, the room felt infinite, moody, and intentionally cozy rather than cramped. For a visual feast of specific examples, check out the comprehensive Picture Gallery located at the end of this blog post.
Treating your bathroom ceiling with the same care as your floors or walls can elevate the entire renovation. Whether you are dealing with a standard 8-foot height or a soaring vaulted master bath, the right treatment draws the eye up and creates a finished, high-end look.
1. The Power of Paint and Color Blocking
The easiest and most cost-effective way to transform a bathroom ceiling is through paint. However, simply picking a color isn’t enough; you need to understand how placement affects the perception of space.
Color Drenching
One of my favorite techniques for powder rooms or small guest baths is “color drenching.” This involves painting the baseboards, walls, crown molding, and ceiling the exact same color. When you remove the visual break between the wall and the ceiling, the boundaries of the room disappear.
This is particularly effective with moody colors like charcoal, forest green, or deep plum. It turns a small, boxy room into a jewel box. If you choose this route, ensure your lighting is adequate, or the room will feel like a cave.
Contrast and Finish
If you prefer a traditional separation, reconsider the finish. In bathrooms, flat paint is standard for ceilings because it hides drywall imperfections. However, flat paint is porous and absorbs moisture.
For a ceiling that handles steam better, I recommend a satin finish. It has a slight sheen that reflects light, making the ceiling feel higher, and it is much easier to wipe down if condensation builds up.
Common Mistakes + Fixes
Mistake: Using flat paint directly above a shower.
Fix: Flat paint traps moisture and promotes mildew growth in high-humidity zones. Always use a bathroom-specific paint with antimicrobial additives in a satin or semi-gloss finish for the area directly above the shower stall.
2. Adding Warmth with Wood Treatments
Bathrooms are inherently “cold” spaces filled with hard surfaces like ceramic, porcelain, glass, and metal. Adding wood to the ceiling is the single best way to introduce organic warmth and softness.
Tongue and Groove vs. Shiplap
Wood cladding is timeless. For a coastal or cottage vibe, V-groove paneling works wonders. If you want something more modern or rustic, shiplap offers a wider plank look.
When installing wood in a bathroom, the material choice is critical. Real wood expands and contracts with humidity. You must acclimate the wood to the room for at least 72 hours before installation.
Faux Beams for Architecture
If you have high ceilings (9 feet or above), installing faux wood beams can bring the scale of the room down to a more human level. This creates a spa-like, intimate atmosphere.
I often arrange beams in a grid pattern for a coffered look or run them parallel to the longest wall to elongate the room. Since faux beams are hollow and lightweight, they are safe to install without reinforcing the joists above.
Designer’s Note: The Moisture Barrier
In a real project, I never install raw wood in a bathroom. Every piece of timber must be sealed on all six sides—front, back, and all four edges—before it goes up.
If moisture gets behind the plank, unsealed back faces will warp, causing the ceiling to buckle. Use a marine-grade polyurethane or a high-quality exterior sealer for longevity.
3. Wallpaper and Statement Textures
Wallpapering the ceiling is a trend that has solidified into a design staple. It provides a surprise element that guests don’t expect.
Choosing the Right Material
You cannot use standard paper-based wallpaper in a full bathroom. The humidity will cause the paper to swell and the glue to fail.
You must look for “non-woven” wallpapers or solid vinyl options. These are breathable and resistant to moisture. Additionally, use a mildew-resistant clay adhesive rather than standard clear paste.
Scale and Pattern
The ceiling is a great place to take a risk with pattern because it doesn’t compete with your eye level.
- For small rooms: A dense, small-scale pattern can mimic the look of a mosaic.
- For large master baths: Large-scale botanicals or geometric shapes work best. Small patterns can look “busy” or like visual noise when spread across a large surface area.
Renters and Temporary Solutions
If you are renting, peel-and-stick wallpaper is a fantastic option. However, gravity is working against you.
To ensure it stays up, clean the ceiling thoroughly with a degreaser or a TSP substitute to remove any invisible soap scum or dust. Let it dry completely for 24 hours before application.
4. Tiling the Fifth Wall
Tiling the ceiling is a functional and aesthetic powerhouse move, especially in steam showers or wet rooms. It creates a seamless, waterproof envelope.
Continuity
The most modern approach is to take the wall tile and continue it straight across the ceiling. This works exceptionally well with large-format tiles (like 12×24 inch), as it creates long, uninterrupted lines that make the shower feel massive.
Weight and Safety
This is where DIYers often get into trouble. Tile is heavy. Standard drywall cannot support the weight of tile on a ceiling; it will eventually pull away and crash down.
You must install a cement board substrate (like HardieBacker or Durock) screwed into the joists with specific spacing. For steam showers, a waterproofing membrane like Kerdi is mandatory behind the tile.
What I’d Do in a Real Project
When specifying a tiled ceiling, I always switch to epoxy grout. Cement-based grout is porous and can discolor from rising steam and condensation. Epoxy grout is waterproof, stain-proof, and creates a permanent seal that keeps the ceiling looking pristine for decades.
5. Architectural Moldings and Trays
If you want elegance without introducing new colors or materials, architectural molding is the answer. It adds depth and shadow play.
Crown Molding
A heavy crown molding draws the eye upward. In a bathroom, I prefer using PVC or polyurethane moldings instead of MDF or wood. They look identical once painted but are completely impervious to water and will never rot.
Tray Ceilings
If you are doing a major renovation and have the attic space above, consider framing out a tray ceiling. This adds height to the center of the room.
I often line the inside of the tray with a different material, such as beadboard or a soft contrasting paint color, to accentuate the depth.
Common Mistakes + Fixes
Mistake: Installing crown molding in a room with low ceilings (under 8 feet).
Fix: Heavy molding can make a low ceiling feel lower. Instead, run the wall tile all the way to the ceiling line. If you must use molding, choose a flat profile that mounts partially on the ceiling rather than just the wall, which helps blur the edge.
6. Lighting Integration
Your ceiling treatment and your lighting plan must be developed together. The type of ceiling dictates the type of light, and vice versa.
Cove Lighting
If you install a tray ceiling or drop the ceiling slightly around the perimeter, you can install LED tape lights to create a “cove.” This casts a soft, indirect glow onto the ceiling.
This is the most flattering light for a bathroom because it mimics natural daylight and eliminates harsh shadows on the face.
Pendants and Chandeliers
A chandelier over a freestanding tub is a classic luxury look. However, there are strict electrical codes regarding this.
The Rule of Thumb: The bottom of the fixture usually needs to be at least 8 feet above the highest point of the tub rim, unless the fixture is low-voltage or protected by a GFCI circuit. Always consult a licensed electrician.
For placement, I like to center a statement fixture over the circulation space in the room, rather than just centering it in the geometric center of the room. Think about where you stand and walk.
7. Metal and Tin Accents
For a vintage or industrial aesthetic, pressed tin panels or corrugated metal can be stunning.
Vintage Appeal
Pressed tin tiles are perfect for Victorian or farmhouse renovations. They come in various finishes, from bright copper to powder-coated white.
If you use real metal, it must be sealed to prevent rust. Many designers now use faux-tin tiles made of thermoplastic. They are lightweight, easy to cut with scissors, and completely rust-proof.
Industrial Edge
Corrugated galvanized metal is a bold choice for a boys’ bathroom or a rustic cabin. It reflects light interestingly and is incredibly durable.
To prevent it from looking like a shed, pair it with high-end finishes like marble countertops and polished chrome fixtures. The contrast between the “rough” ceiling and the “refined” fixtures creates the design magic.
Final Checklist: Before You Start
Before you purchase materials or hire a contractor, run through this checklist to ensure your ceiling idea is viable for your specific bathroom.
- Ventilation Check: Do you have a working exhaust fan? If your mirror fogs up completely after a shower, your ventilation is insufficient. Upgrade your fan (look for 110+ CFM) before investing in an expensive ceiling treatment.
- Ceiling Height: Measure exactly. If you have 8-foot ceilings, avoid dark, heavy beams. If you have 10-foot ceilings, you need larger-scale patterns or fixtures to fill the void.
- Moisture Zone: Is the ceiling directly inside the shower stall? If yes, you are limited to tile, exterior-grade paint, or PVC beadboard. Wallpaper and wood are risky here.
- Lighting Rough-ins: Decide on your lighting layout before closing up the ceiling. Moving a junction box after the wood paneling is installed is a nightmare.
- Access Panels: Does your bathroom ceiling hide plumbing valves or HVAC access? Ensure your design incorporates a discreet access panel so you don’t have to destroy your work for a plumbing repair.
FAQs
Can I paint my bathroom ceiling a dark color?
Absolutely. While the old rule says white expands a room, a dark ceiling adds depth and blurs the boundaries of the space. It creates a cozy, cocoon-like effect that is perfect for powder rooms or bathrooms where you want to relax. Just ensure you have adequate wall sconces or recessed lighting so the room isn’t gloomy.
Is peel-and-stick wallpaper safe for bathrooms with showers?
Yes, but with caveats. It works best in well-ventilated bathrooms where the humidity doesn’t hang in the air for hours. Avoid placing it directly above the shower stall. Always smooth it out perfectly to prevent steam from getting under the seams, which causes peeling.
What is the best material for a bathroom ceiling renovation on a budget?
Paint is the obvious answer, but for a structural change, PVC beadboard is excellent. It is relatively cheap, easy to cut, water-resistant, and can be glued and nailed over existing drywall imperfections.
How do I handle a popcorn ceiling in a bathroom?
Removal is best, but messy. If you don’t want to scrape it (and have tested it for asbestos if the home is pre-1980), covering it is the best solution. Installing tongue-and-groove planks or a stretch ceiling system directly over the popcorn is a common designer workaround.
Conclusion
The bathroom ceiling is an opportunity to express personality in a space that is often purely utilitarian. Whether you choose the moody drama of a painted black ceiling, the organic warmth of cedar planks, or the clean luxury of floor-to-ceiling tile, the key is balancing aesthetics with moisture control.
Don’t be afraid to look up and imagine something other than white drywall. Start small with a bold paint color, or go big with architectural molding. The “fifth wall” might just become your favorite part of the room.
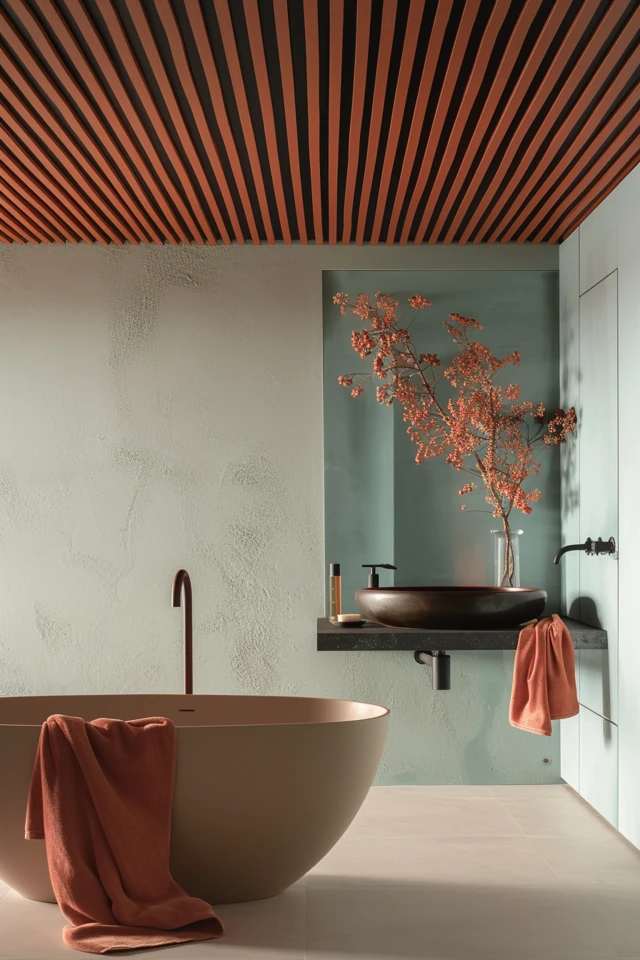
Picture Gallery


