
L Shaped Kitchen Island Ideas for Stylish Homes
The kitchen is rarely just a place to cook anymore. It has evolved into the command center of the home, where homework happens, guests gather, and meals are shared. If you are blessed with enough square footage, an L-shaped island is one of the most transformative design decisions you can make.
Unlike a standard rectangular island, an L-shape creates distinct zones naturally. It allows you to separate the messy prep work from the social space, keeping your guests close but out of the splash zone. Check out our curated Picture Gallery at the end of this post for visual inspiration.
In my years as an interior designer, I have found that this layout solves the specific problem of the “bowling alley” kitchen. It introduces perpendicular lines that stop the eye and create a cozy, conversational pocket. Let’s dive into how to design one that functions as beautifully as it looks.
Defining Zones: The Functional Layout
The primary advantage of an L-shaped island is the ability to multitask without chaos. You effectively create two different islands that share a corner. I almost always recommend designating the longer “arm” of the L for utility and the shorter arm for hospitality.
On the utility side, you should focus on the “work triangle.” This is where you might install a prep sink, a dishwasher, or pull-out trash bins. The goal is to keep this area within pivoting distance of your stove and refrigerator.
The hospitality arm—usually the section facing the living room or dining area—is for seating and serving. By keeping the stove and sink on the other axis, you ensure that someone sitting with a glass of wine isn’t getting splashed by dishwater. This separation is vital for maintaining a relaxed atmosphere during parties.
Designer’s Note: The Clearance Rule
One of the most frequent errors I see in DIY kitchen renovations is ignoring clearance zones. An L-shaped island is bulky, and it eats up floor space quickly.
- The Golden Rule: You need a minimum of 36 inches of walkway clearance on all sides.
- Ideally: Aim for 42 inches for a one-cook kitchen and 48 inches if two people cook simultaneously.
- The Fix: If you don’t have the space, do not force it. A cramped kitchen feels cheap, regardless of the finishes. Tape the outline on the floor with painter’s tape and walk around it for a few days before ordering cabinetry.
Seating Configurations and Comfort
Standard islands force everyone to sit in a straight line, which makes conversation difficult for more than three people. An L-shaped island solves this by creating a slight wrap-around effect. This arrangement encourages eye contact and makes the kitchen feel more like a lounge.
When planning your seating, you have two main options: bar height (raised) or counter height (flush). For modern homes, I almost exclusively specify counter-height seating. It creates a cleaner visual line and expands your usable prep surface when the chairs are empty.
However, you must account for “knee space.” Nothing is worse than sitting at an island and banging your knees against the cabinetry.
Measurements for Seating
- Width: Allow 24 inches of width per person for comfortable dining.
- Depth: The overhang should be at least 15 inches deep for counter-height stools.
- Height: Standard counters are 36 inches high; pair these with stools that have a seat height of 24–26 inches.
Common Mistakes + Fixes
Mistake: Using heavy, solid cabinetry underneath the seating overhang without protection.
The Fix: The back of the island where people sit is a “kick zone.” Kids and guests will scuff this area. I recommend paneling this section with a durable material like shiplap, oak slats, or a darker paint color that hides scuffs better than white.
Maximizing the “Dead” Corner
The intersection where the two arms of the L meet creates a notoriously difficult storage area. In standard cabinetry, this often becomes a dark cavern where Tupperware lids go to die. However, with custom island design, we can turn this into an asset.
One approach is to access that corner from the “back” side of the island (the seating side). Use a touch-latch cabinet door hidden under the overhang to store seasonal items like holiday platters or turkey roasters. You won’t need to access them often, so the awkward reach isn’t a dealbreaker.
Alternatively, you can install a “Magic Corner” pull-out or a heavy-duty Lazy Susan. These mechanisms swing the internal shelves out into the room, bringing the contents to you.
Smart Appliance Integration
The L-shape offers ample real estate for under-counter appliances. Here is how I like to distribute them:
- Microwave Drawer: Place this on the interior, working side of the island, away from the main cooktop traffic.
- Beverage Center: Install a wine fridge or beverage cooler on the outer, social arm of the L. This allows guests to grab a drink without entering the cooking zone.
- Outlets: Code requires electrical outlets on islands. Hide them in the side panels or use pop-up outlets on the countertop to keep the backsplash clean.
Material Selection and Countertops
An L-shaped island requires a significant amount of countertop material. This can be a challenge because stone slabs come in fixed sizes. You will almost certainly have a seam where the two pieces of stone meet.
To handle this, you need a skilled fabricator who can “bookmatch” the stone. This means mirroring the veining so the seam looks intentional rather than accidental. If you are using quartz, the seam is easier to hide, but with natural marble or granite, the pattern needs to flow.
Another stylish option is to mix materials. You can use a durable quartz for the “prep” arm of the island and a warm wood butcher block for the “eating” arm. This not only solves the seam issue but also adds visual texture and delineates the zones.
For Families and Renters
If you are renting or on a tight budget, you can still achieve this look without a full remodel.
- The Hack: Buy a standard rectangular rolling island and place a rectangular dining table perpendicular to it.
- Durability: If you have young kids, avoid polished marble. It etches instantly with lemon juice or tomato sauce. Go for a honed finish or a high-quality quartz that mimics the look of stone without the fragility.
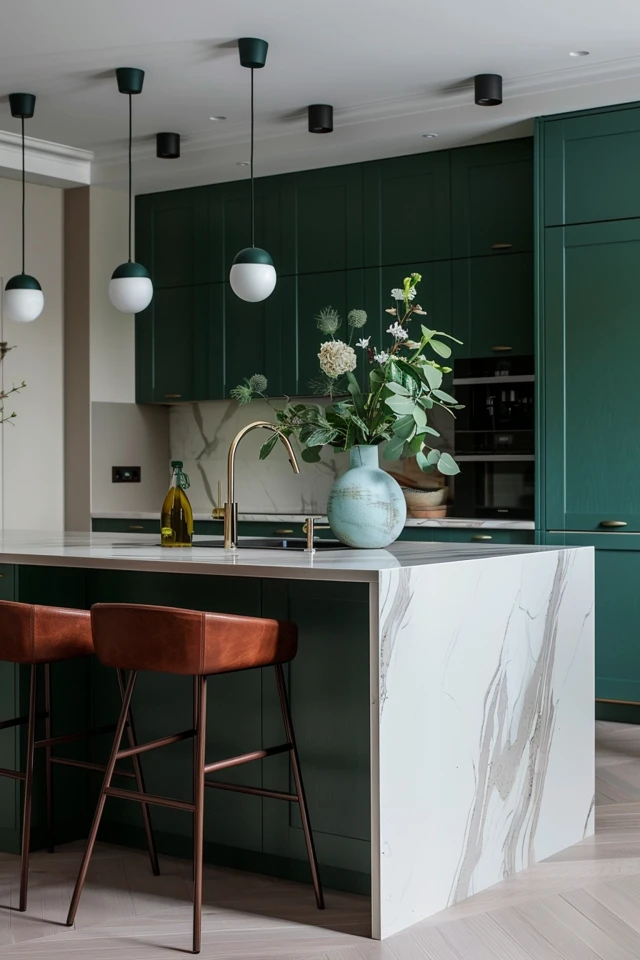
Lighting the L-Shape
Lighting an L-shaped island is trickier than lighting a straight one. If you hang a straight row of pendant lights, it can look disjointed against the angled footprint below. You need a lighting plan that acknowledges the shape of the cabinetry.
I generally recommend following the shape of the island with recessed can lights for general illumination. For decorative pendants, you have to be strategic.
One successful method is to hang a large statement chandelier over the “corner” or the largest section of the island, rather than trying to string small lights along the whole length. Alternatively, you can use two oversized pendants centered over the longer arm of the island, leaving the shorter arm clear.
Lighting Rules of Thumb
- Height: The bottom of the pendant should sit 30 to 36 inches above the countertop.
- Spacing: Lights should be spaced roughly 30 inches apart from bulb to bulb.
- Scale: A common error is choosing lights that are too small. An L-shaped island is massive; tiny pendants will get lost. Go bigger than you think you need.
What I’d Do in a Real Project: A Mini Checklist
If I were designing an L-shaped island for your home today, this is the exact workflow I would follow to ensure success.
1. Tape and Test
I would outline the island on your floor using blue painter’s tape. I would then place cardboard boxes to mimic the height. I would ask you to walk through the space carrying a laundry basket or a tray of food to test the clearances.
2. Check the Slab Size
Before falling in love with a marble slab, I would check its dimensions against the L-shape. If the seam creates an ugly cut through a beautiful vein, we pick a different stone or adjust the island dimensions.
3. Plan the Plumbing First
Moving gas lines and water pipes in a slab foundation is expensive. I would try to locate the prep sink on the island near existing plumbing lines if possible.
4. Select the Stools Early
I would choose the stools before finalizing the overhang depth. If you want big, comfortable leather armchairs, we might need an 18-inch overhang instead of the standard 15 inches.
5. Add “Furniture” Details
To keep the island from looking like a utility block, I would add furniture-style legs to the seating area or a contrasting color for the base cabinetry. This anchors the room.
FAQs
Is an L-shaped island more expensive than a regular island?
Generally, yes. It requires more cabinetry, more countertop material (often two slabs), and more complex installation labor. The corner storage mechanisms also add to the hardware cost.
Can I put an L-shaped island in a small kitchen?
It is difficult. L-shaped islands dominate a room. If your kitchen is less than 12×12 feet, this layout might make the room feel claustrophobic. A galley layout or a small peninsula is often better for tight spaces.
Should the island height match the rest of the kitchen counters?
Yes, for a cohesive look, keep the island at 36 inches high. Split-level islands (with a raised bar top) are considered dated in modern design and break up the visual flow of the room.
Conclusion
An L-shaped kitchen island is a commitment to a specific way of living. It prioritizes connection, cooking, and conversation all in one centralized hub. While it requires careful planning regarding clearance and seams, the payoff is a kitchen that feels grand and welcoming.
By separating the work zones from the social zones, you allow your home to function smoothly even when it is full of guests. Whether you are doing a full gut renovation or just looking for layout inspiration, remember that function must come first. Once the flow works, the style will naturally follow.
Picture Gallery


