
Title: Small Garden Stream Ideas for Your Backyard Haven
Introduction
There is nothing quite like the sound of moving water to transform a frantic day into a peaceful evening. For many of my clients, a water feature is the ultimate goal, but they often believe their yard is too small to accommodate one. If you are looking for visual inspiration to spark your creativity, please scroll down to view the Picture Gallery at the end of this blog post.
You do not need a sprawling estate to create a river; you simply need to understand scale and perspective. In fact, a small garden stream often feels more intimate and magical because it is contained within a “secret garden” setting. I once designed a stream for a row house courtyard that was only twelve feet wide, and it remains one of my favorite projects to date.
The key to success in a compact space is blending the water feature seamlesslessly with your hardscaping and planting. It should look as though the garden grew around the water, rather than the water being dropped into the garden. In this guide, I will walk you through the design principles, mechanical realities, and styling tricks I use to bring these features to life.
1. Mapping the Flow: Scale and Perspective
The biggest mistake I see DIYers make is underestimating the footprint of a stream. While the water channel might only be two feet wide, the supporting berms and rock work will take up three times that space. In a small yard, every square foot counts, so we have to be strategic about placement.
I always advise clients to place the stream where it can be viewed from the interior of the home. Stand in your kitchen or living room—wherever you spend the most time—and identify your primary sightline. The stream should ideally flow toward this viewpoint, as looking down the length of a stream makes a space feel deeper than it actually is.
If you position the stream to flow perpendicular to your view (left to right), it creates a visual barrier that can cut the yard in half. By orienting it to flow toward the house or patio, you draw the eye outward, creating an illusion of distance.
Regarding size, a stream in a small garden should generally be between 6 and 15 feet in length. Anything shorter tends to look like a puddle; anything longer can overwhelm the space. The width of the water course should vary, pinching to 10 inches in some spots and widening to 24 inches in pools, to mimic nature.
2. The “Pondless” Approach: A Safety and Space Solution
For 90% of my residential clients with small yards, especially those with kids or pets, I recommend a “pondless” stream. Traditional streams empty into a standing pond, which requires significant maintenance and poses a drowning risk for toddlers and small animals.
A pondless stream creates the illusion of a creek disappearing into the ground. The water flows over the rocks and vanishes into a hidden underground reservoir filled with gravel. A pump buried deep in this gravel pit circulates the water back to the top.
This design is brilliant for small spaces because you do not lose square footage to a stagnant pond. When the pump is off, the water drains away completely, leaving a dry rock bed that looks like natural landscaping. This allows you to walk across the feature when it is not in use.
From a maintenance perspective, this is a game-changer. Algae requires standing water and sunlight to thrive. Since the water in the reservoir is underground and dark, algae growth is significantly reduced. This approach typically saves my clients about two hours of maintenance work per month.
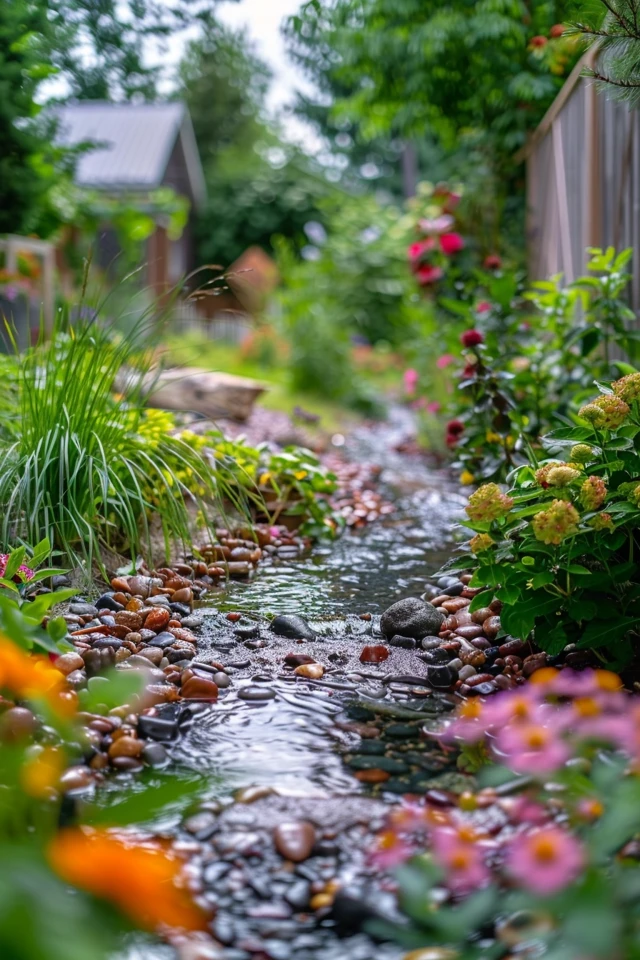
3. Rock Selection and Placement: The Rule of Thirds
Nothing ruins the illusion of a natural stream faster than the “pearl necklace” effect. This happens when homeowners buy rocks of the exact same size and line them up in a perfect single file along the edge of the liner. Nature is chaotic, and your design should reflect that.
To achieve a professional look, you need three distinct sizes of stone. I use a specific ratio for my projects: 1 part large boulders (approx. 12-18 inches diameter), 2 parts medium river rock (4-8 inches), and 1 part small gravel (1-2 inches).
Start by placing the large boulders first. These are your structural anchors. Place them at the twists and turns of your stream to “deflect” the water. A boulder jutting into the stream creates the turbulence that makes the pleasing babbling sound.
Fill in the gaps with the medium stones, and use the gravel to cover the bottom liner and hide the cracks between larger rocks. The goal is to hide every square inch of the black rubber liner. If you can see the liner, the illusion is broken.
Designer’s Note: When placing the large boulders, bury the bottom one-third of the rock into the ground. A rock sitting on top of the soil looks dropped; a rock buried slightly looks like it has been there for a thousand years.
4. Softscaping: Planting the Water’s Edge
The transition between the wet rock and the dry soil is the most critical area for design integration. If you have a harsh line where the rocks stop and the mulch begins, the stream will look artificial. You need plants that spill over the edge to soften this boundary.
I categorize stream plants into two zones: “The Spillers” and “The Anchors.” Spillers are low-growing ground covers that creep over the rocks and dip into the water. Creeping Jenny (Lysimachia nummularia) is the gold standard here. Its chartreuse leaves contrast beautifully with dark wet stone and it loves the moisture.
For “The Anchors,” I use plants with architectural interest to frame the view. In shady small gardens, ferns and Hostas are unbeatable. A large Blue Angel Hosta placed at the head of the stream can effectively hide the filtration box and the hose origination point.
Be mindful of root systems. Never plant aggressive bamboo or willow trees right next to a lined stream. Their roots are incredibly powerful and will eventually puncture the EPDM rubber liner, causing leaks that are nightmare to find and fix. Stick to shallow-rooted perennials and grasses.
5. Lighting and Sound Tuning
A garden stream should be enjoyed 24 hours a day. Lighting a water feature requires subtlety; you never want to shine a light directly at the viewer, as the glare will blind you to the rest of the yard.
I use submersible 2-3 watt LED puck lights placed inside the waterfalls, shining up into the falling water. This creates a shimmering, dancing light effect that reflects off nearby foliage. Use warm white bulbs (2700K to 3000K). Cool white light (4000K+) looks like a shopping mall fountain and ruins the natural ambiance.
Sound tuning is an art form that many overlook. The sound of the water is determined by the distance the water falls. A drop of 2 inches creates a gentle trickle, perfect for meditation or reading nooks. A drop of 6 to 8 inches creates a robust splash, which is excellent for masking traffic noise from a nearby street.
If you build your stream and find the water is too loud, you can “tune” it by adding a flat stone at the bottom of the waterfall to reduce the depth of the crash. If it is too quiet, remove a stone to increase the fall distance.
Common Mistakes + Fixes
Mistake: The Volcano Effect.
This happens when the dirt dug out for the stream is piled up high to create the waterfall, resulting in an unnatural mound that looks like a volcano erupting from a flat yard.
The Fix: Grade the soil gently. The berm for the waterfall should slope back gradually over several feet. Use plantings behind the waterfall to hide the change in elevation.
Mistake: Undersized Pump.
Buying a cheap pump results in a pathetic trickle that looks like a leaky pipe rather than a stream.
The Fix: Calculate your “Head Height” (the vertical distance from the water surface in the reservoir to the top of the waterfall). Buy a pump rated for at least 1,500 Gallons Per Hour (GPH) at your specific head height for a standard 10-foot stream.
Mistake: Blue Water.
Some people add blue dye to the water thinking it looks tropical. In a small garden, it just looks like mini-golf course water.
The Fix: Keep the water clear. The beauty comes from the color of the wet stones and the reflection of the sky, not artificial dyes.
What I’d Do in a Real Project: Mini Checklist
If I were consulting on your small backyard today, this is the exact workflow I would follow:
1. Site Analysis: Mark out the stream path with a garden hose. Leave it there for 24 hours to ensure it doesn’t block foot traffic.
2. Excavation: Dig the stream bed in “steps” or shelves, not a smooth slide. This holds rocks in place.
3. Liner & Underlayment: Install a non-woven geotextile underlayment first (to protect from roots/rocks), then a 45-mil EPDM fish-safe liner.
4. Rock Installation: Place boulders first, then medium stones, then gravel. No liner visible.
5. Foaming: Use black waterfall foam to fill gaps behind the waterfall stones. This forces water over the rocks rather than sneaking under them.
6. Planting: Plant heavy at the top (to hide the source) and soft at the edges.
7. Lighting: Install two submersible lights at the main drops.
8. Mulch: Finish the surrounding soil with dark hardwood mulch to make the greenery pop.
FAQs
How much does a small stream affect my electric bill?
Modern high-efficiency pumps are surprisingly cheap to run. A standard 2,000 GPH pump typically uses about as much electricity as a 150-200 watt lightbulb. Depending on your local rates, this might cost between $10 and $20 per month if run 24/7. You can put it on a timer to save money, but running it constantly extends the pump’s life.
Will a stream attract mosquitoes?
Mosquitoes only lay eggs in stagnant, still water. As long as your stream is running, the water is moving too fast for them. If you use a pondless design, the reservoir is underground, so they cannot access the water even when the pump is off.
How do I handle winter maintenance?
If you live in a hard-freeze climate (Zone 5 or lower), you have two options. You can remove the pump and store it in a bucket of water in your garage (to keep seals from drying out). Or, if you have a pondless system, you can just unplug it. The water drains into the deep underground pit, which is usually below the frost line, preventing damage.
Can I build a stream on a completely flat yard?
Yes. In fact, most yards are relatively flat. You create the slope by digging the reservoir pit deep (usually 2 feet) and using that excavated dirt to build up the “head” of the stream by 12 to 18 inches. That subtle elevation change is all you need for gravity to do its work.
Conclusion
Adding a stream to a small backyard is an exercise in restraint and detail. By focusing on scale, hiding the mechanics, and softening the edges with lush planting, you can create a feature that feels like a natural spring rather than a plumbing project.
Remember that the goal is not to replicate Niagara Falls, but to capture the essence of a mountain brook. The sound of water has a primal ability to lower blood pressure and mask the noise of the outside world.
Whether you hire a landscape pro or tackle this as a weekend warrior project, the result is always worth the effort. Start with a solid plan, buy more rocks than you think you need, and enjoy your new sanctuary.
Picture Gallery


