
Transform Your Attic with Chic Closet Ideas
There is something undeniably magical about an attic space. While many homeowners see dusty boxes and awkward angles, I see the potential for the ultimate sanctuary. Converting this underutilized square footage into a dressing room is one of the smartest investments you can make for your home’s value and your daily routine.
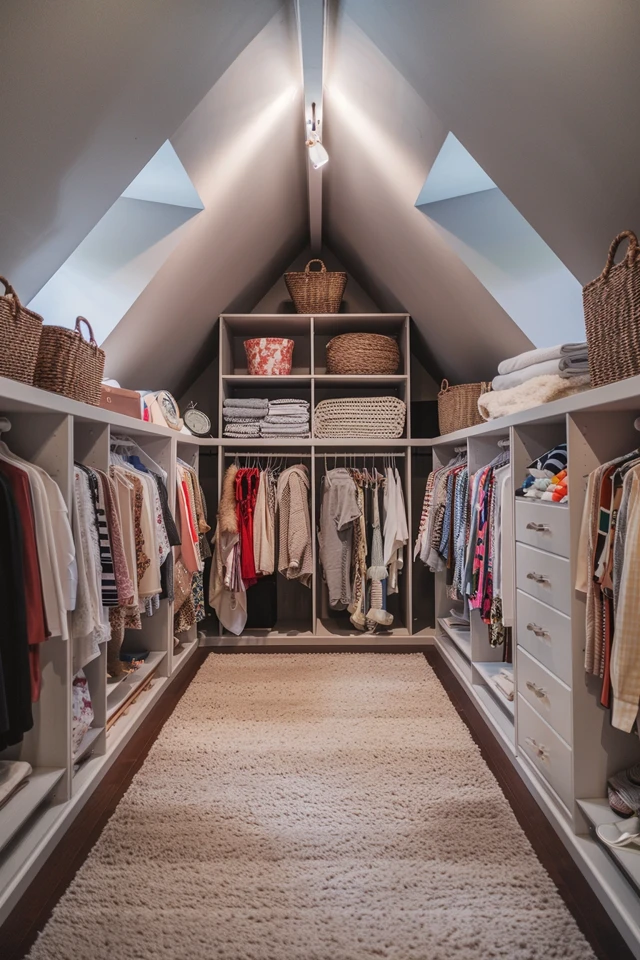
I recently worked on a project where the client was ready to move because they lacked storage. By reimagining their dark, unfinished attic, we created a boutique-style walk-in closet that actually convinced them to stay. If you are looking for visual inspiration to guide your renovation, be sure to check out the Picture Gallery at the end of this blog post.
However, designing an attic closet isn’t quite like designing a standard room. You are battling gravity, slopes, and usually a lack of natural light. But with the right rules of thumb and a bit of creativity, those constraints often lead to the most interesting design moments.
1. Assessing the Anatomy of Your Attic
Before we start picking out brass hardware or velvet ottomans, we need to have a serious conversation about structure. Attics are quirky environments. Unlike a standard bedroom, you don’t have four vertical walls to work with.
The first thing I check in any attic consultation is the “knee wall” height. This is the short vertical wall that connects the sloped ceiling to the floor. In most attics, this is between 30 and 40 inches high.
Knowing this measurement is critical because it dictates what you can store there. You generally cannot hang adult clothing on a rod against a 40-inch knee wall without the hems dragging on the floor.
Designer’s Note: The Structural Reality Check
I once had a client who wanted heavy, solid oak cabinetry installed directly onto her attic floor joists. We had to pause and bring in a structural engineer. Attic floors are often framed with 2x6s intended only to hold up the ceiling below, not the live load of a fully furnished room. Before building, verify your floor joists are reinforced to handle the weight of wardrobes and foot traffic.
You also need to evaluate the insulation. Attics are notorious for extreme temperature swings. If you don’t have proper spray foam or batted insulation behind those knee walls, your clothes will suffer. Leather can crack in the heat, and moisture can lead to mold on fabrics.
2. Layout Strategies for Sloped Ceilings
The layout of an attic closet depends entirely on the roof pitch. The “A-frame” shape is the most common, creating a triangle of space. The biggest mistake I see is people trying to force standard tall wardrobes into the center of the room.
To maximize the space, you must push storage to the perimeter. This leaves the highest point of the room—the center line—clear for walking. You want a comfortable clearance of at least 7 feet in the center path to avoid feeling claustrophobic.
What I’d do in a real project:
- Zone A (Center): This is your walkway. Keep it clear. If the room is wide enough (over 10 feet), I might place a low island or ottoman here.
- Zone B (The Slopes): This is prime real estate for hanging rods. Place the rod far enough away from the slanted wall so hangers don’t hit the drywall. usually, this means mounting the rod 12 to 14 inches out from the slope.
- Zone C (The Knee Wall): This is for deep storage. I love building dresser drawers here or using open shelving for shoes.
If your attic is tight, consider a “galley” layout. This involves a single center aisle with hanging storage running parallel on both sides. It is efficient and mimics the feeling of a high-end boutique.
Common Mistakes + Fixes
Mistake: Installing shelves too deep under a sharp slope.
Fix: If the shelf is 24 inches deep but the ceiling slopes down sharply, you won’t be able to access the items at the back of the top shelf. Keep upper shelves shallower (12–14 inches) to maintain access.
3. Storage Solutions for Awkward Angles
Standard IKEA boxes or big-box store closet systems rarely work in attics without major hacking. This is usually a job for custom carpentry or very clever modular systems. The goal is to embrace the triangle.
Utilizing the Knee Wall
The space behind the knee wall is often wasted. In my designs, I like to recess dresser drawers into the wall. This gives you flush-mount storage without encroaching on the floor space. If that isn’t structurally possible, place low-profile dressers against these short walls.
Hanging Heights
You need to be ruthless about measuring your vertical clearance.
- Long Hang: Dresses and long coats require 60–66 inches of vertical space. You usually cannot put these on the sloped sides. Reserve a tall gable end wall or a partition wall near the entrance for these items.
- Short Hang: Shirts and folded pants need about 40 inches. This fits perfectly under most slopes, provided you pull the rod forward.
Shoe Storage
Attics are perfect for shoe display because shoes don’t require much height. You can install angled shelves right into the lowest part of the eaves. I usually space shoe shelves 8 to 10 inches apart vertically.
Designer Tip: If you have a really tight corner where the roof meets the floor, use it for luggage storage. Suitcases are bulky and rarely used, making them perfect candidates for those hard-to-reach deep corners.
4. Lighting and Ventilation Essentials
Lighting is the number one failure point in DIY attic closets. Because the ceilings are low and angled, you generally cannot use pendant lights or bulky chandeliers. They visual clutter the space and become head-bumping hazards.
The Lighting Plan
I rely heavily on recessed cans and LED strips in attics. Gimbal recessed lights are a pro secret; they pivot, allowing you to direct the beam of light straight down even if the ceiling is sloped.
LED Strip Lighting
I insist on integrating LED channels into the closet joinery. Run a strip of LED light along the top of your hanging rod or vertically down the side of shelf units. This ensures you can actually distinguish navy blue from black.
Color Temperature Matters
Always aim for 3000K to 3500K color temperature. This provides a clean, white light that renders colors accurately. Anything warmer (2700K) will make your crisp white shirts look yellow.
Ventilation and Air Quality
Clothes create dust. In a small, enclosed attic, that dust settles quickly. Ensure you have return air vents installed to keep air circulating.
Temperature Control
If your central HVAC doesn’t reach the attic effectively, install a mini-split system. This allows you to control the humidity and temperature independently. High humidity is the enemy of handbags and silk; a mini-split is cheaper than replacing a ruined wardrobe.
5. Finishes and Styling for Cozy Vibes
Once the layout and mechanics are solved, we can have fun with the aesthetics. Attics naturally feel cozy and intimate, so I like to lean into that with texture.
Flooring Choices
Carpet is a safe bet for attics because it reduces noise transfer to the rooms below. However, if you want a luxe look, engineered hardwood or luxury vinyl plank (LVP) are great options. Just be sure to use a high-quality sound-dampening underlayment.
Mirrors
Mirrors are non-negotiable in tight spaces. They double the visual size of the room and bounce light around. I often cover the faces of the knee-wall cabinets in antique mirror glass. It hides the bulk of the cabinetry and makes the floor look like it extends further than it does.
Paint and Wallpaper
Don’t be afraid of wallpaper on the ceiling. In an attic, the ceiling is often more prominent than the walls. A subtle pattern draws the eye up and distracts from the weird angles.
If you prefer paint, I recommend painting the walls, trim, and ceiling the same color. This technique, called “color drenching,” blurs the lines where the angles meet. It makes the irregular shapes feel intentional rather than accidental.
The Hardware
Since attic closets often lack grand architectural details, your hardware is the jewelry. Oversized brass pulls or leather tabs can elevate simple MDF cabinetry into something that looks custom-made.
6. Advanced Customization: The “Designer” Touches
To truly make the space feel high-end, you need to think beyond basic shelves. It is the specific, tailored accessories that signal luxury.
Valet Rods
These are retractable rods that slide out perpendicular to your shelving. They are perfect for planning an outfit for the next day or airing out a piece of clothing. In an attic where wall space is scarce, a valet rod is a huge functional asset.
Jewelry Drawers
If you are building custom drawers into the knee wall, line the top drawer with velvet or felt. Custom inserts for rings and watches keep counters clutter-free. This is particularly important in attics where you might not have room for a standalone jewelry armoire.
A Place to Sit
Even in a small attic closet, try to squeeze in a place to sit. Putting on socks or shoes while standing on a sloped floor can be tricky. A small velvet pouf or a built-in window seat under a dormer window adds immense functionality.
Designer’s Note: The Mirror Trick
If you have a tall gable wall, lean a massive floor mirror against it. Anchor it to the wall for safety. This is often cheaper and more stylish than trying to install mirrored closet doors, which can look dated.
7. Final Checklist
Ready to start your renovation? Here is the workflow I use to ensure nothing gets missed.
- Measure the knee wall: Confirm you have at least 36 inches for usable storage.
- Check the floor: verify with a pro that the joists can support the weight.
- Insulate: Ensure the space is conditioned to protect your clothes.
- Map the rods: Place rods 12 inches off the slope to ensure hangers fit.
- Plan the height: locate the one tall wall for long dresses and coats.
- Lighting: Rough-in wiring for gimbal lights and LED shelf strips before drywalling.
- Ventilation: Install a vent or mini-split to manage heat and humidity.
- Flooring: Install sound-dampening underlayment.
- Installation: Build perimeter units first, then add any center islands.
- Style: Add rugs, mirrors, and hardware.
8. FAQs
Is it expensive to turn an attic into a closet?
It varies widely. If the attic is already finished (drywalled and floored), you might spend $2,000 to $5,000 on cabinetry and lighting. If you are starting with raw studs and need insulation, HVAC, and electrical, the cost can easily range from $15,000 to $30,000.
How do I stop my attic closet from smelling musty?
Airflow is key. Keep the door open when possible, use a dehumidifier, and ensure your roof is properly vented with soffit and ridge vents. Cedar blocks can also help mask odors and deter pests naturally.
Can I use IKEA PAX wardrobes in an attic?
Only if you have a flat ceiling height of nearly 8 feet. For sloped ceilings, IKEA PAX units usually have to be cut down, which ruins their structural integrity. You are often better off using the IKEA AURDAL or BOAXEL systems, which are wall-mounted rails that can be cut to fit angles.
Does an attic closet count as square footage for resale?
Generally, yes, provided it is accessible via a permanent staircase (not a pull-down ladder), has a minimum ceiling height (usually 7 feet for at least 50% of the room), and is heated/cooled. Check your local building codes for the specific definition of “habitable space.”
9. Conclusion
Transforming your attic into a chic closet is about more than just finding a place for your winter coats. It is about reclaiming lost space and creating a private retreat within your home. By respecting the architecture, prioritizing lighting, and customizing storage to fit the slopes, you turn a design challenge into a design feature.
Don’t let the angles scare you. With the right plan, those quirks become the character that makes your dressing room feel unique, cozy, and undeniably yours.
10. Picture Gallery


