
Transform Your Lanai with Chic Decorating Ideas
A lanai is more than just a porch or a patio; it is a vital transition zone that bridges the comfort of your interior living room with the refreshing openness of the outdoors. In many homes, especially in warmer climates, this space becomes the primary spot for morning coffee, evening cocktails, and weekend entertaining. The challenge lies in making it feel like a cohesive part of the home rather than an afterthought filled with leftover folding chairs.
To truly elevate this space, you need to treat it with the same design rigor you apply to your indoor living room. This means considering floor plans, lighting layers, and durable textures that can withstand humidity and sunlight. For plenty of visual inspiration to guide your renovation, check out the extensive picture gallery at the end of this post.
My goal in this guide is to walk you through the practical steps of transforming your lanai. We will move beyond basic furniture placement and dive into the specific measurements, material choices, and styling tricks that professional designers use to create those effortless, magazine-worthy outdoor rooms.
1. Layout and Zoning: Defining the Space
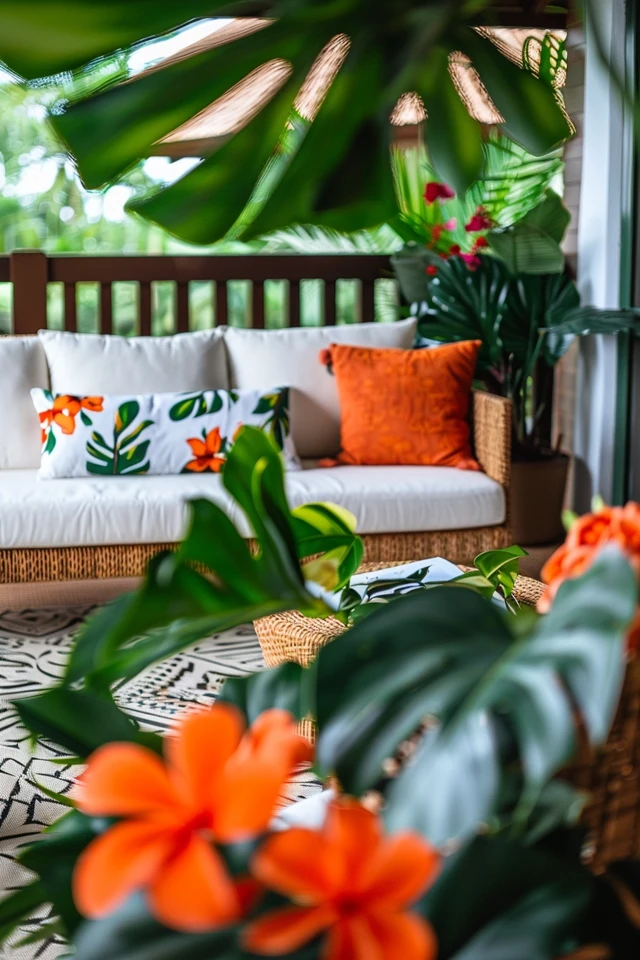
The biggest mistake homeowners make with lanais is pushing all the furniture against the walls to “maximize” space. This actually makes the room feel uninviting and cavernous. To create a chic environment, you must pull furniture away from the perimeter and create distinct zones.
If you have a standard 10×12 lanai, you likely have room for one primary function: either dining or lounging. If your space is larger, perhaps 12×20 or an L-shape, you should aim for two distinct zones. Use the back of a sofa or a large planter to visually divide the dining area from the conversation area.
Designer’s Note: The 3-Foot Rule
In professional space planning, flow is everything. You must maintain a clear pathway for traffic. I always allocate a minimum of 36 inches (3 feet) for main walkways. If you have a sliding glass door opening onto the lanai, ensure you aren’t placing a heavy armchair right in that 36-inch exit path. It ruins the flow and makes the house feel smaller.
Getting the Distances Right
- Coffee Table Clearance: Place your coffee table 14 to 18 inches away from the edge of the sofa. This is close enough to set down a drink but far enough to walk around comfortably.
- Conversation Circle: The front legs of your seating (sofas and chairs) should generally face each other. Keep the distance between seating pieces under 8 feet so guests don’t have to shout to be heard.
- Rug Sizing: Avoid the “postage stamp” look. Your rug should be large enough that at least the front legs of all furniture pieces sit on it. For a typical conversation set, an 8×10 rug is usually the minimum standard.
2. Flooring Foundations: Grounding the Look
Builders often leave lanais with plain, unsealed concrete. This is functional but rarely chic. The quickest way to transform the vibe is to address the floor. If you have the budget, installing slip-resistant porcelain tile that mimics natural stone or wood is a permanent upgrade that adds immense value.
If you are renting or working with a tighter budget, outdoor rugs are your best friend. However, you cannot use just any rug. In a lanai, moisture is a constant factor, even if the space is screened. You need materials that will not trap mold or mildew against the concrete.
Common Mistakes + Fixes
- Mistake: Using a jute or natural fiber rug. While they look beautiful, natural fibers absorb humidity and will rot or smell musty within a season in a damp lanai environment.
- Fix: Use 100% polypropylene rugs. They are synthetic, scrubbable, and resistant to UV fading. Look for “flatweave” styles rather than high-pile options, as they dry much faster after a heavy rain or a hose-down.
Layering for Luxury
To achieve a high-end designer look, try layering rugs. Start with a large, neutral sisal-look outdoor rug (polypropylene) to cover the bulk of the concrete. Then, place a smaller, patterned vintage-style outdoor rug on top, centered under the coffee table. This adds texture and visual interest without overwhelming the space.
3. Furniture Selection: Materials Matter
When selecting furniture for a lanai, you must balance aesthetics with durability. Since a lanai is covered, you have slightly more flexibility than an open patio, but you still have to deal with temperature fluctuations and ambient moisture.
My top recommendation for the “skeleton” of your furniture is aluminum or synthetic wicker. Powder-coated aluminum is lightweight, rust-proof, and easy to clean. Synthetic wicker (specifically high-density polyethylene, or HDPE) offers that classic, texture-rich look but won’t crack or peel like natural rattan.
Wood and Maintenance
If you love the look of wood, choose teak or eucalyptus. However, be realistic about maintenance. Teak will turn a silvery-gray patina over time if left untreated. If you want it to maintain that warm, honey-brown color, you will need to sand and oil it every 6 to 12 months.
What I’d Do in a Real Project: The Comfort Test
- Seat Depth: I never buy outdoor furniture without checking the seat depth. Look for a depth of at least 24 inches if you want a “lounge” feel. Shallow seats (under 20 inches) feel like waiting room furniture.
- Cushion Fabric: This is non-negotiable. Spend the extra money on solution-dyed acrylic fabrics (like Sunbrella or similar performance brands). They are water-repellent, bleach-cleanable, and fade-resistant. Polyester cushions will fade within one summer season.
- Foam Density: Ask for “quick-dry” foam. Standard indoor foam acts like a sponge and will hold water, leading to mold inside the cushion.
4. Lighting and Ambiance: Setting the Mood
Lighting is the most underutilized element in outdoor design. Most lanais come with a single, harsh overhead light or a basic ceiling fan kit. This creates an unflatering “interrogation room” effect at night. To make the space chic, you need to layer your lighting just like you would indoors.
The goal is to create a warm glow. Avoid “daylight” or cool white bulbs, which feel clinical. Stick to bulbs with a color temperature of 2700K to 3000K for that inviting, sunset warmth.
The Three Layers of Lanai Lighting
- Overhead: Upgrade your ceiling fan to a sleek, modern wet-rated fixture. If you have high ceilings, a statement outdoor chandelier (woven textures look great here) can act as a focal point.
- Ambient: String lights are a classic for a reason. Zig-zag them across the ceiling for a bistro vibe. Ensure you use commercial-grade cords that can withstand wind.
- Task/Accent: This is the secret weapon. Use portable, rechargeable LED table lamps on your side tables. They provide intimacy for late-night conversations. Additionally, consider a weighted floor lamp designed for exteriors to arc over your sofa.
Safety Tip:
Always check the rating on your fixtures. “Damp-rated” is acceptable for a covered lanai where rain doesn’t hit directly. “Wet-rated” is required if the fixture is exposed to direct elements or hose water.
5. Textiles and Decor: The Finishing Touches
This is where the “chic” really happens. Once the layout, flooring, and furniture are set, you use decor to inject personality. The line between indoor and outdoor decor is blurring, allowing us to bring substantial style outside.
Outdoor curtains are fantastic for lanais. They soften the hard lines of aluminum screen frames, provide privacy from neighbors, and block low-hanging afternoon sun. Look for curtains with grommets (metal rings) and consider sewing small weights into the bottom hem to keep them from blowing wildly in the breeze.
Styling the Coffee Table
Don’t leave your outdoor surfaces empty. Treat your outdoor coffee table like your indoor one, but with sturdier materials:
- A heavy stone or wood tray to corral small items.
- A citronella candle in a decorative ceramic vessel (keeps bugs away in style).
- A succulent bowl or a hardy potted plant like a Snake Plant (Sansevieria) or a ZZ plant, both of which tolerate varying light conditions well.
Pillows and Throws
You cannot have a cozy space without pillows. Mix sizes for a professional look. On a sofa, place 20-inch square pillows in the corners and layer a smaller lumbar pillow in the center.
Designer’s Note: Storage Solutions
Even the best fabrics should be protected during pollen season or heavy storms. I always incorporate a dual-purpose piece, like a large wicker storage trunk that doubles as a side table, or a bench with hidden storage. This gives you a place to quickly stash pillows and throws when the weather turns nasty.
6. Bringing Nature In: Biophilic Design
Since the lanai is a transition space, plants are essential. However, because the space is covered (roofed), it does not get direct rainfall, and often receives less light than the open garden.
You must select plants that thrive in bright, indirect light. Large potted plants in the corners soften the architecture.
- For Vertical Height: Ficus Audrey or a Bird of Paradise (if you have enough light).
- For Low Maintenance: Monstera Deliciosa or Ferns (great for humidity).
- Pot Selection: Use lightweight resin or fiberglass pots that look like concrete or ceramic. Real stone pots are often too heavy to move when you need to clean the floor.
Final Checklist: What I’d Do in a Real Project
If I were hired to design your lanai today, this is the exact order of operations I would follow to ensure success:
Phase 1: Planning
- Measure the room length and width.
- Measure the position of doors and clear walkways (36 inches min).
- Determine the primary function (dining vs. lounging).
- Set a budget (allocate 40% to furniture, 30% to flooring/lighting, 30% to decor).
Phase 2: Purchasing
- Select the rug first—it sets the color palette.
- Order major furniture pieces (check lead times).
- Purchase lighting fixtures (schedule an electrician if wiring is needed).
Phase 3: Installation & Styling
- Deep clean the space (pressure wash concrete, clean screens).
- Lay down the rug.
- Assemble and place furniture (start with the largest pieces).
- Install lighting.
- Add plants, pillows, and tabletop decor.
Frequently Asked Questions
How do I keep my lanai furniture clean?
For aluminum and wicker, a monthly wash with mild dish soap and water is sufficient. For cushions, brush off loose dirt regularly. If a stain occurs on performance fabric, blot it immediately. Most Sunbrella fabrics can be cleaned with a bleach solution for tough mold stains, but always check the manufacturer’s tag first.
Can I put a TV on my lanai?
Yes, but you should buy an outdoor-rated TV. These are built to withstand humidity and temperature swings. If you use a regular indoor TV, moisture will eventually corrode the internal components, and it creates a safety hazard. Always mount it away from direct rain exposure and use a weatherproof cover when not in use.
My lanai is very narrow. What should I do?
For narrow spaces, avoid bulky sofas. Instead, use four comfortable armchairs arranged around a round coffee table. This creates a cozy conversation circle without blocking the flow. Alternatively, a slim “bistro set” for dining fits well in tight corners.
How do I deal with pollen season?
There is no magic shield for pollen. During high pollen counts, I recommend stacking your cushions and covering them with a custom furniture cover or storing them in an airtight deck box. Hose down the screens and floor weekly to prevent buildup.
Conclusion
Transforming your lanai from a simple screened-in porch to a chic, functional living space is one of the most rewarding home improvement projects you can undertake. It effectively adds square footage to your home and encourages a slower, more relaxed lifestyle.
By focusing on a functional layout, investing in durable materials like solution-dyed acrylics and aluminum, and layering lighting and textures, you can create a retreat that rivals any high-end resort. Remember to measure twice, respect the flow of traffic, and don’t be afraid to bring your personal interior style outdoors.
Picture Gallery


