
Hillside Step Designs: Creative Ideas for Slopes
Designing a landscape on a hill is one of the most intimidating challenges a homeowner can face. While flat yards offer a blank canvas, a slope requires engineering, careful planning, and a deep understanding of gravity and drainage. However, I have found that these constraints often lead to the most breathtaking results in landscape architecture.
When you work with the land rather than fighting against it, you can create a journey through your garden that feels magical. Steps are the connective tissue of this journey, guiding guests from a patio to a garden bed or from the driveway to the front door. They provide safety, but they also dictate the pace and mood of the outdoor experience.
If you are struggling to visualize how to tame your incline, you can find our curated Picture Gallery at the end of this blog post to spark your creativity. Before we get to the visuals, let’s dive into the practical design rules, material choices, and structural considerations that will ensure your hillside steps stand the test of time.
1. The Geometry of Comfort: Understanding Rise and Run
The most critical aspect of outdoor stair design is the ratio between the “rise” (the vertical height of each step) and the “run” (the depth of the tread where you place your foot).
Indoor stairs typically have a steeper rise, usually around 7 to 7.5 inches, with a run of about 10 or 11 inches. However, applying these indoor measurements to a hillside landscape is a major mistake.
The Outdoor Step Rule
Outdoors, we psychologically expect a more leisurely pace. A steep indoor-style staircase feels aggressive and tiring in a garden setting.
For landscape steps, I aim for a rise of 5 to 6 inches. The run should be significantly deeper, typically between 14 and 16 inches.
The Comfort Formula
Designers often use a formula to check comfort: 2R + T = 26 (where R is Rise and T is Tread/Run).
- If your rise is 6 inches: (2 x 6) + T = 26. Your tread should be 14 inches.
- If your rise is 5 inches: (2 x 5) + T = 26. Your tread should be 16 inches.
This formula ensures a natural stride. If the tread is too short, people feel like they are tripping. If it is too long without being a full landing, they have to stutter-step to maintain their gait.
Landings are Non-Negotiable
On a long, steep slope, you must break up the climb. I never design a flight of outdoor stairs with more than 10 steps without a landing.
A landing gives the climber a physical and visual break. It also allows you to change the direction of the stairs, which can add interest and reduce the visual severity of a straight, steep climb. A landing should be at least 3 to 4 feet deep to allow a person to stand comfortably without blocking the flow.
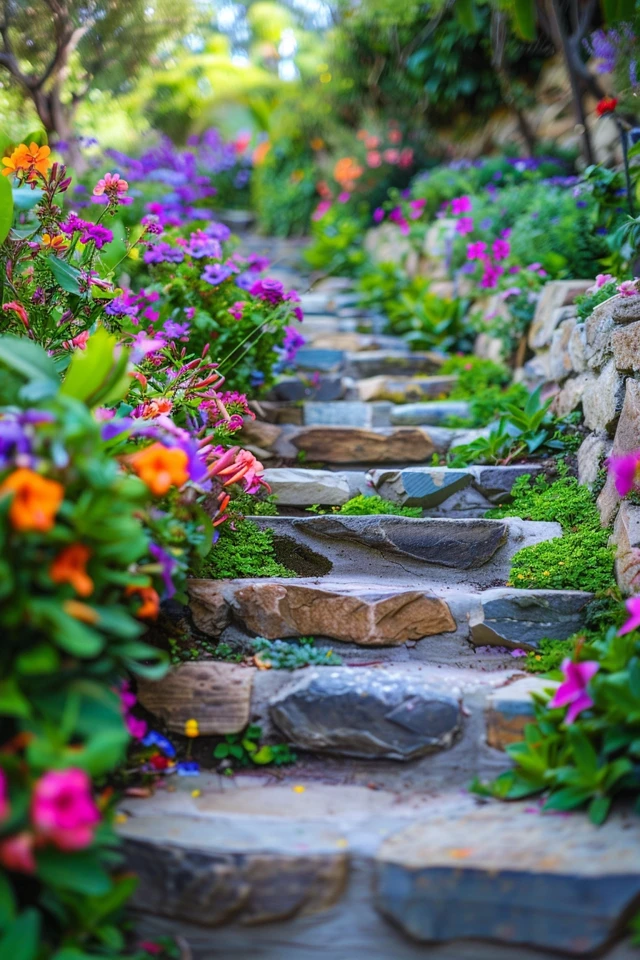
2. Natural Stone and Boulder Steps
For a rustic or cottage-style garden, natural stone is my top recommendation. It blends seamlessly with the environment and ages beautifully, acquiring moss and patina over time.
Boulder Steps
These are massive, irregular rocks with a flat-ish top and bottom. They are incredibly heavy and usually require heavy machinery to set in place.
Because of their weight, they are very stable. They work exceptionally well in informal, wooded areas.
Designer’s Note:
When selecting boulders, look for “stackable” or “step grade” stones at the quarry. Standard landscape boulders are often too round. You need a flat top for safety. I always advise clients to walk on the stones at the supply yard before buying them. If it feels wobbly in the yard, it will feel wobbly on your hill.
Cut Stone Slabs
If you want the natural look but with a cleaner, more formal edge, opt for cut slabs of bluestone, granite, or limestone.
These are uniform in thickness (usually 6 to 7 inches), which makes installation easier and the walk safer for elderly guests or children.
Installation Best Practices
- The Foundation: Never place stone directly on top of topsoil. Topsoil moves, freezes, and thaws. You must dig out the organic soil and replace it with a 4 to 6-inch base of compacted crushed stone (often called “process” or “Item 4”).
- Backfill: Behind every stone step, you need gravel for drainage. If water gets trapped behind the stone and freezes, “frost heave” will push your heavy stones out of alignment within two winters.
3. Timber and Railroad Tie Assemblies
For a budget-friendly or highly rustic aesthetic, timber is a classic choice. It is particularly effective in functional areas, such as a path leading to a vegetable garden or a shed, where you might not want the expense of masonry.
Material Options
- Pressure-Treated 6×6 Lumber: This is the standard. It is rot-resistant, uniform, and easy to cut. It provides a clean, linear look.
- Landscape Timbers: These are rounded on two sides. They are cheaper but can be harder to stack securely.
- Reclaimed Railroad Ties: These offer a great vintage look but come with warnings. They are often soaked in creosote, a preservative that can be toxic. I avoid using these in vegetable gardens or areas where children play or sit.
Infill Materials
Timber steps usually form a “box” frame. You then fill the inside of the frame to create the tread.
Gravel is the most common infill. It drains perfectly and provides good traction. Use angular gravel (crushed stone) rather than pea gravel. Pea gravel acts like ball bearings and is slippery underfoot.
For a softer look, you can use wood chips or mulch as the infill. However, mulch decomposes and will need to be topped off every spring.
Structural Integrity
Timber steps essentially act as mini retaining walls. They need to be anchored to the ground.
What I’d Do in a Real Project:
I drill half-inch holes through the timber and drive 18-inch pieces of rebar (steel reinforcing bar) through the wood and deep into the ground. This “deadman” staking prevents the timber from sliding down the hill during heavy rains.
4. Modern Concrete and Floating Steps
If your home has a contemporary or mid-century modern architecture, rustic boulders will look out of place. You need clean lines and geometric precision.
Poured-in-Place Concrete
This allows for complete customization of shape and size. You can create extra-wide steps that double as seating areas during parties.
Concrete can be finished in many ways: acid-stained, stamped to look like wood, or simply broom-finished for a minimalist grip.
Floating Steps (Cantilevered)
This is a high-impact design feature where the steps appear to hover over the ground or over each other.
Visually, this is stunning. Structurally, it is complex.
To achieve a true cantilever, you generally need a reinforced concrete spine hidden beneath the grade, or steel supports anchored into deep footings.
Common Mistake:
Many DIYers try to create floating steps by just stacking blocks with an overhang. Without proper counter-weighting or steel reinforcement, these will tip over when someone steps on the edge. This is a job for a professional engineer or seasoned landscape contractor.
Lighting Integration
Modern steps beg for lighting. I typically specify LED strip lights installed under the “nosing” (the overhanging edge) of each step. This casts a soft glow down the riser, illuminating the tread below without shining in anyone’s eyes.
5. Integrating Softscaping and Erosion Control
A staircase alone looks stark. The magic happens when you integrate plants to soften the edges and anchor the soil.
When you cut into a hill to build steps, you disturb the soil structure. You must replant immediately to prevent erosion.
Plant Selection Logic
- Root Structure: You want plants with fibrous, spreading root systems that hold dirt in place.
- Height: Avoid tall plants right next to the steps. They will flop over the walkway when it rains, soaking your pant legs and narrowing the usable path.
- Maintenance: Choose low-maintenance ground covers. You do not want to be balancing on a steep slope with a weed whacker every week.
Top Plant Picks
- Creeping Phlox: Provides a carpet of color in spring and stays green most of the year.
- Creeping Thyme: Can handle light foot traffic and smells wonderful when brushed against.
- Sedum: Extremely drought tolerant and great for sunny slopes.
- Liriope (Monkey Grass): Excellent for stabilizing banks and creating a border.
Common Mistakes + Fixes
Over years of site visits, I see the same issues popping up in DIY hillside projects. Here is how to spot them and fix them.
Mistake 1: Ignoring Drainage
The Issue: Water flows downhill. If your steps block that flow, the water will pool behind them or wash them away.
The Fix: Incorporate a slight pitch (1/8 to 1/4 inch) on every tread, sloping forward so water runs off. Install a French drain or gravel trench alongside the staircase to catch runoff from the hill above.
Mistake 2: Inconsistent Rise Heights
The Issue: The bottom step is 5 inches high, the middle is 7 inches, and the top is 4 inches.
The Fix: This is a major safety hazard. Our brains “learn” the stair height after the first two steps. If the height changes, we trip. You must calculate the total change in elevation before you start building and divide it evenly.
Mistake 3: Slick Surfaces
The Issue: Using polished tile or smooth wood on outdoor steps.
The Fix: Rain, morning dew, and sprinkler overspray make smooth surfaces deadly. Always choose “thermal” or “flamed” finishes for stone, which provide a rough texture. If using wood, apply a non-slip stain or grit additive.
Designer’s Note: The “Rule of Three” for Materials
When designing a hardscape, I stick to a strict rule: Do not use more than three different hard materials in one view.
If you have a brick house, a concrete driveway, and wood steps, you are already at three. Do not add gravel paths and metal edging. It becomes visually chaotic.
If your house is sided in neutral vinyl, you have more flexibility. But generally, try to match the stone of your steps to any existing retaining walls or patio pavers. Cohesion makes a small space feel larger and a large space feel organized.
Final Checklist: What I’d Do in a Real Project
If I were managing your hillside renovation today, this is the exact workflow I would follow to ensure success:
1. Site Analysis
Measure the total rise (vertical drop) and total run (horizontal distance). This tells me if I need a switchback path or a straight shot.
2. Utility Check
Call 811 (or your local utility dig line). Hillside grading often cuts deep, and you do not want to hit a gas or water line.
3. Material Selection
Choose a material that matches the architecture of the house.
- Brick Colonial home? Brick or cut stone steps.
- Log cabin? Timber or boulders.
- Modern minimalist box? Concrete or steel.
4. Lighting Plan
Plan the conduit runs for lighting before pouring concrete or laying stone. Retrofitting wires later is expensive and ugly.
5. Drainage Strategy
Determine where the water from the roof and the upper yard goes. divert it away from the stairs using swales or catch basins.
6. The “Furniture Test”
Verify the width. Can you carry a patio chair up these stairs? I recommend a minimum width of 4 feet for main access stairs. 3 feet is acceptable for garden paths.
FAQs
Do I need a permit for landscape steps?
In most jurisdictions, yes. If the steps involve retaining walls over a certain height (usually 3 or 4 feet) or if you are running electrical for lighting, permits are required. Always check your local building department code.
What is the cheapest way to build steps on a steep hill?
Treated landscape timbers with gravel infill are the most cost-effective durable option. Simply digging “earthen steps” is free but will wash away in the first heavy rain.
How steep is too steep for steps?
If the slope is very aggressive, you may need a switchback design (zig-zag) rather than a straight flight. If the grade is over 45 degrees, you are entering the realm of ladders or elevators. A comfortable outdoor stair generally handles a slope of 30 to 35 percent grade comfortably.
Can I use interior tiles for outdoor steps?
Generally, no. Interior tiles are often not rated for frost. When they absorb water and freeze, they crack. They also lack the slip resistance required for wet outdoor conditions. Look for porcelain pavers specifically rated for exterior use.
Conclusion
Transforming a hillside with well-designed steps does more than just provide access; it unlocks the square footage of your property that you previously wrote off. Whether you choose the rugged charm of boulders, the clean lines of concrete, or the warmth of timber, the principles remain the same: prioritize the “rise and run” ratio for comfort, manage your water flow, and soften the structure with resilient planting.
Take your time planning the layout. Walk the slope. Visualize the path. When done correctly, your hillside steps will be an invitation to explore, turning a challenging incline into the highlight of your home’s exterior.
Picture Gallery


